
Building AI Agents With LangGraph Part 1/4: A Basic Chatbot
 Piotr Zborowski•Dec 5, 2025•15 min read
At Software Mansion, we’ve created various AI tools like React Native ExecuTorch, which allows you to run AI models declaratively on-device. We’ve also built React Native RAG, which offers native support for Retrieval-Augmented Generation, and Private Mind, a private assistant app that showcases the possibilities of the libraries mentioned above.
Having created these tools, we wanted to share them with the world — that’s when we decided to build an LLM agent to help us search for places to advertise them. Since then, we’ve created many other agents, tested out various agentic frameworks and development practices. This experience makes us believe we’re the right people to talk about building AI agents with LangGraph.
In this series, you’ll learn the basics of building functional AI agents and workflows with LangChain and LangGraph. You only need a bit of basic Python knowledge to write the scripts yourself. You can also build LangChain agents in TypeScript — the concepts are the same. If you want to find out more about the core concepts of agents or benefits of these frameworks, make sure to check out this article. You can find all scripts from this series in our GitHub repository.
In this part, we’ll explore the LangChain environment, build a simple LangGraph workflow to calculate the greatest common divisor, and create a basic LLM-powered chat flow.
By the end of the series, you’ll know how to build a fully-featured LLM chat agent with RAG, web search, intelligent shutdown, and persistent memory.
The LangChain environment
We’re using both LangChain and LangGraph which may be confusing, since you’ve probably heard of them separately.
LangChain is a framework that enables seamless use of foundation models, like GPT or Claude. It also lets you equip them with tools, custom or premade, or run them in a simple ReAct workflow for reasoning, planning, and execution.
On the other hand, LangGraph gives you complete control over the workflow. You can create custom states, nodes, edges, conditions, middleware, etc. — more on that later. If simple planning done by a ReAct agent is not enough for you and you want to build a complex, production-ready agent, you should use LangGraph. It allows you to force the execution (or parts of it) to happen in a predefined order, without giving up on any functionalities.
For example, if you’re building an agent to search for advertisement opportunities for your company — you know it’s going to have a searching phase, a phase where the LLM analyzes the candidate websites, and so on — so you can encode that in a workflow without having the foundation model come up with this execution plan each time. What’s more, LangGraph enables you to heavily reduce token usage, orchestrate multiple agents, build loops and much, much more.
The last part of the LangChain environment is LangSmith — it’s a platform that allows you to use live production data for continuous testing and improvement, observe, evaluate and deploy your agents in a comfortable UI. However, we won’t be using LangSmith in this course, since it’s not needed for learning the basics, and including it would only make the articles longer than necessary.
The entire environment has a neat documentation you can check for details. You can also watch tutorials and learn alongside the community at LangChain Academy.
This article is about building complex agents with both LangGraph and LangChain — so we’re going to balance the two of them.
Setup
Throughout the tutorials, you’ll need a Python interpreter (version 3.13 or newer) along with the following libraries:
bs4>=0.0.2
ddgs>=9.6.1
dotenv>=0.9.9
langchain>=1.0.0
langchain-community>=0.4
langchain-huggingface>=1.0.0
langchain-openai>=1.0.0
langchain-text-splitters>=1.0.0
langgraph>=1.0.0
sentence-transformers>=5.1.1
If you’re using pip, you can install them with pip install [library]. However, we recommend creating a separate virtual environment for your project using uv — in this case, one virtual environment for the entire course is enough, as the above dependencies list is meant for all parts. Once you have uv installed, you can create the virtual environment in your folder with uv venv, then uv init, and add the dependencies with uv add [library]. You will run your scripts with uv run filename.py.
Building your first LangGraph workflow
First, we’re going to convert a very simple greatest common divisor algorithm into the LangGraph workflow format. There’s usually no need to implement such simple algorithms as workflows and it might seem as overcomplicating the issue, but it’s just meant to give you a sense of what’s happening before we move on to adding an LLM to the workflow:
a = int(input("a = "))
b = int(input("b = "))
while b != 0:
 a, b = b, a % b
print("GCD = ", a)
Let’s start creating our LangGraph version!
State
First, your workflow needs a state. The state is meant to hold memory that flows through the graph, all information that can be useful at later development phases. Basically, you can think of it as memory in a program that you share between functions, without local variables. In this example, our memory consists of two values we’ll store throughout the execution: a and b. In order to create a custom state, you create a class that inherits from TypedDict:
from typing import TypedDict

class State(TypedDict):
    a: int
    b: int
Nodes
A graph consists of nodes and edges. You can think of nodes as functions — these are the steps that happen in the execution of the program.
A node gets a copy of the current state and returns a modification to it. That’s where it’s different from a normal function — you don’t return the entire new state, just the change. For example, if your state is State(a=3, b=2) and you return {“a”: 1}, the state in the graph changes to State(a=1, b=2), while notice b doesn’t change. So, if you don’t wish to change the state at all, you do return {}.
How you divide execution into nodes is often arbitrary — the entire GCD algorithm could easily be just one node. But to show how to construct graphs, we’ll create separate nodes: one to get user input, one to calculate the next values of a and b, and one to output the results.
def get_user_data(_: State) -> State:
    a = int(input("a = "))
    b = int(input("b = "))
    return {"a": a, "b": b}

def modify(state: State) -> State:
    a, b = state["a"], state["b"]
    a, b = b, a % b
    return {"a": a, "b": b}

def write(state: State) -> State:
    print("GCD = ", state["a"])
    return {}
Notice: each node takes in the State instance (copy of the current state) at input and returns the State object, which is the modification. You access variables from State like from a dictionary — state[“a”], state[“b”] — and return dictionaries too. You could also return State(a=…,b=…), but that’s not the way it’s usually done, as State inherits from TypedDict for a reason. Also, if you don’t use the state in a given node, you can just replace it with an underscore, but it has to be in the function declaration.
Edges
Finally, you have to connect the nodes to create a graph. First, you initialize the graph and add nodes, along with names for them.
from langgraph.graph import StateGraph

graph = StateGraph(State)

graph.add_node("get_user_data", get_user_data)
graph.add_node("modify", modify)
graph.add_node("write", write)graph = StateGraph(State)
Edges define the order in which the nodes are executed — edge from node A to node B means node A runs before node B. There are also constant nodes START and END you have to add for LangGraph to know the order of execution. In our case, we first get user data:
from langgraph.graph import START

graph.add_edge(START, “get_user_data”)
However, before we modify a and b, we need to check the loop condition. How can you do that in LangGraph? You can use conditional edges. From a given node, a condition is checked to determine which node to execute next. But after checking the loop iteration, we don’t want to go back to fetching user data. We only do that once — so we need some “dummy node” to identify the start of the loop we can go back to. It’s not always necessary, but it’s important in this specific case:
def loop_condition(_: State) -> State:
    return {}

graph.add_node("loop_condition", loop_condition)

graph.add_edge("get_user_data", "loop_condition")
Now, we can create the loop with a conditional edge:
from langgraph.graph import END

graph.add_conditional_edges(
    "loop_condition",
    lambda state: state["b"] != 0,
    {
        True: "modify",
        False: "write",
    },
)
graph.add_edge("modify", "loop_condition")
graph.add_edge("write", END)
First, you specify which node it goes from — it’s loop_condition in our case. Then, you pass a function which takes the current state as input and returns some value — here, the function is really simple, so we just do it with lambda. Last but not least, you pass a dictionary mapping the function result to the name of the next node to go to. Here, if b != 0, the condition returns True and we move to the modify node. Otherwise, we go to write to output the result. From write, the workflow ends at END.
Compilation
Having constructed the graph, you need to compile it before execution. You simply do it in the following way:
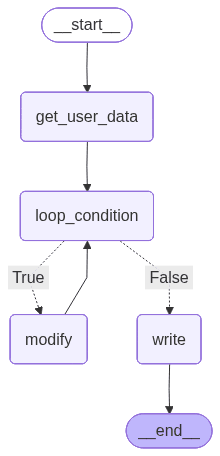
workflow = graph.compile()Then, you can save an image of the graph. It can help with the analysis and allows you to check if it’s created correctly:
with open("graph1.png", "wb") as f:
    f.write(workflow.get_graph().draw_mermaid_png())
Now, our graph looks like this:
To run the workflow, just invoke it with some initial state. In our case, we don’t really need to pass anything at the beginning, as we get a and b later from the user, so we just invoke it with an empty dictionary:
workflow.invoke({})Our program is nearly ready and you can run it already, but you may notice that it won’t work for high a and b — that’s because LangGraph limits the recursion depth in case of a loop. You need to increase the limit by passing it as a configuration argument when invoking:
workflow.invoke({}, {“recursion_limit”: 100})At the end, your script should look like this:
from langgraph.graph import StateGraph, START, END

class State(TypedDict):
    a: int
    b: int

def get_user_data(_: State) -> State:
    a = int(input("a = "))
    b = int(input("b = "))
    return {"a": a, "b": b}

def loop_condition(_: State) -> State:
    return {}

def modify(state: State) -> State:
    a, b = state["a"], state["b"]
    a, b = b, a % b
    return {"a": a, "b": b}

def write(state: State) -> State:
    print("GCD = ", state["a"])
    return {}

graph = StateGraph(State)

graph.add_node("get_user_data", get_user_data)
graph.add_node("loop_condition", loop_condition)
graph.add_node("modify", modify)
graph.add_node("write", write)

graph.add_edge(START, "get_user_data")
graph.add_edge("get_user_data", "loop_condition")
graph.add_conditional_edges(
    "loop_condition",
    lambda state: state["b"] != 0,
    {
        True: "modify",
        False: "write",
    },
)
graph.add_edge("modify", "loop_condition")
graph.add_edge("write", END)

workflow = graph.compile()

with open("graph1.png", "wb") as f:
    f.write(workflow.get_graph().draw_mermaid_png())

workflow.invoke({}, {"recursion_limit": 100})
And an example of running the script:
a = 64
b = 240
GCD = 16
Congrats, that’s your first LangGraph workflow! If you want to learn more about Graph API, this page is a great point of reference. Now let’s add an LLM and create your first chatbot — it will also be your first AI agent in LangGraph.
Adding LLMs to the equation: building a simple chatbot with LangGraph
In order to use an LLM, we need to initialize it with LangChain’s init_chat_model:
from langchain.chat_models import init_chat_model

model = init_chat_model("openai:gpt-4o")
In our case, we’re using GPT-4o. Specific providers may require you to install additional libraries. In our case, it requires the langchain-openai library that’s listed in dependencies — check this page for more on integrations.
However, in order to use paid models, you need to provide an API key. You can set it as a constant in Python, but we recommend creating an .env file in your folder, where you set it up:
OPENAI_API_KEY = “sk-…”Then, in your actual script, you load environment variables:
from dotenv import load_dotenv

load_dotenv()
We want to create a simple, infinite loop where the user sends prompts to the model and receives answers. We don’t need to hold anything in the state for now, and we only need one node:
class State(TypedDict):
    pass

def ask_llm(_: State) -> State:
    user_query = input("query: ")
    answer_message: AIMessage = model.invoke([HumanMessage(user_query)])
    print("answer: ", answer_message.content)

    return {}
When invoking a chat model, you need to provide a conversation history as a list of messages (classes inheriting from BaseMessage, like AIMessage or HumanMessage) that serve as a prompt. We don’t have any conversation history except the last query, so it’s just [HumanMessage(user_query)] for now. The answer is AIMessage, and its content attribute contains the message string.
With this one node, we just loop the whole thing. Your code should look like this for now:
from langgraph.graph import StateGraph, START
from langchain.chat_models import init_chat_model
from langchain_core.messages import HumanMessage, AIMessage
from typing import TypedDict
from dotenv import load_dotenv

class State(TypedDict):
    pass

load_dotenv()
model = init_chat_model("openai:gpt-4o")

def ask_llm(_: State) -> State:
    user_query = input("query: ")
    answer_message: AIMessage = model.invoke([HumanMessage(user_query)])
    print("answer: ", answer_message.content)

    return {}

graph = StateGraph(State)

graph.add_node("ask_llm", ask_llm)

graph.add_edge(START, "ask_llm")
graph.add_edge("ask_llm", "ask_llm")

workflow = graph.compile()

with open("graph2.png", "wb") as f:
    f.write(workflow.get_graph().draw_mermaid_png())

workflow.invoke({}, {"recursion_limit": 100})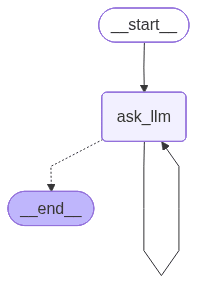
Congrats, you’ve built your first agent with LangGraph! For now, it’s a simple chatbot.
query: Hi
answer: Hello! How can I assist you today?
query: what was my previous query?
answer: I'm sorry, but I can't recall previous interactions or queries. Each session is independent and doesn't retain past information. How can I assist you today?
...
There are still some things we need to add, though. For once, as I’ve mentioned, there’s no conversation history — each query is separate. The loop is also infinite, which isn’t a good practice. We’ll add conversation memory and a limit of loop iterations now.
Message history
Since we want the message list to be used throughout many node executions, we add it to our state. In order to do that, instead of inheriting from TypedDict, you inherit from AgentState:
from langchain.agents import AgentState

class State(AgentState):
   pass
AgentState implementation starts the following way:
class AgentState(TypedDict, Generic[ResponseT]):
    """State schema for the agent."""

    messages: Required[Annotated[list[AnyMessage], add_messages])
The use of add_messages changes how the updates are handled. When you return {“messages”: [HumanMessage(…), HumanMessage(…)]}, the messages you return are appended to messages instead of overwriting it. Now, the node should look like this:
def ask_llm(state: State) -> State:
    user_query = input("query: ")
    user_message = HumanMessage(user_query)
    answer_message: AIMessage = model.invoke(state["messages"] + [user_message])
    print("answer: ", answer_message.content)

    return {
        "messages": [user_message, answer_message],
    }
Now you pass the entire message history to the model, so that it remembers the conversation. The node updates the state with the new user message and the answer from the model, which get appended to messages (instead of overwriting it).
Iterations limit
As we want to limit the number of iterations, we need to track how many iterations have already been executed.
class State(AgentState):
    iteration: int # add this
Since there’s only one node, we’re going to increment iteration there. We need to change the state by returning the update:
def ask_llm(state: State) -> State:
    user_query = input("query: ")
    user_message = HumanMessage(user_query)
    answer_message: AIMessage = model.invoke(state["messages"] + [user_message])
    print("answer: ", answer_message.content)

    return {
        "messages": [user_message, answer_message],
        "iteration": state["iteration"] + 1, # add this
    }
The last step is to update the graph to include a conditional edge that checks the number of iterations. If it’s exceeded, we go to END.
ITERATION_LIMIT = 5

graph = StateGraph(State)

graph.add_node("ask_llm", ask_llm)

graph.add_edge(START, "ask_llm")
graph.add_conditional_edges(
    "ask_llm",
    lambda state: state["iteration"] < ITERATION_LIMIT,
    {
        True: "ask_llm",
        False: END,
    },
)
This time, when invoking, we need to set iteration to 0.
Your final code should look like this:
from langgraph.graph import StateGraph, START, END
from langchain.chat_models import init_chat_model
from langchain_core.messages import HumanMessage, AIMessage
from langchain.agents import AgentState
from dotenv import load_dotenv

class State(AgentState):
    iteration: int

ITERATION_LIMIT = 5
load_dotenv()
model = init_chat_model("openai:gpt-4o")

def ask_llm(state: State) -> State:
    user_query = input("query: ")
    user_message = HumanMessage(user_query)
    answer_message: AIMessage = model.invoke(state["messages"] + [user_message])
    print("answer: ", answer_message.content)

    return {
        "messages": [user_message, answer_message],
        "iteration": state["iteration"] + 1,
    }

graph = StateGraph(State)

graph.add_node("ask_llm", ask_llm)

graph.add_edge(START, "ask_llm")
graph.add_conditional_edges(
    "ask_llm",
    lambda state: state["iteration"] < ITERATION_LIMIT,
    {
        True: "ask_llm",
        False: END,
    },
)

workflow = graph.compile()

with open("graph3.png", "wb") as f:
    f.write(workflow.get_graph().draw_mermaid_png())

workflow.invoke({"iteration": 0}, {"recursion_limit": 100})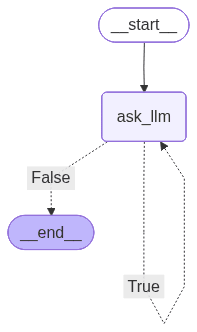
Congrats! You’ve now built a chatbot with persistent conversation memory in LangGraph and LangChain.
answer: Hello! How can I assist you today?
query: what's 2+2?
answer: 2 + 2 equals 4.
query: what was the thirst thing I said
answer: The first thing you said was "Hi."
query: thanks
answer: You're welcome! If you have any more questions or need further assistance, feel free to ask.
query: bye
answer: Goodbye! Have a great day, and feel free to return if you have more questions in the future!
# ended after 5 iterations
What’s next in our LangGraph agent series?
In the next part, we’re introducing tools, giving our LangGraph agent access to web search, and making it shut down when the user asks it to.
You can learn about premade and custom tools, tool nodes, conditional edges with tool call, structured outputs, and callbacks. Part #2 is already on our blog, so be sure to check it out: Building AI Agents With LangGraph Part 2/4: Adding Tools.
We are Software Mansion — software development consultants, a team of React Native core contributors, multimedia and AI experts. Drop us a line at projects@swmansion.com and let’s find out how we can help you with your project.