How to Build a Custom React Renderer?
 Wojciech Kozyra•May 12, 2025•8 min read
React started out as a library for building user interfaces on the web. But with the arrival of React Native, it quickly proved to be a solid choice for building UIs across platforms. Thanks to its flexibility, you can now use React to build apps for web, iOS, Android, macOS, Windows, terminal, and even some TV platforms.
Today, I’ll walk you through integrating your own API with React. As an example, we’ll use Smelter, the video compositing software we built. While we’ll focus on this specific case, the steps can easily be adapted to other target APIs. We’ll cover different ways to integrate React syntax into your app, explain when each approach makes sense, and provide a general overview of the implementation.
Just so you know — this isn’t a step-by-step guide. It’s more of a big-picture overview to help you get a feel for what it takes to connect React with your own API.
How to integrate your API/platform with React?
When you write React components, they construct a tree structure that holds some state and can trigger re-renders under certain conditions.
For instance, within a browser, the nodes correspond to DOM elements. Whenever the state in React changes, its internal JavaScript representation is re-calculated, or re-rendered. If the rendering results in any changes, those same changes are then applied to the browser’s DOM.
When integrating React for a custom target, you can choose between 2 options:
- Implement a new React renderer.
When: It’s a good option if you’re already running in a JavaScript environment like a browser or Node.js. Especially if most of your APIs can be expressed in JavaScript without any native bindings.
Examples:
@react-three/fiber,react-pdf,react-nil - Implement a new target platform for React Native.
When: It’s a good option if you need to run outside of a JavaScript runtime. React Native ships its own JS engine (Hermes or JSC) and provides abstractions to integrate with native code. But this flexibility also makes things a bit more complicated.
Examples:
react-native-windows,react-native-tvos
In this article, we‘re going to focus on the first option.
What is Smelter and why did we build it?
Let’s start with a quick overview of what Smelter is. It’s a video compositing software we developed in response to a common issue: the need for a tool that could take some real-time video sources, combine them, and produce a single video and audio stream. There are already plenty of tools out there — like FFmpeg, headless Chromium, or OBS — that can handle similar problems. Check out my previous post to learn why we decided to build a custom rendering engine instead.
The Smelter API was designed to be language-agnostic, so we implemented it using a standalone Rust server featuring a straightforward JSON-based HTTP API, where the composed video is represented as a component tree. While this setup works well as an internal API, language-specific SDKs could provide a more streamlined and user-friendly experience.
The definition of an example video layout in the Smelter API can look like this:
{
  "type": "view",
  "children": [
    { "type": "image", "image_id": "example_image" }
  ]
}
As you can see, the above structure could easily map to React components like this:
<View>
  <Image source="https://example.com/image.png" />
</View>
From JSON APIs to React components
So, how to go from a simple JSON-based HTTP API to using React components?
Since the entire rendering API can be expressed through HTTP requests, we can implement everything we need in JavaScript with just a custom React renderer.
Implementing react-reconciler API
React exposes an API to implement your own renderer via the package react-reconciler. You only need to provide aHostConfig object that implements interactions with an underlying platform.
React exposes 2 modes:
- Mutation— good for APIs like browser DOM, where you can add and remove nodes.
- Persistance — good for APIs that replace the entire tree on updates (for example, used in React Native with Fabric renderer). In this mode, each node is immutable, and when something changes, elements are cloned with new props.
Using Smelter, we update the entire video layout definition with every change, so implementing the Persistance mode is much simpler. The rest of this guide will focus on this mode.
Let’s begin with the core types. You’ll need a way to represent your components, for example:
interface HostComponent {
  type: Type;
  props: Props;
  children: HostComponent[];
}
The API you need to implement boils down to a few basic functions:
- Building a new component tree:
-
createInstance-cloneInstance/prepareUpdate-appendInitialChild - Replacing an old component tree with a new one:
-
createContainerChildSet-appendChildToContainerChildSet-replaceContainerChildren
interface HostConfig = {
  // Create HostComponent that represents React component based on type/props.
  //
  // When you create an element in your React code:
  // - <example key="value" />
  // - React.createElement("example", { key: "value"}, [])
  //
  // It will call this function with type "example" and props
  // `{ key: "value" }`.
  //
  // e.g. `return { type: type, props: props, children: [] }`
  createInstance(
    type: Type,
    props: Props,
    rootContainer: Container,
    hostContext: HostContext,
    internalHandle: any
  ): HostComponent;

  // Add child to a HostComponent. This function is called after
  // createInstance or cloneInstance, but before component is part of the
  // tree.
  //
  // e.g. `parent.children.push(child)`
  appendInitialChild(parent: HostComponent, child: HostComponent): void;

  // You can decide whether props changed or not and pre-comupte
  // something here.
  prepareUpdate(
    instance: HostComponent,
    type: Type,
    oldProps: Props,
    newProps: Props,
    rootContainer: Container,
    hostContext: HostContext
  ): object | null;

  // Clone instance with different props and/or children.
  cloneInstance(
    instance: HostComponent,
    updatePayload: object | null, // return value of prepareUpdate()
    type: Type,
    oldProps: Props,
    newProps: Props,
    internalInstanceHandle: any,
    keepChildren: boolean,
    recyclableInstance: HostComponent | null
  );

  // Create new empty ChildSet, most implementations will just return []
  createContainerChildSet(rootContainer: RootContainer): ChildSet;

  // Add new root component to ChildSet, most implementation will just
  // do `childSet.push(child)`
  appendChildToContainerChildSet(childSet: ChildSet, child: HostComponent);

  // Replace old component tree with a new one.
  replaceContainerChildren(
    rootContainer: Container,
    newRootComponents: ChildSet
  );
}
In the case of Smelter, whenever replaceContainerChildren is called, we’re constructing a JSON object representing a new state and sending it to the rendering server.
To illustrate, let’s start with a simple component that updates one second after it mounts:
function Example() {
  const [show, setShow] = useState(false);
  useEffect(() => {
    setTimeout(() => setShow(true), 1000);
  }, []);

  return (
    <View>
      <Text>Example text</Text>
      {
        show
          ? <View><Text>Added text</Text></View>
          : null
      }
    </View>
  )
}
When the state changes, the following functions are called:
createInstanceto create aTextcomponentAdded textcreateInstanceto create a newViewcomponentappendInitialChildto add a previously createdTextcomponent to theViewprepareUpdateon the rootViewcomponentcloneInstanceon the rootViewcomponentappendInitialChildto add existingExample textTextcomponent as a child of the cloned rootViewappendInitialChildto add a previously createdViewas a child of the cloned rootView
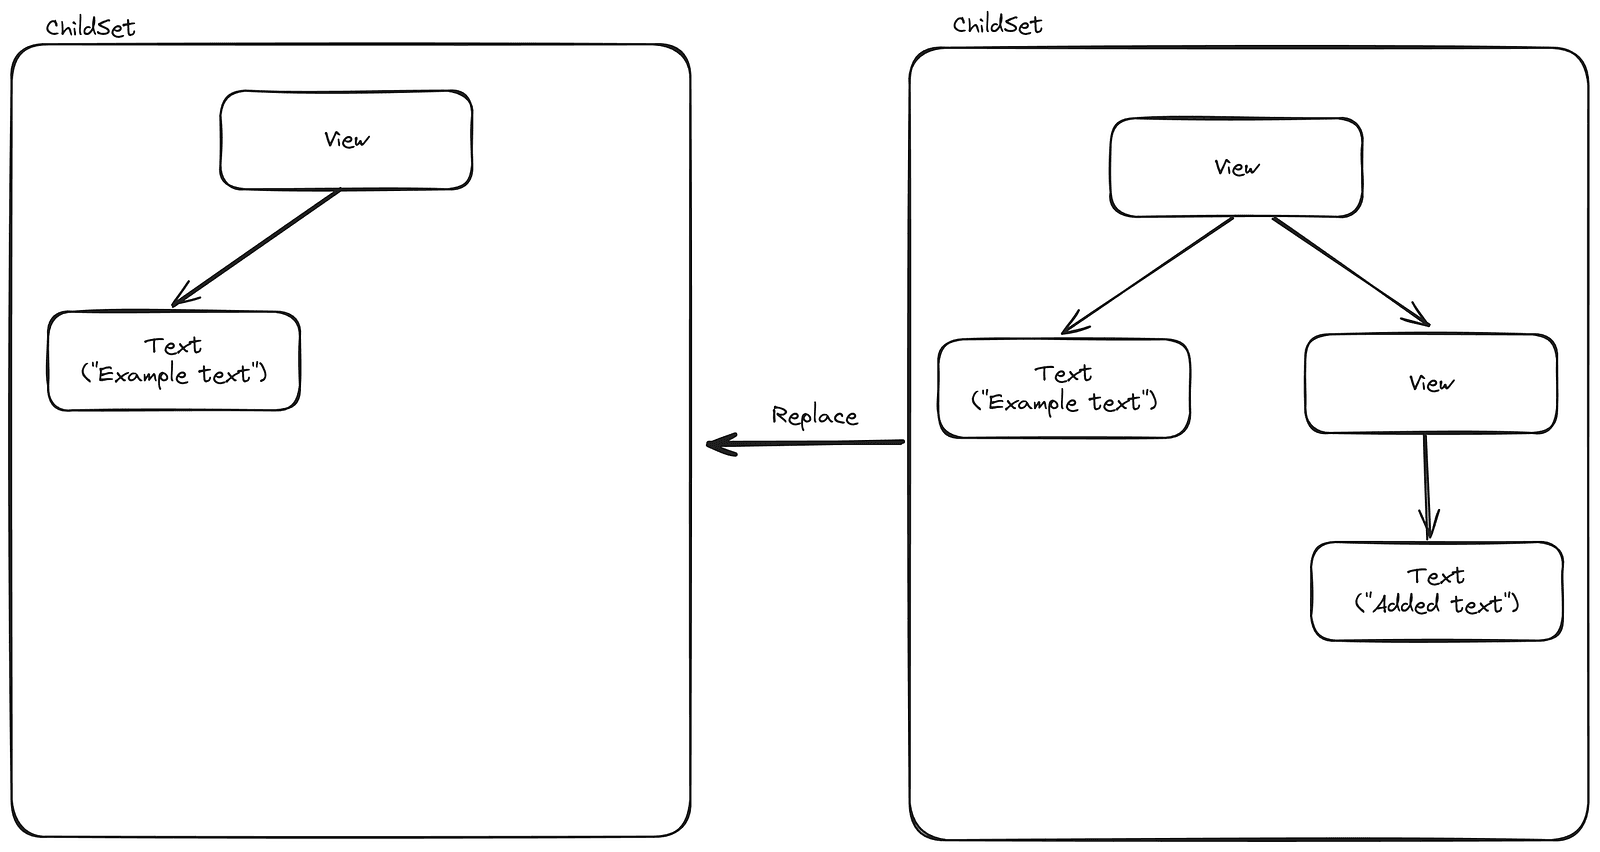
At this point, we have an entirely new tree and just need to replace it:
createContainerChildSetto create a new emptyChildSetappendChildToContainerChildSetto add the root component to the newChildSetreplaceContainerChildrento replace the old component tree with the new one
When you implement your own renderer, the replaceContainerChildren function is likely central to triggering updates in the native API you're using. In Smelter, we take the root HostComponent received as an argument, convert it into a JSON object, and then send it via an HTTP request to the server to modify the video layout.
Learn more
For a complete example, check out our renderer implementation. It should give you a sense of what’s involved in building your own — but keep in mind, it’s not meant to be a reference. The react-reconciler API is unstable and subject to changes at any time. Furthermore, some assumptions our implementation depends on are not officially documented and were determined through empirical methods.
See the react-reconciler documentation to learn more.
Limitations of using React for non-UI use cases
At first glance, it might seem like React handles most of the heavy lifting and you just need to implement a few simple callbacks — but it doesn’t take long to run into some limitations.
- React is designed with the assumption that the rendering engine runs locally alongside the React code. However, in many cases, you might run your React code in the browser or on a phone, while the actual video rendering happens on a server. Current abstractions don’t offer any way to handle update order or network unreliability — you have to take care of that yourself.
- In real-time mode, there’s no way to guarantee that a specific update will be applied at exactly the frame you want — though that is possible in offline processing mode.
- React is great for interactive UIs, so it works well for processing real-time streams. But what if you need to process static video? To do that, you need to know when the React code for a specific timestamp has finished running. Even if you make sure that no work in the React renderer is pending, you can’t be sure whether the user doesn’t have
useEffect+setTimeoutsomewhere in their code. For Smelter’s offline processing, we chose an imperfect but practical solution: when rendering an update for a specific timestamp, we wait up to 20ms after the last tree change to allow for any potential user-side effects.
Using React for video compositing — the takeaway
Using React as your API has its limitations. Not everything translates seamlessly, and you might find yourself needing workarounds or fixes.
That said, it opens the door to a massive ecosystem, with countless libraries and an impressive community of developers already familiar with React. This is particularly beneficial when you only need to implement a few simple callbacks.
Want to learn more about Smelter or give it a try?
If you’re interested in learning more about our video compositing software or trying it in your project, be sure to check out: