
React & Live Streaming: How to Include Video Mixing in Your App
 Bartek Krason•Apr 4, 2025•8 min read
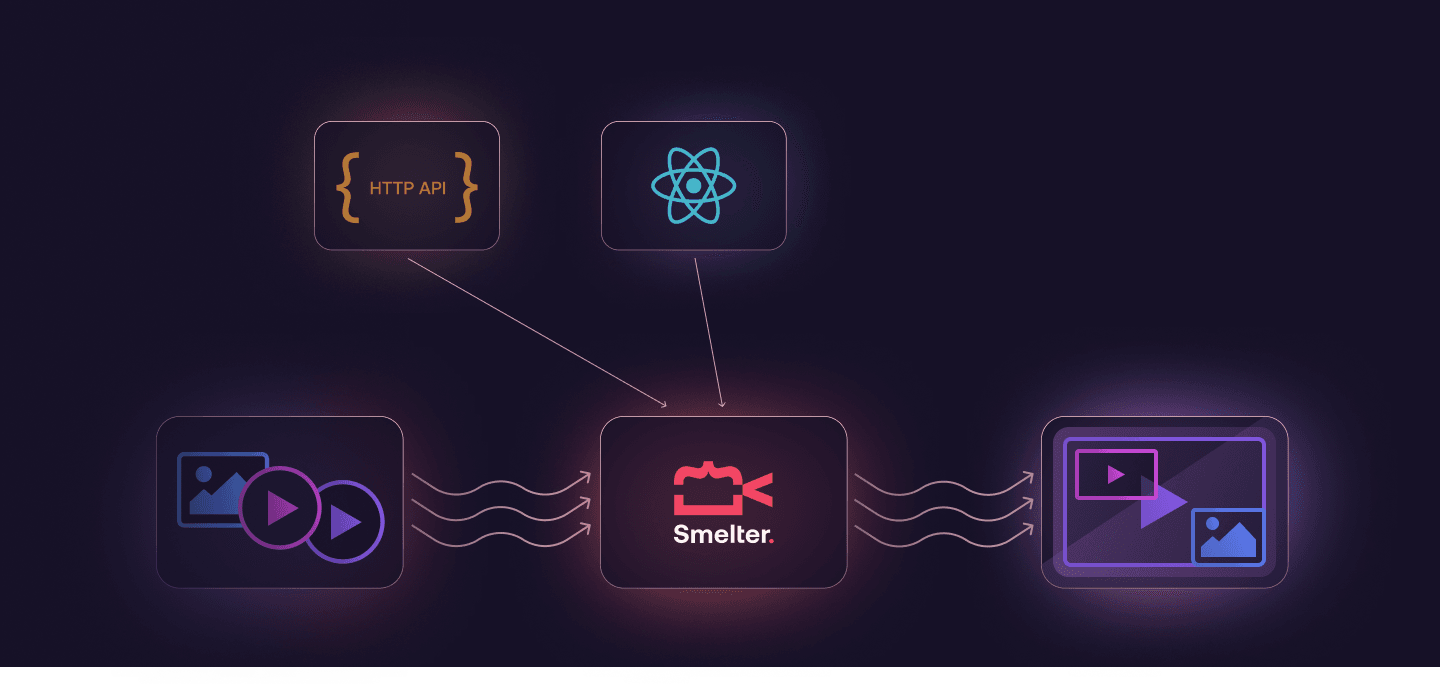
As of March 2025, React is almost 12 years old. During that time, it has spread to various platforms, such as mobile apps. We specialize in React and multimedia, and have always seen the flexibility of React as a huge opportunity. We’ve decided to push React a bit further, by using its syntax not just for traditional application development, but for live video compositing. To achieve this, our team created a toolkit called Smelter.
In a nutshell
We’ve seen how complicated it is to compose live streams with tools like FFmpeg or headless Chromium (more on that later). As a response, we’ve created a toolkit that makes this process easier by using React syntax. In this article, I would like to show you how to compose a simple gaming stream, incorporate it into a React application and send it to Twitch, as well as explain the logic and the decision-making process behind the tool.
What are we building?
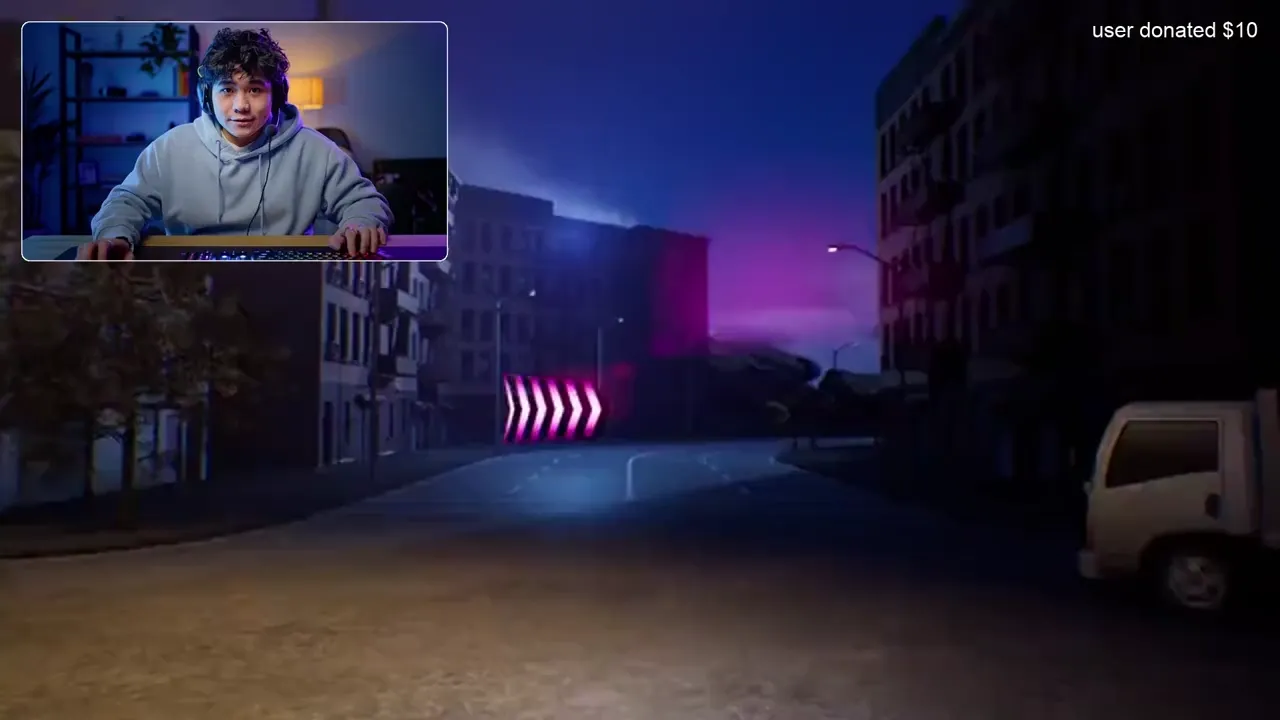
We would like to build something resembling a simple gaming stream for Twitch.
Let’s consider the following requirements: 1. Display the gameplay video in the background 2. Display the camera in the top left corner 3. Apply border radius and white border to the streamer camera 4. Display text on the top right part of the output 5. Gradually transition to the fullscreen camera view after 10 seconds mark
In the end, you should see something like this:
What are we going to use?
As I’ve already mentioned, I’m going to use Smelter, but why exactly? There are a couple of reasons. First, I will be able to use React syntax for describing the layout. This should be much more comfortable for web developers and easier to maintain long-term. Secondly, since Smelter can be compiled to WASM, I can embed it in a web application and stream directly from a browser. Lastly, I am getting a simple, unified API whether my inputs are from a camera, MP4 file, or WebRTC connection.
What are the alternatives?
FFmpeg
If you’ve ever worked with anything related to media processing, you probably know what FFmpeg is. You could use it to handle sending and receiving streams in many ways. It would be also possible to compose everything using filter_complex and apply the desired effects, but for this simple scenario, you would end up writing something like this:
ffmpeg \
  -i ./camera.mp4 \
  -i ./gameplay.mp4 \
  -i border-mask.png \
  -filter_complex \
    "\
    [0:v]scale=640:360,setsar=1[streamer_scaled]; \
    [2:v]scale=640:360[mask_scaled]; \
    [streamer_scaled][mask_scaled]overlay=format=auto,format=rgba[mask_overlay]; \
    [mask_overlay]colorkey=0x00ff00:0.3:0.1[masked_streamer]; \
    [1:v]scale=1920x1080,setpts=PTS-STARTPTS[bg]; \
    [bg]drawtext=text='user donated \$10':font=Arial:fontsize=32:fontcolor=white:x=w-tw-32:y=32[bg_text]; \
    [masked_streamer]setpts=PTS-STARTPTS, \
    scale='w=if(lte(t,10),640,if(between(t,10,11),lerp(640,1920,(t-10)),1920))':\
    'h=if(lte(t,10),360,if(between(t,10,11),lerp(360,1080,(t-10)),1080))':eval=frame[top]; \
    [bg_text][top]overlay=x='if(between(t,10,11),lerp(32,0,(t-10)),if(lte(t,10),32,0))':\
    y='if(between(t,10,11),lerp(32,0,(t-10)),if(lte(t,10),32,0))'\
    " \
  -c:v libx264 \
  -pix_fmt yuv420p \
  -preset fast \
  out.mp4
While you can more-or-less understand what’s happening here, it’s not something that would be convenient to maintain in more complex applications, even though it is still a very simple composition. It’s getting even more painful if you need to make a transition in response to an event, not just at a fixed time.
Chromium
With headless Chromium, it would be possible to leverage HTML as a composition syntax and capture rendered output as a video, but there are some issues. With this approach, you don’t have precise control over when elements are shown in the browser. This can result in frames with partially rendered content when the browser is slow or dropped frames when the encoder is a bottleneck. Also, this limits everything to real-time applications, which means it wouldn’t be possible to process static video files.
Describing a stream layout
Let’s go through the list of steps and build the desired composition using Smelter instead.
- Add a rescaled gameplay as a background
<View>
  <Rescaler style={{ rescaleMode: "fit" }}>
    <InputStream inputId="stream" />
  </Rescaler>
</View>
2. Add a rescaled streamer in the top left corner
<View>
  ...
  <Rescaler
    id="streamer"
    style={{
      left: 32,
      top: 32,
      width: OUTPUT_SIZE.width / 3,
      height: OUTPUT_SIZE.height / 3,
      rescaleMode: "fill"
    }}
  >
    <InputStream inputId="streamer" />
  </Rescaler>
</View>
3. Apply border and round the container
<View>
  ...
  <Rescaler
    id="streamer"
    style={{
      ...,
      borderRadius: 12,
      borderColor: COLORS.white100,
      borderWidth: 1.5
    }}
  >
    <InputStream inputId="streamer" />
  </Rescaler>
</View>
4. Display text label in the corner
<View>
  ...
  <View
    style={{
      top: 0,
      right: 0,
      width: OUTPUT_SIZE.width / 2,
      padding: 32,
    }}
  >
    <View />
    <Text
      style={{
        fontSize: 64,
        fontWeight: "bold",
      }}
    >
      Smelter demo text
    </Text>
  </View>
</View>
5. And add a transition
const STYLES = {
  full: {
    left: 0,
    top: 0,
    width: OUTPUT_SIZE.width - 3,
    height: OUTPUT_SIZE.height - 3,
    borderRadius: 12,
    borderColor: COLORS.white100,
    borderWidth: 1.5,
    rescaleMode: "fill",
  },
  min: {
    left: 32,
    top: 32,
    width: OUTPUT_SIZE.width / 3,
    height: OUTPUT_SIZE.height / 3,
    borderRadius: 12,
    borderColor: COLORS.white100,
    borderWidth: 1.5,
    rescaleMode: "fill",
  },
} as const;

function StreamContent() {
  const [isFullscreenActive, setIsFullscreenActive] = useState(false);

  useEffect(() => {
    const timer = setTimeout(() => {
      setIsFullscreenActive(true);
    }, 10000);
    return () => clearTimeout(timer);
  }, []);

  return (
    <View>
      ...
      <Rescaler
        id="streamer"
        transition={{ durationMs: 500 }}
        style={isFullscreenActive ? STYLES.full : STYLES.min}
      >
        <InputStream inputId="streamer" />
      </Rescaler>
      ...
    </View>
  );
}
And that’s it. The desired output, but powered by a simple code resembling React.
It’s easy to maintain, you can embed it in the React applications, and combine with most of the standard React logic. That’s basically the core idea behind Smelter. But how does it work, and how does it relate to React?
Smelter as an abstraction
I like to define Smelter as a flavor of React. When you use React.js in a browser, component changes are reflected as updates to the DOM. In React Native, it updates native components specific to the platform. For Smelter, this translates to HTTP requests that are sent to our rendering engine.
When I describe this type of UI
<View>
  <Text
    style={{
      fontSize: 64,
      fontWeight: "bold",
    }}
  >
    Smelter demo text
  </Text>
</View>
It’s being sent to Smelter as
{
 "type": "view",
 "children": [
   { "type": "text", "text": "Smelter demo text", "font_size": 64, "font_weight": "bold" },
 ]
}
If you’re interested in what’s happening on a deeper level, my colleague has already explained this in one of the previous articles.
Now that you can see how Smelter handles UI definitions, let’s talk about how it fits into a React setup. Defining the UI is really just the first step. To create a complete application, I need to connect Smelter with React and bring in some external data for the inputs to have something to work with.
Using the defined composition
The description of the UI is usually not enough to create a more complex working application. Generally, we need some logic to interact with external resources. The fact that Smelter can use a single input stream for multiple outputs meant we had to take a different approach. It led us to implement the registration of the inputs separately, outside of the JSX.
function StreamSection() {
  const smelter = useSmelter();

  useEffect(() => {
     void smelter?.registerInput("stream", { url: GameplayMp4, type: "mp4" });
     void smelter?.registerInput("streamer", { url: StreamerMp4, type: "mp4" });
   }, [smelter]);

  ...
}
Of course, those are static resources, for the sake of the example, but nothing stands in the way of using camera, screen_capture, or one of the streaming protocols Smelter supports. This limitation doesn’t apply to some components, like Image or Mp4. You can either register them as described above and use ID, or just pass a remote or local source.
<Image source="https://example.com/image.png" />This leaves us with displaying the results and sending them to the streaming platform of our choice via WHIP protocol. In the example below, I’ve used a useSmelter hook to start a new Smelter instance and a SmelterWhipOutput component to create a new output stream via WHIP protocol. For displaying the defined scene SmelterWhipOutput is using HTML video element, however you can also render it on canvas. Check out the implementation of this particular helper output, as well as the other ones, in our example app.
function StreamSection() {
  const smelter = useSmelter();

  ...

  return (
    <SmelterWhipOutput
      smelter={smelter}
      audio
      video={{ resolution: { width: OUTPUT_SIZE.width, height: OUTPUT_SIZE.height } }}
      endpointUrl={endpointUrl}
      bearerToken={twitchKey}>
      <StreamContent />
    </SmelterWhipOutput>
  );
}
This, in combination with the components from Smelter and a pinch of React should be sufficient to create a working application that incorporates video compositing. The only remaining question should be what to build exactly.
What can you create?
Obviously, Smelter isn’t something you would use in a standard web application, but as long as you want to bring live/offline video composition utilities to your application, Smelter can make it much easier.
Our initial thoughts regarding the possible use-cases for Smelter have been mostly focused on applications that benefit from utilities for streaming directly from the browser, setting up news/events broadcasting, or even adding some fun features for streaming games. However, I believe the tool is quite flexible, and as a team, we are open to exploring its potential in various other directions.
If you have any questions regarding Smelter, you can submit a GitHub ticket, reach out to us via Discord or send a message through the contact form on our website. And if you would like to see Smelter in action, visit one of our examples.