Building a Globally Distributed WebRTC Service with Elixir WebRTC, STUNner, and Cilium Cluster Mesh
 Péter Megyesi•Feb 3, 2025•20 min read
Acknowledgments: This blog presents a joint work between Software Mansion and L7mp Technologies. Special thanks to all contributors, who made this work possible: Michał Śledź, Piotr Wodecki, Jakub Pisarek, and Máté Nagy.
1. Introduction
WebRTC has become the backbone of real-time communication applications, powering video calls, live streaming, and other latency-sensitive services. However, building a scalable, globally distributed WebRTC service is a notoriously difficult challenge, particularly when aiming for high-quality user experiences across regions. But first off, what’s the point of setting up a geographically distributed WebRTC system?
- Improved Performance (e.g. latency and jitter): servers and clients can join the geographically closest server, resulting in lower jitter and latency (e.g. video conf rooms are placed closest to the majority of participants, minimizing the average latency)
- High Availability and Resiliency: eliminates single points of failure, ensuring robust service continuity.
- Enhanced Privacy: keeps business-critical data within private networks, even across country boundaries. Reduces vulnerability to WebRTC leaks, minimizing the attack surface by limiting exposure of user IP addresses. This approach can also aid in GDPR compliance by ensuring sensitive user data, such as IP addresses, is processed and transmitted within controlled environments that adhere to data privacy regulations.
One major challenge in building global WebRTC services is their sensitivity to network conditions. In setups where the source of a WebRTC stream is geographically far from the users, it is worth considering the option of purchasing inter-regional connections with higher QoS guarantees through the cloud provider’s private WANs. These private networks are more resilient to latency and jitter issues, especially under high traffic loads, resulting in a smoother overall client experience compared to relying solely on the public internet.
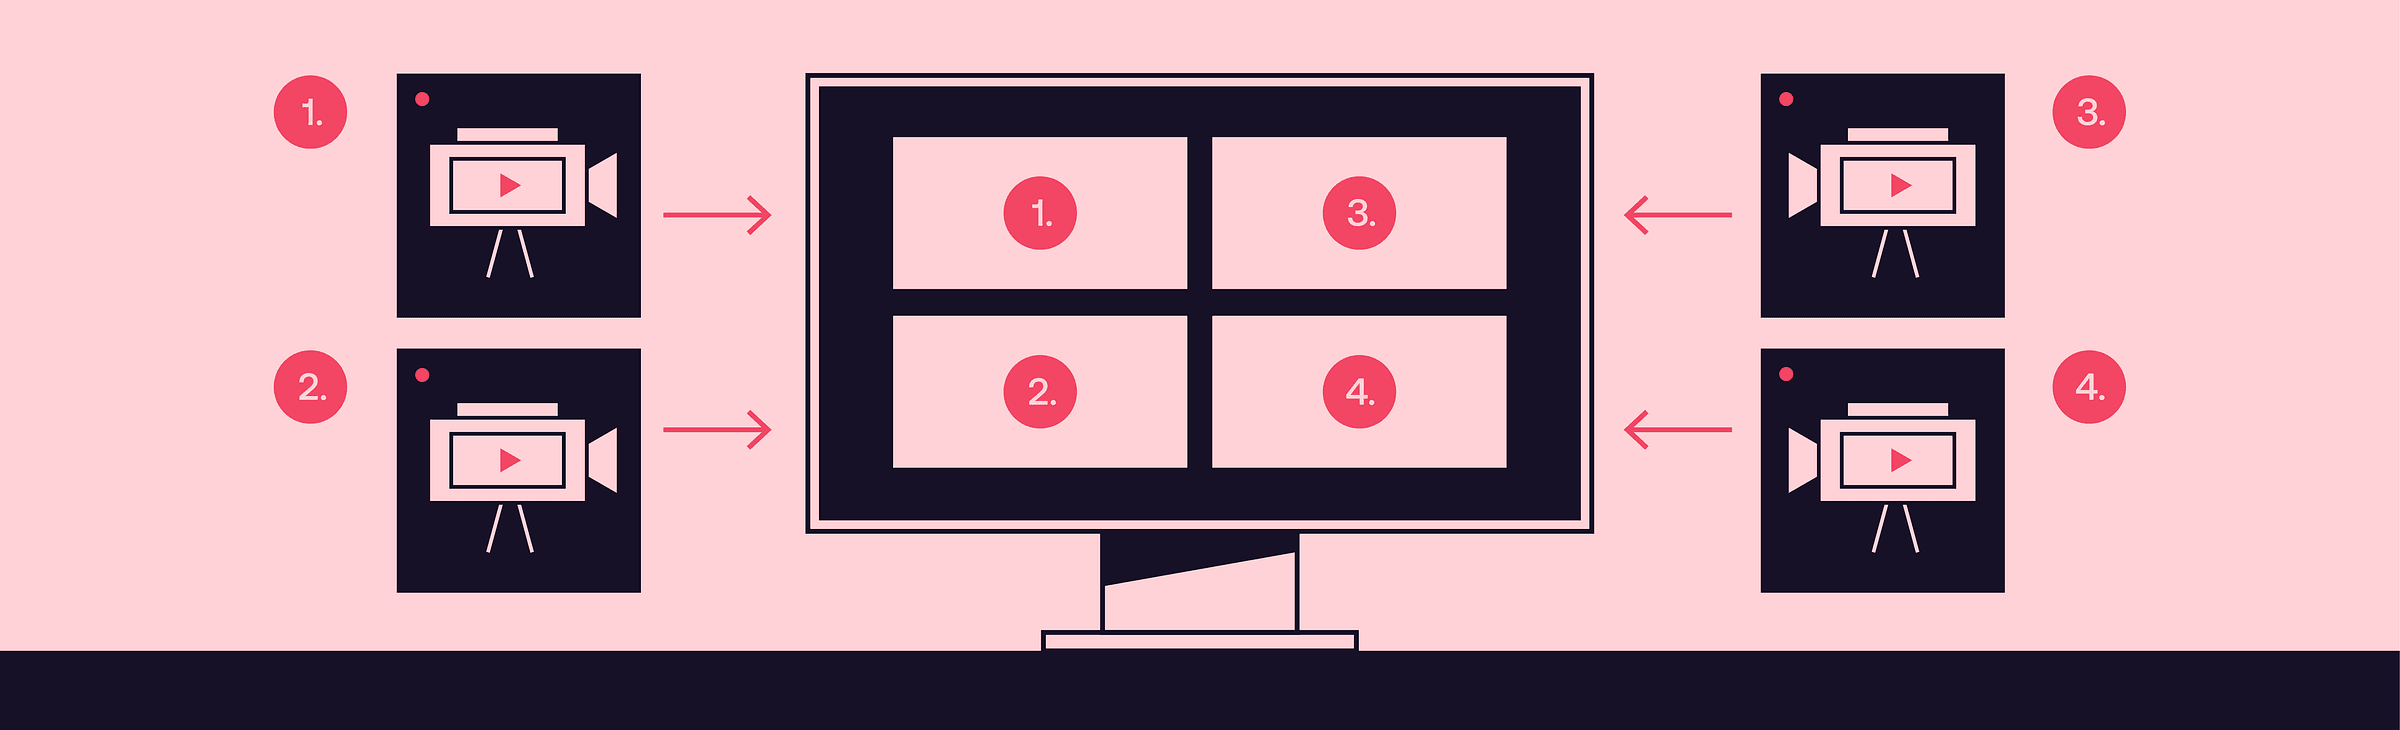
Moreover, scaling WebRTC media servers introduces an additional layer of complexity. Popular open-source media servers, such as Mediasoup, Pion, LiveKit, or Janus, host WebRTC sessions (e.g., a video meeting room or a live stream) on a single server. This means a specific session is inherently tied to one machine. While this design works well for smaller-scale sessions, it becomes a bottleneck when scaling to a large number of users or across distributed regions. This problem is usually referred to as the cascading SFU problem, and some advanced frameworks like Jitsi support it. However, usually setting this up requires complex steps, whereas the method presented in this post is quite straightforward.
In this blog, we demonstrate how to overcome these challenges by building a scalable, geo-distributed WebRTC service. By combining Elixir WebRTC as a powerful and open-source WebRTC media server implementation, STUNner as a Kubernetes-native TURN server, and Cilium Cluster Mesh for seamless multi-cluster networking, we create a system where users, no matter where they are located, can access the same high-quality live stream with minimal latency.
To make the solution concrete, we’ll showcase a modified version of Broadcaster, a sample live streaming application, deployed across three Kubernetes clusters in different regions (Germany, Singapore, and the US West Coast). Users will be routed to the nearest site using DNS-based geo-routing, while Elixir WebRTC ensures that all Broadcaster nodes stay synchronized using the Erlang Distribution Protocol.
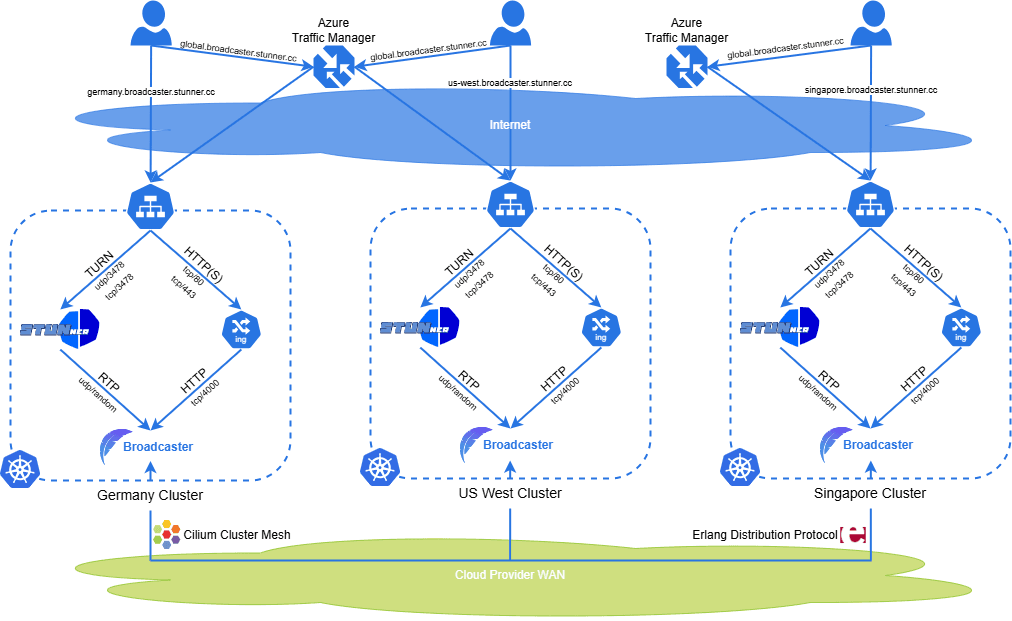
We will create the architecture depicted in the Figure below, which is deployed in our demo site. Moreover, the full installation manual is available in our GitHub repository, allowing you to try out this system in your own cloud environment.

Let’s dive into how this scalable architecture works!
2. Overview of Broadcaster: A Live Streaming Application
To demonstrate how to build a globally distributed WebRTC service, we’ll use a modified version of a sample application called Broadcaster. Broadcaster is a real-time streaming application designed to showcase the power of Elixir WebRTC. The application enables users to create or watch a stream via WebRTC, delivering seamless and interactive media experiences regardless of their geographical location.
Why Elixir for Real-Time Applications?
Broadcaster is built with Elixir, a language that thrives in building fault-tolerant, distributed systems. Elixir runs on the Erlang VM, which is designed for concurrency and low-latency communication — perfect for real-time media delivery. Here are a few reasons why Elixir is ideal for Broadcaster:
- Scalability: Elixir processes are lightweight and highly scalable, allowing Broadcaster to handle hundreds of concurrent connections effortlessly.
- Fault Tolerance: The Erlang VM provides robust fault-tolerance mechanisms, isolating processes and automatically restarting them when they crash according to a predefined restart strategy.
- Distributed Communication: Erlang Distribution Protocol makes communication between processes transparent, regardless of the node they are spawned at. The distribution mechanism is implemented using TCP/IP sockets. Thanks to this, it is easy to synchronize state across nodes in a cluster, which is critical for a globally distributed WebRTC application.
WHIP and WHEP: Simplifying WebRTC Ingestion and Playback
Broadcaster uses two emerging WebRTC standards: WHIP (WebRTC HTTP Ingestion Protocol) and WHEP (WebRTC HTTP Egress Protocol). These protocols are designed to simplify how WebRTC streams are ingested and delivered:
- WHIP: Used by streamers to publish their audio and video to the service. WHIP standardizes the process of pushing WebRTC media to a server over a simple HTTP-based interface.
- WHEP: Used by viewers to establish connections and receive streams from the service. WHEP provides a standardized and efficient signaling mechanism over HTTP for clients to consume WebRTC media, which is transmitted directly via WebRTC once the connection is established.
By adopting WHIP and WHEP, Broadcaster benefits from reduced complexity and interoperability. These protocols eliminate the need for custom signaling mechanisms and make it easier to integrate with other WebRTC tools and workflows. Additionally, they align with industry best practices, ensuring Broadcaster remains future-proof as WebRTC evolves.
How Broadcaster Works
Here’s a high-level view of how Broadcaster operates:
- Starting a Stream: A streamer starts publishing audio and video data to the service via WHIP.
- Viewing a Stream: Viewers connect to the service and receive the stream in real time via WHEP, ensuring seamless playback.
- Synchronization Across Clusters: Elixir nodes in geographically distributed clusters communicate to ensure all users see the same live stream, no matter which cluster they’re connected to.
Consider a live concert being streamed using Broadcaster. The concert originates from a single streamer, who publishes their stream to the service via WHIP. Viewers join from all over the world and consume the stream via WHEP. Users in Europe are routed to a nearby cluster in Germany, while those in Asia and the US are routed to their respective local clusters.
Even though users connect to different clusters, the streams they see are delivered in a synchronous manner, thanks to WebRTC’s low-latency design. WebRTC streams use minimal buffering, ensuring that what users see is nearly identical, regardless of their location. While there may still be slight differences in latency depending on the geographic distance from the source, viewers in the same region will experience a near-simultaneous stream, often with only millisecond-scale differences (e.g., ~10–20 ms). This is a vast improvement over traditional HTTP-based live-streaming protocols like DASH or HLS, where users often experience significant delays — sometimes even in the range of minutes — between the source and their screens. Additionally, with HTTP-based live streaming, different users watching the same stream from the same physical location can still be completely out of sync with each other.
This difference is stark and noticeable in real-world scenarios. For example, I’ve often experienced watching a live football match where my neighbors shouted “GOAL!” a full 30 seconds before I saw the action unfold on my screen. This delay, common in traditional HTTP-based streaming, can be incredibly frustrating and detracts from the sense of shared experience in live events. With WebRTC and Broadcaster, these issues are virtually eliminated, enabling a truly live and synchronized experience for all viewers around the globe.
In the next section, we’ll start by setting up the geo-distributed Kubernetes clusters that form the backbone of this architecture.
3. Setting Up the Geo-Distributed Kubernetes Clusters
To create the foundation for our globally distributed WebRTC service, we’ll set up three Kubernetes clusters located in Germany, Singapore, and West US (Washington State). These clusters will serve as the deployment sites for Broadcaster, ensuring low latency for users across different regions. In this setup, we’ll use Hetzner Cloud to provision virtual machines (VMs) and install k3s, a lightweight Kubernetes distribution, to manage our clusters.
In this blog, I won’t go through the actual install scripts, I will only emphasize the necessary steps. If you’re interested in the actual scripts that can build this setup, please visit our dedicated GitHub repo.
Step 1: Provisioning VMs on Hetzner Cloud
Hetzner is a cost-effective and reliable cloud provider that offers the flexibility to provision VMs in multiple locations. Here’s a high-level summary of what we’ll do:
1. Create VMs in three different regions:
- Germany (Frankfurt)
- Singapore
- West US (Washington State)
2. Configure basic networking and ensure each VM can communicate over the internet.
3. Install k3s on each VM.
Step 2: Installing k3s Without a CNI Provider
k3s is a lightweight Kubernetes distribution that is perfect for quick and easy setups. However, by default, k3s installs a built-in Container Network Interface (CNI) provider to handle networking between pods. For our use case, we’ll skip this step and allow Cilium to handle the networking. To do this:
- Install k3s on each VM using the — flannel-backend=none flag to disable the default CNI provider.
- This prepares the clusters for Cilium, a powerful eBPF-based networking and security solution that will also enable inter-cluster connectivity.
Step 3: Installing Cilium and Configuring Cluster Mesh
Cilium will serve as the networking layer for our Kubernetes clusters and allow us to connect them using Cilium Cluster Mesh. This setup enables secure, high-performance communication between clusters and provides several key features required for Broadcaster:
- Networking and Service Discovery: Cilium provides the container networking required for intra-cluster and inter-cluster communication.
- Endpoint Slice Synchronization: Cilium Cluster Mesh synchronizes the endpoint slices (metadata about available pod endpoints) between clusters. Broadcaster will use this to discover other Elixir nodes in the Erlang Distribution Protocol setup.
Here’s how to configure Cilium and Cluster Mesh:
- Install Cilium on each Kubernetes cluster by deploying its Helm chart with the appropriate configuration to enable eBPF-based networking.
- Enable Cilium Cluster Mesh on all three clusters and link them together.
- Verify that endpoint slices are being synchronized across clusters, allowing services to discover and communicate with pods in other clusters.
Step 4: Testing the Multi-Cluster Setup
After connecting the clusters with Cilium Cluster Mesh, we should confirm that the clusters can communicate with each other. This includes verifying:
- Pods in one cluster can connect to services or pods in another cluster;
- Endpoint slices for global services are visible across all clusters;
- The latency between clusters is within acceptable bounds for real-time WebRTC communication.
Production-Ready Alternatives
While Hetzner and k3s provide a simple and cost-effective way to build a proof-of-concept, a production scenario may require more robust infrastructure. Any major cloud provider — such as AWS, GCP, or Azure — offers managed Kubernetes services like EKS, GKE, or AKS. These services simplify the setup process with built-in features like automatic scaling, robust networking, and endpoint synchronization:
- Managed Kubernetes services can replace Cilium Cluster Mesh’s endpoint slice synchronization feature with their own cross-region service discovery capabilities.
- This can reduce operational overhead while ensuring high availability and reliability in a global deployment.
4. Set Up Broadcaster Behind STUNner
With our geo-distributed Kubernetes clusters ready and interconnected via Cilium Cluster Mesh, the next step is to deploy the Broadcaster application and configure it to work with STUNner, a Kubernetes-native STUN/TURN server. This section outlines the high-level setup for Broadcaster and STUNner without diving into implementation details. The actual Kubernetes manifests and configurations are available in our GitHub repository.
Using STUNner in this setup provides significant advantages when running WebRTC media servers in Kubernetes. While it is technically possible to run media servers without STUNner — often by using host networking mode — this approach is a Kubernetes anti-pattern. Host networking disables many of Kubernetes’ core benefits, such as efficient scheduling and scalability. It limits you to running only one media server per node, making it extremely difficult to scale or upgrade your deployment smoothly. Moreover, even with host networking you’ll still need a TURN server for clients behind strict firewalls, so why not use STUNner to solve these problems at once?
STUNner allows you to deploy WebRTC media servers in regular Kubernetes pods, enabling seamless scaling, upgrades, and auto-scheduling, just like any other Kubernetes workload. It acts as a fully Kubernetes-integrated STUN/TURN server, ensuring compatibility with Kubernetes-native tools like autoscalers for dynamic scaling. With STUNner, you not only eliminate the need for host networking but also gain a powerful, streamlined way to manage WebRTC traffic across your clusters. This makes it an indispensable component for deploying scalable WebRTC services in Kubernetes.
Deploying Broadcaster as a StatefulSet
Broadcaster is deployed as a StatefulSet in each Kubernetes cluster. The StatefulSet ensures consistent naming for Broadcaster replicas (e.g., broadcaster-0, broadcaster-1) which is useful for the stateful nature of WebRTC connections. Here’s why this approach is important:
- Stable Network Identities: the Erlang Distribution relies on stable peer connections, and consistent pod names help simplify service discovery, especially in a distributed multi-cluster setup.
- Managing State: While Broadcaster pods do not use persistent volumes, their WebRTC sessions and distributed Erlang state make them sensitive to disruptions. For example, when scaling up or down, or performing upgrades, care should be taken to ensure connections and state synchronization are not interrupted.
The Broadcaster StatefulSet is configured identically across all three clusters, except for the ingress hostnames, which we’ll cover shortly.
Setting Up STUNner
STUNner serves as the TURN server for Broadcaster, enabling media traffic to traverse NATs and firewalls. It provides an essential component for WebRTC communication, ensuring users can connect regardless of network conditions. The setup process for STUNner follows its generic installation guidelines, which include:
- Deploying STUNner to each Kubernetes cluster;
- Configuring STUNner to route WebRTC traffic to the Broadcaster pods within each cluster.
STUNner integrates natively with Kubernetes, making it straightforward to set up and scale alongside Broadcaster. For detailed installation steps, refer to the STUNner documentation and our repository.
Configuring Broadcaster to Use STUNner
Broadcaster is configured to use STUNner as a standard TURN server. When establishing WebRTC connections, Broadcaster pods reference the STUNner server in their ICE (Interactive Connectivity Establishment) configuration. This ensures that media streams are relayed efficiently, even in challenging network environments.
Cluster-Specific Hostnames with Global Geo-Routing
Each cluster is configured with its own subdomain, and a global domain is set up to route users to the nearest cluster. Here’s how the DNS configuration is organized:
- Cluster-Specific Subdomains: — Germany: germany.broadcaster.stunner.cc — Singapore: singapore.broadcaster.stunner.cc — West US: us-west.broadcaster.stunner.cc
- Global Domain: global.broadcaster.stunner.cc
The global domain (broadcaster.stunner.cc) is configured to always point users to the closest site based on their geographic location. This DNS-based geo-routing is implemented using Azure Traffic Manager, a simple yet powerful traffic management tool. Azure Traffic Manager uses DNS queries to direct users to the optimal cluster, minimizing latency.
Why Azure Traffic Manager?
Azure Traffic Manager was chosen for this setup because:
- It is easy to configure and requires minimal effort to get started.
- Its reliability and flexibility make it suitable for production workloads.
- It provides free usage in low-traffic scenarios, making it ideal for small-scale deployments like this.
Alternative Providers
While Azure Traffic Manager is used here, many cloud providers offer similar DNS-based geo-routing solutions. For example:
- Cloudflare DNS load balancing: Comprehensive support for any DNS based routing scenario.
- AWS Route 53: Supports geo-routing and latency-based routing.
- Google Cloud DNS: Provides policy-based traffic routing across regions.
The choice of provider ultimately depends on your preferences and experience. In this case, Azure Traffic Manager was selected for its simplicity and free-tier usage.
5. Testing the System: A Unified Streaming Experience
With Broadcaster and STUNner fully deployed across the geo-distributed Kubernetes clusters, it’s time to validate the system and ensure that it provides a seamless streaming experience for users worldwide. In this section, we’ll walk through the key tests to verify the system’s functionality and performance.
Step 1: Verifying Endpoint Slice Synchronization
Since Broadcaster relies on the Erlang Distribution Protocol to maintain state consistency across nodes, it’s essential to confirm that Cilium Cluster Mesh is properly synchronizing endpoint slices between the clusters. This ensures that Broadcaster nodes in one cluster can discover and communicate with nodes in other clusters.
To verify:
- Use kubectl get endpointslices in each cluster to check that endpoint slices for Broadcaster are present and updated with pods from all three clusters.
- Inspect the endpoint slice metadata to confirm that cross-cluster communication is established.
Proper synchronization guarantees that Broadcaster nodes across Germany, Singapore, and West US clusters can form a unified distributed system. You should see something like this, if you query the endpointslices:
user@germany:~# kubectl get endpointslices.discovery.k8s.io
NAME                                  ADDRESSTYPE  PORTS    ENDPOINTS    AGE
broadcaster-7fzh4                     IPv4         4000     10.101.0.60  42d
broadcaster-headless-singapore-gvmw9  IPv4         <unset>  10.103.0.85  41d
broadcaster-headless-us-west-nvftm    IPv4         <unset>  10.102.0.26  42d
broadcaster-headless-v64b2            IPv4         <unset>  10.101.0.60  42d
Step 2: Checking Broadcaster Logs for Cluster Events
Broadcaster’s logs are a valuable tool for monitoring the health of the system and verifying that nodes in different clusters are successfully communicating.
- Access the logs of any Broadcaster pod using kubectl logs broadcaster-0 (or another pod name) in each cluster.
- Look for logs indicating node discovery events or successful establishment of Erlang Distribution connections, e.g. by searching for GlobalPeerRegistry:
user@germany:~# kubectl logs broadcaster-germany-0 | grep GlobalPeerRegistry
13:45:56.845 [notice] SYN[[email protected]] Adding node to scope <Elixir.Broadcaster.GlobalPeerRegistry>
13:45:56.845 [notice] SYN[[email protected]] Creating tables for scope <Elixir.Broadcaster.GlobalPeerRegistry>
13:45:56.845 [notice] SYN[[email protected]|registry<Elixir.Broadcaster.GlobalPeerRegistry>] Discovering the cluster
13:45:56.845 [notice] SYN[[email protected]|pg<Elixir.Broadcaster.GlobalPeerRegistry>] Discovering the cluster
13:46:13.649 [notice] SYN[[email protected]|registry<Elixir.Broadcaster.GlobalPeerRegistry>] Node [email protected] has joined the cluster, sending discover message
13:46:13.649 [notice] SYN[[email protected]|pg<Elixir.Broadcaster.GlobalPeerRegistry>] Node [email protected] has joined the cluster, sending discover message
13:46:13.814 [notice] SYN[[email protected]|registry<Elixir.Broadcaster.GlobalPeerRegistry>] Received DISCOVER request from node [email protected]
13:46:13.814 [notice] SYN[[email protected]|pg<Elixir.Broadcaster.GlobalPeerRegistry>] Received DISCOVER request from node [email protected]
13:46:13.978 [notice] SYN[[email protected]|registry<Elixir.Broadcaster.GlobalPeerRegistry>] Received ACK SYNC (0 entries) from node [email protected]
13:46:13.978 [notice] SYN[[email protected]|pg<Elixir.Broadcaster.GlobalPeerRegistry>] Received ACK SYNC (0 entries) from node [email protected]
13:46:31.755 [notice] SYN[[email protected]|pg<Elixir.Broadcaster.GlobalPeerRegistry>] Node [email protected] has joined the cluster, sending discover message
13:46:31.755 [notice] SYN[[email protected]|registry<Elixir.Broadcaster.GlobalPeerRegistry>] Node [email protected] has joined the cluster, sending discover message
13:46:31.936 [notice] SYN[[email protected]|registry<Elixir.Broadcaster.GlobalPeerRegistry>] Received DISCOVER request from node [email protected]
Logs should show that nodes in each cluster are discovering peers in other clusters, confirming the proper functioning of the multi-cluster setup. Any errors or timeouts would indicate issues in endpoint synchronization or network connectivity that need to be addressed.
Step 3: Testing the User Interface
Broadcaster’s UI provides a user-friendly way to interact with the system. Open the UI from any cluster or the global domain to ensure that the service behaves as expected. You can also try out our demo page.
Connecting to Specific Clusters
Each cluster has its own subdomain (e.g., germany.broadcaster.stunner.cc, singapore.broadcaster.stunner.cc, and us-west.broadcaster.stunner.cc). Test the following:
- Open the UI using either the global or any cluster-specific hostname.
- If a stream is active, it will play automatically. You can also choose to connect directly to any other server in the cluster using the links provided on the page.
- Check that latency and performance metrics are consistent across clusters.
Using the Global Domain
The global domain (global.broadcaster.stunner.cc) is configured to route users to the closest cluster using Azure Traffic Manager. Test this feature by:
- Accessing the global domain from different geographic locations or using VPNs to simulate user locations.
- Confirming that the global domain routes users to the nearest cluster based on their location. For example: — A user in Europe should be routed to germany.broadcaster.stunner.cc. — A user in Southeast Asia should be routed to singapore.broadcaster.stunner.cc. — A user in the United States should be routed to west-us.broadcaster.stunner.cc.
- Verify that the UI behaves consistently, regardless of the cluster users are connected to. All users should see the same live stream, confirming the system’s unified state synchronization.
Step 4: Observing Stream Quality Metrics
On the demo page, we’ve added extensive metrics to evaluate the quality of the stream. These metrics include e.g. the RTT (Round-Trip Time) to the server, audio and video bitrates, packet loss, NACK (requests for retransmissions) counts, jitter buffer statistics, and freeze counts and duration. Users can not only monitor these metrics in real-time but also download measurement results for further analysis. Additionally, the demo page allows for comparing two different measurement results side-by-side by uploading them into the tool. To illustrate this, we performed a comparative test and included screenshots of the results (see the figures below).
For the test, we streamed a simple video from the Singapore cluster containing a timestamp and a frame counter. Then, we connected via a residential internet using an up-to-date Chrome browser. To simulate bad network conditions (e.g. cellular) the simulated packet loss was enabled and set to 1%. This parameter causes the Broadcaster instances to drop the desired percentage of packets at random at the server side of the peer connection.
We used two different modes of connection:
- Direct connection to the source server in Singapore (which goes directly through the public internet) — yellow line on the figures, and
- Connection to the closest cluster in Germany (which goes to the Germany datacenter on the public internet and synchronizes the stream from the origin server also using the public internet) — blue line on the figures.
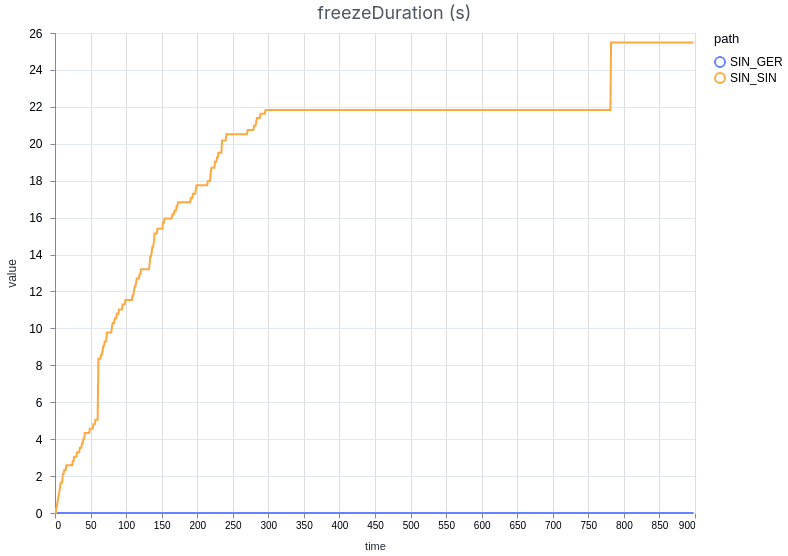
This is happening even though both instances drop 1% of the packets regularly. The Singapore connection is dropping slightly more packets due to the added network overhead of more network hops on the public Internet than the German one.
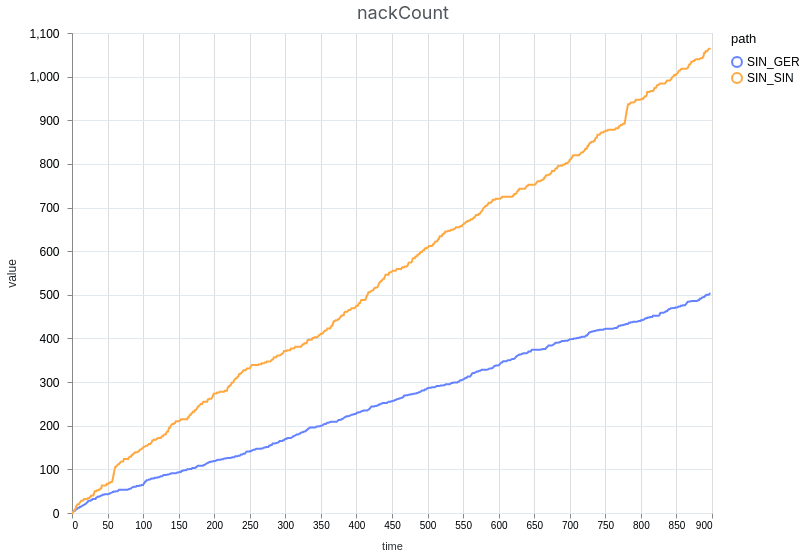
The results demonstrate that the connection through Germany experienced much better stream quality than the Singaporean one. We can observe that the German stream did not freeze for any amount of time, while the other stream was interrupted constantly as the jitter buffer was trying to accommodate the unstable connection.
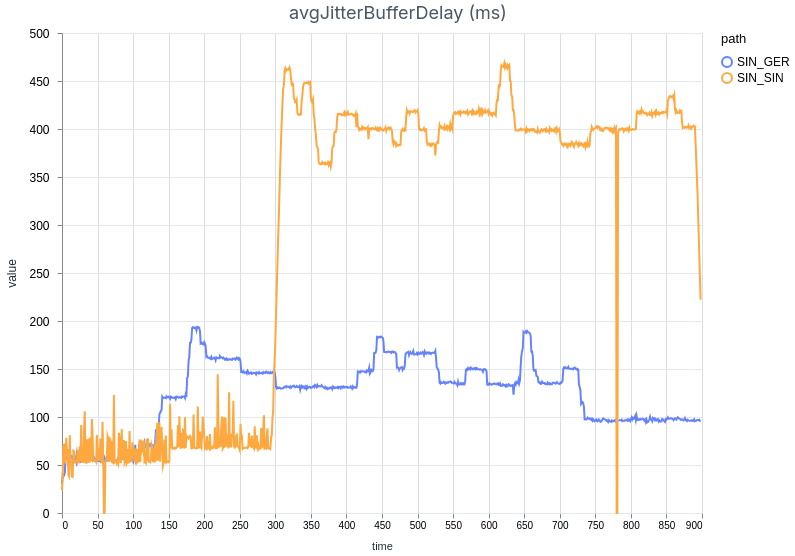
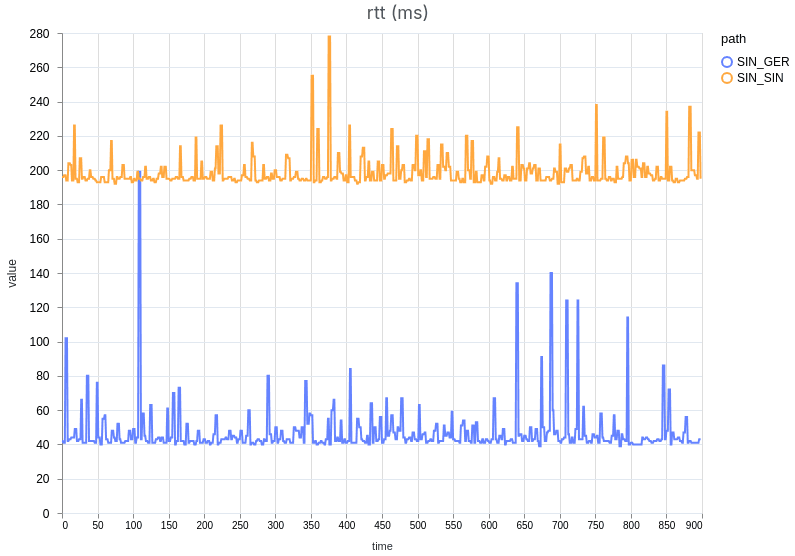
As expected, the RTT was significantly lower when connecting to the German server (~40 ms) compared to the source server in Singapore (~200 ms). Other key metrics confirmed the benefit of connecting to the closest server: the jitter buffer was lower on average and more stable when routing through Germany, even with a simulated packet loss of 1%.
Takeaways
Our benchmark confirms that using the closest data center matters greatly for viewers’ experience. In volatile network conditions, which are common on the public internet, the lost packets can be quickly retransmitted, causing no disruption to the stream. When packets are lost and the connection peer is farther away, they do not have enough time for retransmission before the jitter buffer gets depleted, and the stream is interrupted.
That said, it’s worth noting that even the direct connection to the source server in Singapore delivered very high-quality streaming performance when simulated packet loss was disabled, with no freezes observed during a 30-minute test session. This highlights the benefit of this architecture for streaming solutions when considering fluctuating network conditions.
6. Conclusion
In this blog post, we’ve walked through the process of setting up a scalable, geo-distributed WebRTC service using a combination of Elixir WebRTC, STUNner, and Cilium Cluster Mesh. We deployed a demo application, Broadcaster, which facilitates live streaming across geographically distributed Kubernetes clusters. The setup ensures that users anywhere in the world receive a seamless, low-latency streaming experience. We’ve provided a complete installation manual in our GitHub repository, you can explore the setup and even try it out for yourself in our own environment using the Demo Page.
This architecture is not only scalable but also future-proof. By leveraging stateful WebRTC support in Elixir WebRTC and using STUNner for TURN services, combined with Cilium Cluster Mesh for cross-cluster networking, we have built a system that can easily scale across multiple regions, adapt to growing traffic, and ensure high availability. Additionally, the use of DNS-based geo-routing ensures that users are always connected to the nearest cluster, providing a responsive and fault-tolerant system that can grow with your needs.
This demo and blog post are a joint collaboration between Software Mansion, the creators of Elixir WebRTC, and L7mp Technologies, the creators of STUNner. Together, we’ve demonstrated how to build and deploy a global WebRTC service with minimal complexity, using modern tools that are well-suited to today’s distributed environments.
Thank you for reading, and we hope this post inspires you to build robust, scalable WebRTC systems that provide users with a seamless, high-quality experience across the globe!
If you’re interested in building a similar WebRTC system or have questions about the implementation, we encourage you to reach out to us:
Software Mansion: As multimedia experts, AI explorers, React Native core contributors, community builders, and custom software development company. Hire us: [email protected].
L7mp Technologies: As the creators of STUNner, they can help you design and deploy a modern, cloud-native, scalable, and globally distributed WebRTC infrastructure for any media server. Reach out to us here.
We’re happy to help you get started or offer advice on scaling and deploying your own solution!