
React Native Image List: Recreating Apple & Google Photos in React Native — Part 1
 Bartłomiej Bukowski•Jul 15, 2025•10 min read
This is the first article in our deep dive series, where we’ll walk you through building a high-performance photo list like Apple or Google Photos using just React Native. We’ve also published a video walkthrough and a public GitHub repo so you can explore the code and try it out on your own device.
This part focuses on two key steps:
- Loading all available photos from the device
- Plugging them into a scrollable list component for easy browsing
So, let’s dive in and explore the best practices for speed and top user experience.
References: Apple Photos and Google Photos
So, since we want to build a fast and smooth photo gallery in React Native, let’s take a look at how the market leaders do it.
Both iOS and Android photo apps are great examples of strong performance — it’s not because such an effect can only be achieved with native implementations. It’s because of the smart optimizations they do ahead of time.
Google Photos does two key things to optimize performance:
- The app indexes the phone’s photo gallery during the very first launch. When you open it for the very first time, you can notice a processing indicator and an increasing number of photos found on the device.
- When you’re actually scrolling through the photo list, you can observe that each image initially appears in low resolution, and then swiftly loads in higher resolution:

In contrast, iOS optimizes and gathers information about photos in the background, even before you open Apple Photos. You can notice it e.g., when you migrate to a new device. Alternatively, you can trigger this background processing effect when you transfer a large number of images to the gallery by hand:
Some of these optimization techniques can also be applied to our React Native implementation. So, we’re going to combine these techniques with React Native libraries to recreate Apple and Google Photos.
We’ll be testing our app on the following devices:
- iPhone 13 mini (iOS 18.5)
- iPhone 16 (iOS 18.5)
- Pixel 9 Pro (Android 16)
- Pixel 4a (Android 13)
We seed each device with 2,100 high-resolution photos using the script from the repository. This gives us 7 different images, each duplicated 300 times. The photo resolutions range from 3872×2592 up to 7372×4392 pixels.
Step 1: Loading images from the device (batching & caching)
Efficient image loading is the first step toward building a performant list. On Android, reading the entire MediaLibrary in one go takes about 9 seconds on a Pixel 9 and 16.5 seconds on a Pixel 4a. On iOS, it’s significantly faster — averaging just 0.1 seconds on both devices we’ve tested.
Such long loading times on Android devices can have a negative impact on UX and we aim to ensure our app’s perceived performance is top-notch. That’s why it’s crucial to implement strategies to speed up the time it takes to render the first photo.
One of the effective approaches to do so is batching. Rather than loading all images at once, we fetch them in smaller chunks. This cuts down the initial load time and lets us display photos to the user much faster.
For this purpose, we use the expo-media-library to access the device’s images and implement batching to fetch them in manageable chunks. This helps display the first set of photos much faster.
const LOAD_BATCH_SIZE = 50;
let hasNextPage = true;
let endCursor: string | undefined = undefined;
let photos: MediaLibraryPhoto[] = [];

while (hasNextPage) {
  const newBatch = await MediaLibrary.getAssetsAsync({
    first: LOAD_BATCH_SIZE,
    after: endCursor,
    mediaType: "photo",
    sortBy: [["modificationTime", true]],
  });

  setAssets((prev) => [...prev.assets, ...newBatch.assets]);

  hasNextPage = newBatch.hasNextPage;
  endCursor = newBatch.endCursor;
}
Another technique is caching the data we receive from the device. We use react-native-mmkv to power our caching layer. On subsequent app launches, we load the cached photo data first and then asynchronously compare it with the current photos on the device to keep everything up to date.
Side note: we’ve been curious why Android loading times are this much longer than the ones on iOS. We’ve investigated and we’ve proposed some improvements. You can learn more about it in this GitHub Pull Request.
Step 2: From <Image> to Expo Image
React Native’s built-in <Image> component works fine for basic needs, but if you want better performance and more features, Expo Image is a great alternative.
We’ve compared these components when trying to load 200 full-resolution images into a 5-column grid, and here are our findings:
We tried to measure loading times per image by comparing the timestamp reported between onLoadStart and onLoadEnd callbacks.
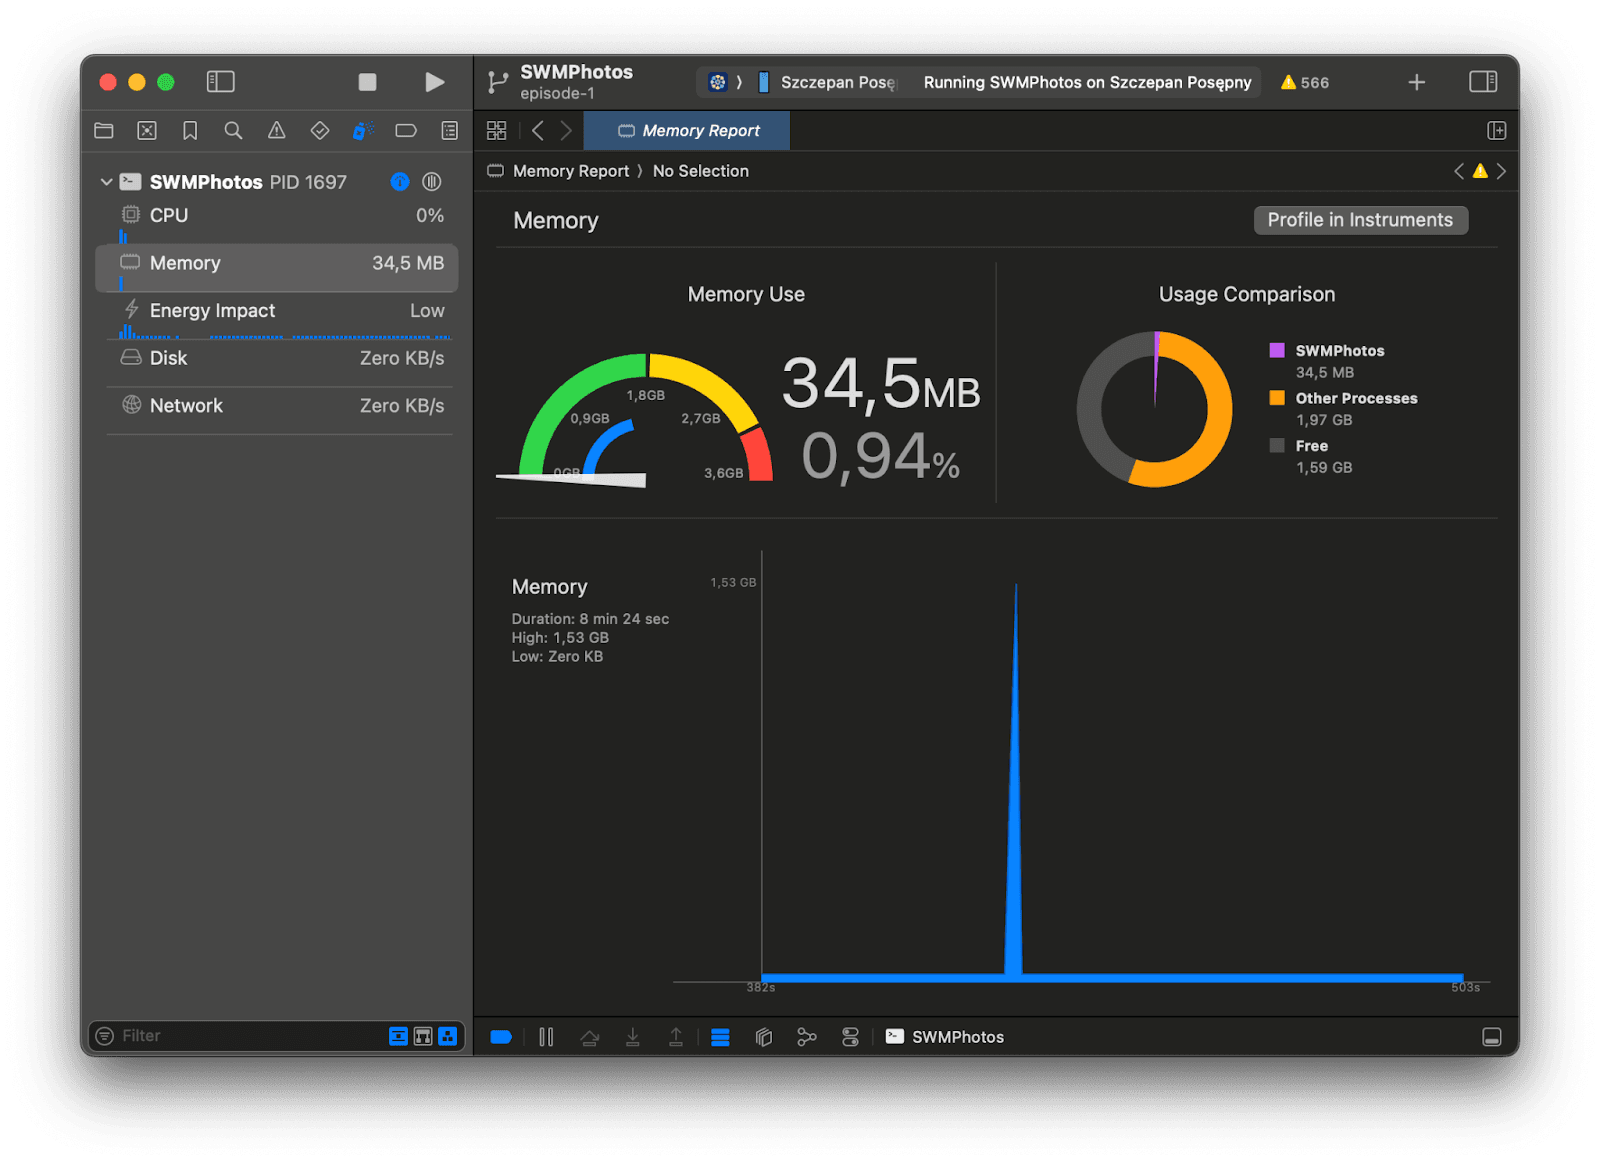
Also, we’ve inspected the memory consumption:
On iOS:
- The default
<Image>component loads images up to 25 times faster thanExpo Image. 😱 Expo Imagecrashes if too many images load at once due to high memory use, so we had to limit the number to 60 instead of 200 for testing.- The initial image load with
Expo Imagecauses a memory spike, reaching around 1.53 GB.
We consulted with the Expo team regarding these iOS issues and were able to significantly improve the package. You can learn more about the improvements in GitHub Pull Requests #37795, #37979, #37987
On Android, here’s what we observed:
- Image loading was limited to about 173 images; the remaining 27 slots appeared blank on both the Pixel 4 and Pixel 9.

Expo Imageperformed better in terms of loading speed, especially on the Pixel 9, where it was twice as fast as the default<Image>component.Expo Imagealso had a smaller memory footprint.
So, we’ve got a clear winner on Android — Expo Image!
It’s also with mentioning that Expo Image comes with more props that let you control how images are loaded:
CachePolicy: Helps optimize memory and disk usage by smartly caching images, so consecutive loads of the same images takes significantly less time.- Android-specific RGB decoding format: Lets you fine-tune how images are decoded on Android, which can improve rendering speed and lower memory usage.
There’s also a useImage hook, which is meant to load images at the desired dimensions and keep them in memory. However, it still loads the full-resolution photo initially, which can cause the app to crash due to high memory usage.
To further improve the perceived performance and UX of the app you can also use some intermediate techniques by giving users immediate visual feedback while images are loading:
- Placeholders: A simple static image is displayed before the actual image loads.
- Blurhashes: A compact way to represent an image, used to display a blurred placeholder for a smooth visual transition while the full image loads.
- Skeletons: Simple grey placeholders that mimic the image layout. They’re especially useful when you don’t yet have any image data (like a URL or blurhashes) but still want to show that something is loading.
Step 3: Optimizing with mipmaps
We know that high-resolution photos — while visually appealing — aren’t necessary for the list view we’re building. All we need is a downscaled version that fits into our 5-column grid.
To handle this efficiently, we use mipmapping — a technique that pre-generates downscaled versions of images. Ideally when an image is displayed, the system automatically selects the right mipmap level based on the display size. This means a smaller, optimized version of the image is rendered in smaller views, reducing memory usage and improving rendering speed.
In our case, we only need a single mipmap per image, sized to match one cell in the gallery grid.
Although Expo Image generates mipmaps automatically, they didn’t work reliably for us on iOS. So we built our own solution.
We added another layer to our image-loading pipeline that uses ImageManipulator to generate downscaled versions of each photo. These processed images are also cached to speed up future app launches.
You can find the full implementation in the repository. Here’s the most important part of the code:
const manipulatorContext = ImageManipulator.manipulate(image.uri);
manipulatorContext.resize({
  height: newSmallerHeight,
});
const optimizedImage = await manipulatorContext.renderAsync();
const result = await optimizedImage.saveAsync({
  format: SaveFormat.JPEG,
  compress: 0.8,
});
optimizedImage.release();
Loading times — original full-resolution images vs. downscaled images:
Memory usage — original images vs. downscaled images (in MB):
There are several important things to notice here:
- On Android,
Expo Imageoutperforms the default<Image>component. - On iOS,
Expo Imageperforms slightly worse than the default<Image>component when mipmaps are in the game.* - We decided that when mipmaps are included the overall gain from using
Expo Imageis greater than the gain we have from using the default<Image>component.
*We consulted with the Expo team regarding these iOS issues and were able to significantly improve the package. You can learn more about the improvements in GitHub Pull Requests #37795, #37979, #37987. Once the next version of Expo Image is released, we expect it to outperform the default Image component on iOS as well.
Step 4: Choosing the right list component: FlatList vs. FlashList vs. LegendList
Choosing the right list component is key to building a responsive and high-performing image list in React Native. We looked at three options recommended by the official React Native docs: FlatList, FlashList, and LegendList — and we tested their performance on iOS, high-end Android, and low-end Android devices.
For a great overview of these list solutions and more about how they’re built, check out Jay Meistrich’s talk from this year’s App.js Conf:
Below, you can find our performance observations:
FlatList — it’s the default list component in React Native
It performs well on high-end devices or with smaller image sets. But on low-end Android phones, scrolling through large photo collections can cause noticeable FPS drops.
FlashList (version 1.8.3) — it’s optimized for large datasets and delivers smoother scrolling, even on lower-end devices
It offers smoother scrolling than FlatList, especially with large datasets. Sometimes you might see brief “whitespace” gaps during fast scrolling, but they fill in quickly.
LegendList (version 1.1.3) — A JavaScript-only package that promises better performance, especially when handling dynamically sized items without any native dependencies
It offers competitive performance and stands out for its pure JavaScript implementation, making cross-platform development easier by avoiding native dependencies. However, regardless of device, it often renders many blank areas during scrolling, especially when scrolling quickly.
When using downscaled versions of the photos, we’ve found that all three list solutions performed similarly.
In tests with over 2,100 high-resolution images, we compared memory usage and perceived performance. We paid close attention to any frame drops during scrolling — even during fast “rage scrolling” — as well as blank (white) areas that would appear briefly before the images load.
Here’s how the memory consumption compares (in MB):
In a nutshell, we can see that FlatList uses the least memory, while FlashList uses the most. However, FlashList performs best across devices, with almost no white areas and fewer frame drops during scrolling.
Code once, run everywhere
One of the coolest things about React Native is that you can write your code once and run it anywhere. The optimizations and techniques discussed in this article work across platforms. Our SWM Photo app is built with these in mind and is meant to run everywhere, though so far we’ve focused on mobile devices. So, stay tuned! More platforms will be coming in future articles and episodes from our series.
By using these optimization techniques, you can build React Native lists that don’t just work, but feel smooth and fast — just like native apps such as Apple Photos.
If you want to dig deeper, check out the code repository. Give it a try, run your own tests, and don’t forget to share your findings in the comments. Let’s keep making the React Native community stronger together!
Huge thanks to Robert Kozik and Jakub Kosmydel for all their contributions to this project!
We’re Software Mansion: multimedia experts, AI explorers, React Native core contributors, community builders, and software development consultants.