
Modeling with DynamoDB made easy in Typescript
 Błażej Kustra•Oct 2, 2023•6 min read
Amazon’s DynamoDB is an exceptional NoSQL database, famous for its scalability and performance. But let’s spill the tea here: while it’s a fantastic database service, operating on DynamoDB through AWS SDK can be about as user-friendly as a cactus. 😅
Problem with the Current Approach
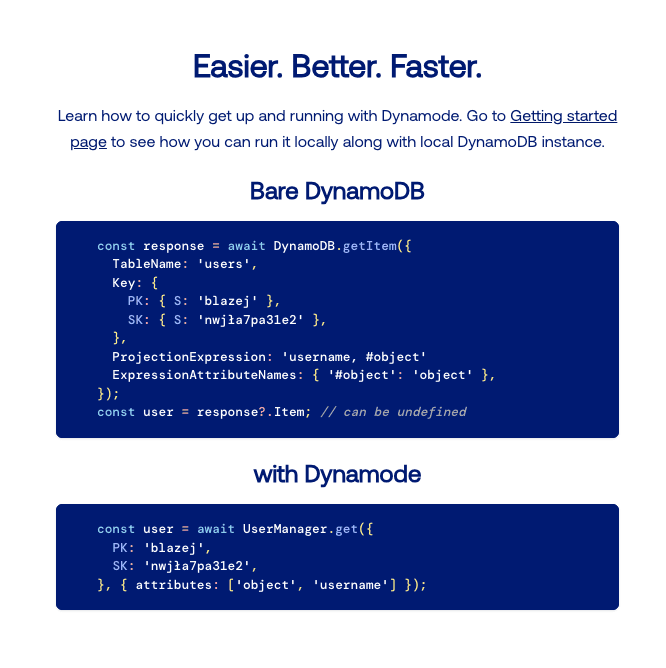
Consider this TypeScript snippet for updating an entity:
const client = new DynamoDBClient({ region: 'us-west-2' });

const params = {
  TableName: 'UserTable',
  Key: { pk: { S: 'blazejkustra' } },
  ExpressionAttributeNames: { '#N': 'name', '#E': 'email' },
  ExpressionAttributeValues: { ':n': { S: 'newName' } },
  UpdateExpression: 'SET #N = :n',
  ConditionExpression: 'attribute_exists(#E)',
  ReturnValues: 'ALL_NEW',
};

const command = new UpdateItemCommand(params);

// user: UpdateItemCommandOutput
const user = await client.send(command);
Looks like a recipe for a headache, right? Let’s break down the pain points:
UpdateExpressionandConditionExpressionare plain strings. One typo, and you've got a faulty database query that's a nightmare to debug.ExpressionAttributeNamesandExpressionAttributeValues, those special properties add another layer of complexity.- No type safety & no validation for the models entering the database 🙈
- No autocomplete…
Introducing a Solution: Dynamode
There are multiple libraries trying to solve this exact problem, such as DynamoDB Toolbox or Dynamoose. But, what if we could do better? This question led to the birth of Dynamode.

Why Choose Dynamode?
- TypeScript Support: Dynamode embraces TypeScript, offering a type-safe solution at the compile-time level.
- Validation Support: Farewell to risky data entries, Dynamode ensures validation for models before they reach the database.
- Intuitive API: Dynamode uses familiar terminologies like
get,put,queryetc., making the usage smooth and straightforward. - Detailed documentation: Backed with thorough instructions, helping you navigate each feature with ease.
Now, let’s get our hands dirty and dive into how Dynamode can transform our code and make it more readable and robust.
Step 1: Install the dependency first
Before we begin, let’s get your workspace ready by installing the library:
npm i dynamodeStep 2: Setting up Dynamode locally
During development, you may find it convenient to first run DynamoDB locally. Dynamode comes with built-in support for this.
import Dynamode from 'dynamode/dynamode';

Dynamode.ddb.local();
You can spin up a DynamoDB instance locally using Docker. If you’re interested, follow this guide on setting up DynamoDB locally with Docker.
Step 3: Create a Table
Dynamode allows you to define the structure of your data using TypeScript classes and decorators. In this step, we create a table UserTable extending an Entity class.
import attribute from 'dynamode/decorators';
import Entity from 'dynamode/entity';

export type UserTablePrimaryKey = {
  pk: string;
  sk: string;
};

export type UserTableProps = UserTablePrimaryKey & {
  createdAt?: Date;
  updatedAt?: Date;
};

export default class UserTable extends Entity {
  @attribute.partitionKey.string()
  pk: string;

  @attribute.sortKey.string()
  sk: string;

  @attribute.gsi.partitionKey.string({ indexName: DYNAMODE_INDEX })
  dynamodeEntity!: string;

  @attribute.gsi.sortKey.string({ indexName: DYNAMODE_INDEX })
  gsi_sk_1: string;

  @attribute.date.string()
  createdAt: Date;

  @attribute.date.string()
  updatedAt: Date;

  constructor(props: UserTableProps) {
    super(props);

    this.pk = props.pk;
    this.sk = props.sk;

    this.createdAt = props.createdAt || new Date();
    this.updatedAt = props.updatedAt || new Date();

    this.gsi_sk_1 = this.createdAt.toISOString();
  }
}
The next step is to create a TableManager, which is used to perform operations on the DynamoDB table and set all the configuration details, such as the table name, partition key, sort key, and the indexes to be used.
import TableManager from 'dynamode/table';

export const USER_TABLE_NAME = 'user-development';
export const DYNAMODE_INDEX = 'dynamode-index';

export const UserTableManager = new TableManager(UserTable, {
  tableName: USER_TABLE_NAME,
  partitionKey: 'pk',
  sortKey: 'sk',
  indexes: {
    [DYNAMODE_INDEX]: {
      partitionKey: 'dynamodeEntity',
      sortKey: 'gsi_sk_1',
    }
  },
  createdAt: 'createdAt',
  updatedAt: 'updatedAt',
});
With the newly initialized manager, creating a DynamoDB table with Dynamode is a breeze. All it takes is a simple function call:
await UserTableManager.createTable();Just like that, your DynamoDB table is ready to use.
Step 4: Model your first entity
Next, we’re going to create our first model. In Dynamode, crafting your data models becomes effortless thanks to the class inheritance. Simply extend the table class (or its derived classes), and add additional attributes as per your requirements.
type UserProps = UserTableProps & {
  email: string;
  isVerified: boolean;
  username?: string;
};

export class User extends UserTable {
  @attribute.sortKey.string({ prefix: User.name }) // `User#${userId}`
  sk!: string;

  @attribute.string()
  userId: string;

  @attribute.string()
  email: string;

  @attribute.boolean()
  isVerified: boolean;

  @attribute.string()
  username?: string;

  constructor(props: UserProps) {
    super(props);

    this.userId = props.pk;
    this.email = props.email;
    this.isVerified = props.isVerified;
    this.username = props.username;
  }

  static getPrimaryKey(userId: string): UserTablePrimaryKey {
    return {
      pk: userId,
      sk: userId,
    };
  }
}
The final piece of the puzzle is to initialize a manager, which serves as a repository for User entity. It lets you execute all CRUD operations on the model seamlessly.
export const UserManager = UserTableManager.entityManager(User);Final Step: Use it inside your code!
Now that we have established our table and user entity, we can perform various CRUD operations with Dynamode.
Create an item:
When you want to add a new item to our table, you simply create an new instance of the entity - in our case, User - and place it in the table using the put method.
// newUser: User
const newUser = await UserManager.put(new User({ ...User.getPrimaryKey(userId), email, isVerified: false }));
Fetch an item:
Need to find a user in your table? No worries! You can fetch it using the get method passing the primary key.
// user: User or throws NotFoundError
const user = await UserManager.get(User.getPrimaryKey(userId));
Update an item:
As your data evolves, updating existing records becomes inevitable. With Dynamode, this operation is made easier by the update method. You don’t have to deal with traditional complexities of handling UpdateCondition, ExpressionAttributeNames and ExpressionAttributeValues yourself. Dynamode conveniently handles all of these details behind the scenes.
// updatedUser: User
const updatedUser = await UserManager.update(User.getPrimaryKey(userId), {
  set: {
    isVerified: true,
  },
  remove: ['username'],
});
Query items:
Using the query method, you can specify filter conditions and fetch multiple matching items from the table.
// users: User[]
const { items: users } = await UserManager.query()
  .partitionKey('pk')
  .eq(userId)
  .sortKey('sk')
  .beginsWith('test')
  .limit(100)
  .run();
Create transactions:
Your application may require performing multiple operations that succeed or fail together, ensuring data integrity. Thankfully, Dynamode provides effortless access to DynamoDB’s transaction capabilities.
// users: [User, undefined]
const { items: users } = await transactionWrite([
  UserManager.transaction.put(new User({ ...User.getPrimaryKey(userId), email, isVerified: false })),
  UserManager.transaction.update(
    User.getPrimaryKey(otherUserId),
    { set: { username } },
    { condition: UserManager.condition().attribute('username').not().exists() },
  ),
]);
Extra: ✨ Typescript Magic ✨
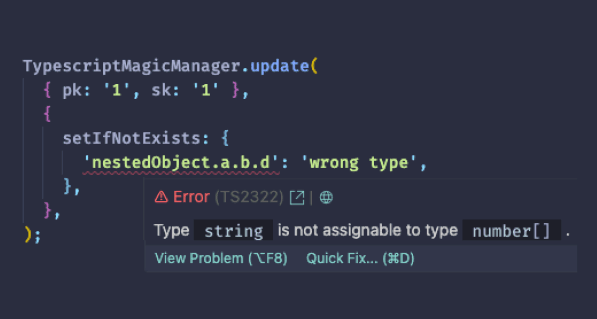
The real power comes with autocomplete and type safety, with Dynamode you get both!
import attribute from 'dynamode/decorators';
import Entity from 'dynamode/entity';
import TableManager from 'dynamode/table';

class TypescriptMagic extends Entity {
  @attribute.partitionKey.string()
  pk: string;

  @attribute.sortKey.string()
  sk: string;

  @attribute.object()
  nestedObject: { a: { b: { c: string; d: number[] } } };

  @attribute.array()
  array: string[];
}

const TypescriptMagicTableManager = new TableManager(TypescriptMagic, {
  tableName: 'typescript-magic',
  partitionKey: 'pk',
  sortKey: 'sk',
});

const TypescriptMagicManager = TypescriptMagicTableManager.entityManager();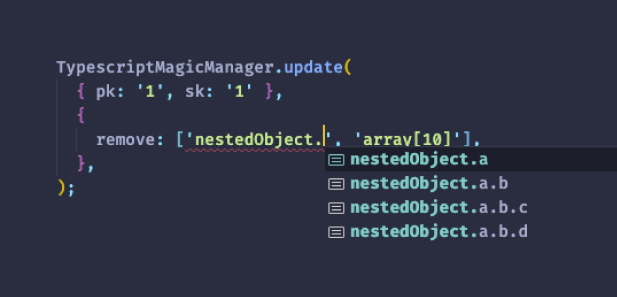
And that’s it! With these steps, you are now ready to embrace the power of DynamoDB with Dynamode ORM in TypeScript. Happy coding!
Leave Dynamode a star on Github ⭐️ / Check out the documentation 📘