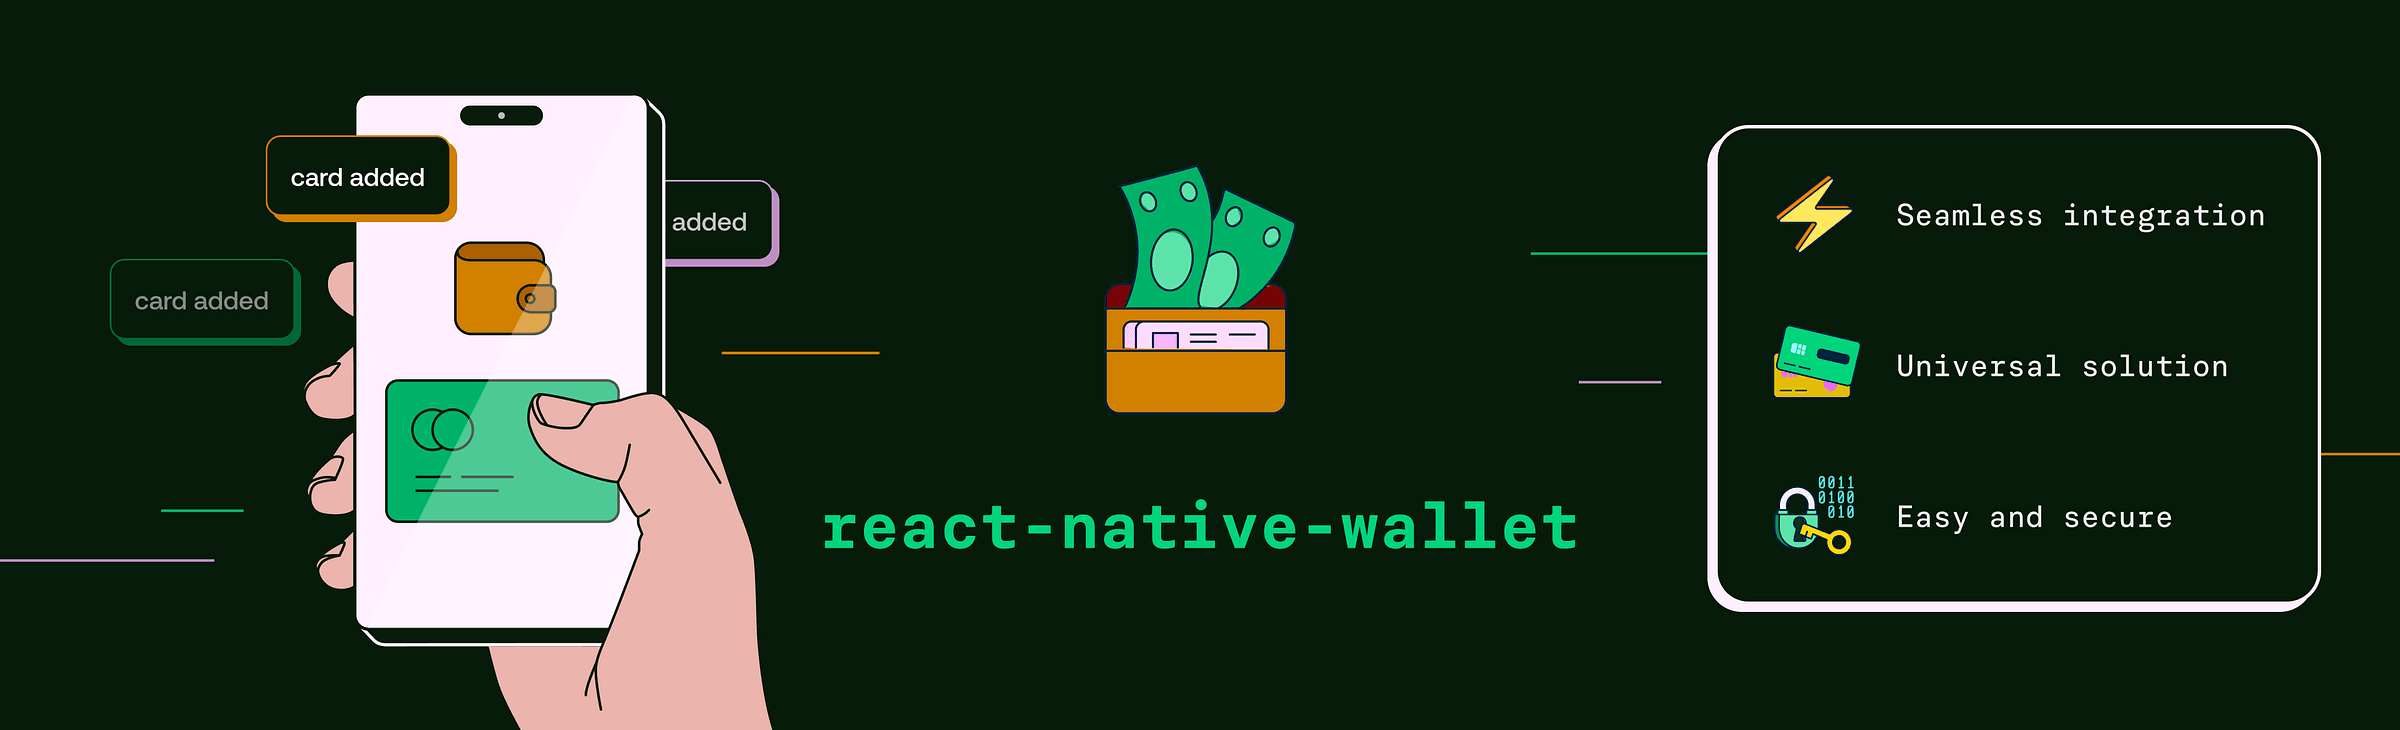
Introducing react-native-wallet
 Michał Skałka•Jul 10, 2025•13 min read
Introducing react-native-wallet: The Cross-Platform Way to Add Cards to Apple & Google Wallet
Let’s face it — mobile wallets are no longer just nice-to-have. For users, tap-to-pay has become a second nature. And for fintech products, letting users add cards directly to Apple Wallet or Google Wallet isn’t just a UX upgrade— it’s a way to gain a competitive edge.
This capability, commonly referred to as in-app provisioning, allows users to easily add payment cards into mobile wallets directly from within an app, eliminating the need to manually input card details or pass through multiple authentication steps. It streamlines the process of integrating secure, ready-to-use payment options within mobile applications, significantly improving both user experience and security.
Up until now, integrating wallet support into a React Native app has been far from straightforward. Strict platform rules, complex native SDKs, and compliance hurdles have turned it into a slow and painful process, often requiring native knowledge and long dev cycles.
That’s why, together with Expensify, we built react-native-wallet — a lightweight, developer-friendly React Native library designed to make adding payment cards to Apple and Google Wallet simple, reliable, and truly cross-platform. It handles the platform-specific complexity, so you can add wallet support without spending weeks on native development and digging through scattered docs.
react-native-wallet — what is it & why does it matter?
As React Native is a major technology used for developing applications across both iOS and Android, having a unified library to add payment and credit cards to Apple Wallet and Google Wallet is really helpful. Unlike other libraries that manage general passes or tickets, react-native-wallet focuses exclusively on payment cards and supports a wide array of card providers like Visa, MasterCard, Amex, or Discover. This allows developers to easily enable their apps to support various types of payment cards without having to integrate bulky or complex SDKs.
By simplifying this process, react-native-wallet not only broadens reach and functionality but also becomes a key component for adding credit or payment cards to any mobile cash app or digital banking app. It significantly accelerates and simplifies the development process, making it easier for developers to deliver a rich, user-friendly payment experience. Moreover, react-native-wallet ensures that the whole integration follows the strict guidelines and best practices required by both Google and Apple. Sticking to these guidelines helps avoid issues during the app review process and increases the likelihood of successful approval.
In-app provisioning requirements
Before integrating react-native-wallet, you need to know that in-app provisioning varies significantly between Google Wallet and Apple Wallet. Each platform has its own access requirements and configurations needed to implement card addition flow successfully. This stems from security and compliance requirements around push provisioning, which make this feature both powerful and exclusive.
Google (Android)
To enable Google Wallet push provisioning you need to:
- Have access to the official Google TapAndPay SDK Since our library is based on Google TapAndPay SDK, you must request access to it. This API is essential for allowing users to add payment cards directly to Google Wallet from within your app.
- Allowlist your application Google requires you to allowlist your application to use the SDK. This involves submitting your app’s package name and SHA-256 certificate fingerprint for approval. Follow the detailed steps provided on the library’s GitHub page to prepare your application for verification.
Apple (iOS)
Apple’s side is more restricted and you need to follow these steps to start the process of adding a payment or credit card to Apple Pay:
- Apply for Apple Pay in-app provisioning entitlement To start the implementation, you’ll need to obtain the special in-app provisioning entitlement. It’s not available by default in our panel and you’ll need to send a precise request to Apple including your app’s name, your Apple Developer Team ID, and your app’s Adam ID. Apple should typically respond within a week. More information can be found in the documentation.
- Configuration and activation Integrate the entitlement into your app by visiting the Apple Developer portal. This step is crucial as it activates the in-app provisioning features in production builds, necessitating careful and secure handling of payment data.
With these steps, you’re now ready to integrate react-native-wallet into your application. For full setup steps, code snippets, and exact configuration details, check out our README.
How to integrate react-native-wallet step-by-step?
To use react-native-wallet, you need to start with the shared entry point for both Apple and Google Wallet — the component that kicks off the card addition flow. According to the branding guidelines, the card addition process must start with dedicated button components. The design and placement of these buttons are regulated to ensure consistency and security across apps. You can find branding guidelines for Android and Apple at the provided links.
To make integration faster, we’ve prepared a ready-to-use React component <AddCardToWallet/>, which automatically adapts to each platform’s design rules and branding guidelines. It supports multiple languages and utilizes the official assets to ensure compliance.
You can easily render this component within your app to initiate the card addition flow with minimal setup:
import {AddToWalletButton} from '@expensify/react-native-wallet';

<AddToWalletButton
  onPress={addCardToWallet}
  locale="en"
  platform="android"
  buttonStyle={{ height: 50 }}
/>
Pressing this button should trigger the in-app provisioning flow, which opens the appropriate native modal dialog. Given the significant differences between the platforms, we provide two distinct functions: addCardToGoogleWallet and addCardToAppleWallet, which can be used here. These functions handle the specifics of each platform, ensuring that cards are added smoothly and securely.
addCardToGoogleWallet — adding a payment card to Google Wallet
The react-native-wallet library provides a high-level API to integrate push provisioning of payment cards into Google Wallet on Android devices. And the core feature is the addCardToGoogleWallet function, which enables secure and seamless provisioning of a card directly from within your application.
This process is closely tied to the Google TapAndPay SDK and requires coordination with your card issuer to supply key data for the flow, such as the Opaque Payment Card (OPC). The OPC is a binary blob that encapsulates sensitive card metadata, allowing Google Pay to securely communicate with the Token Service Provider (TSP) (such as Visa, Mastercard, or Amex) to tokenize the payment or credit card and add it to Google Wallet.
Let’s look closely at the whole process:
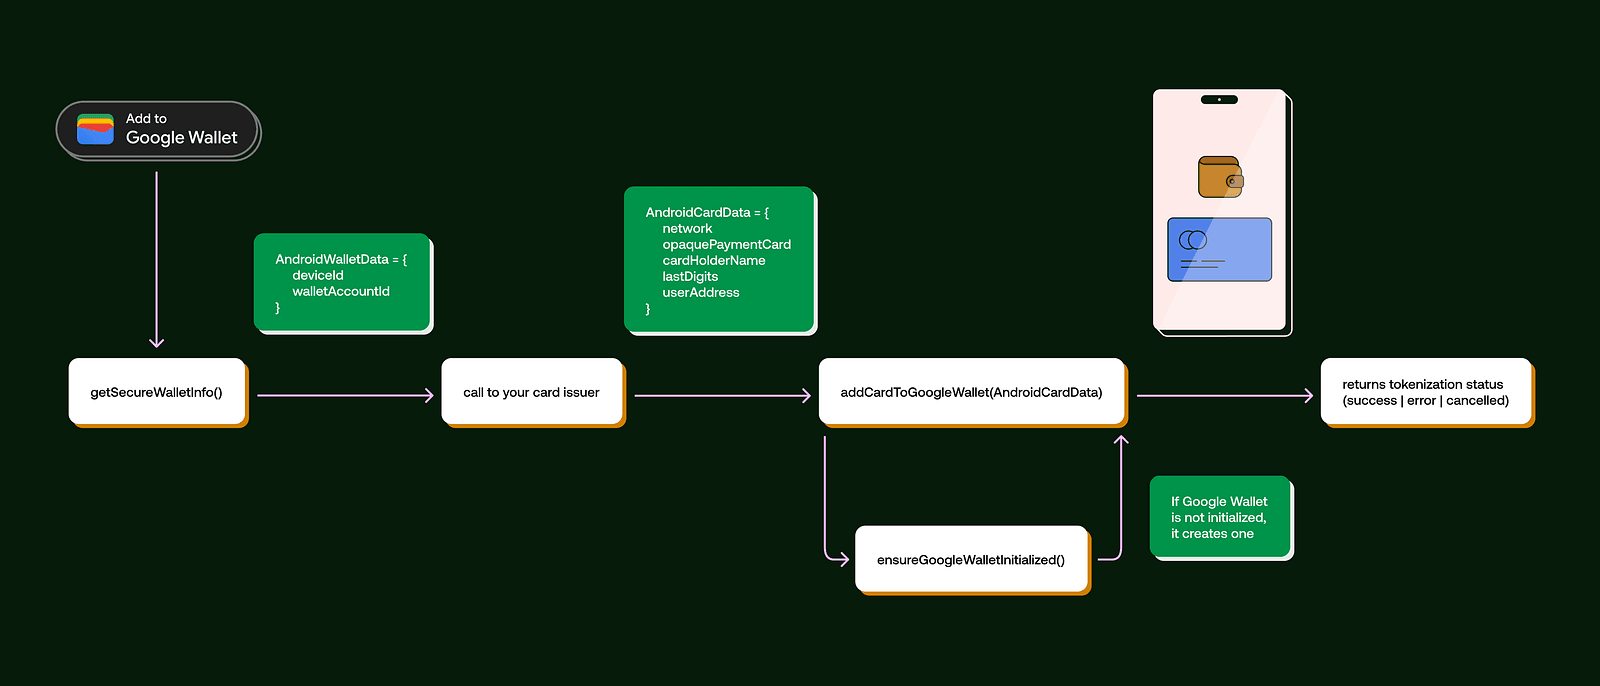
Push provisioning involves a few key steps. Here’s a simple breakdown of what happens from the moment the user taps the button to when the card is successfully added to Google Wallet:
1. User action The flow is initiated by the user tapping a dedicated button in your application.
2. Getting device & wallet info
The process begins by calling getSecureWalletInfo(), a method provided by react-native-wallet. This function returns an AndroidWalletData object, which contains metadata about the user’s device and the current state of Google Wallet on the device.
3. Requesting card data from card issuer
With the secure wallet info in hand, your app must now contact your card issuer to request the AndroidCardData object. This is an important step that is outside of the scope of this library, as it involves issuer-specific APIs and authentication mechanisms. Here is how the data looks:
type AndroidCardData = {
  network: 'VISA' | 'MASTERCARD' | 'AMEX' | 'DISCOVER';
  opaquePaymentCard: string;
  cardHolderName: string;
  lastDigits: string;
  userAddress: UserAddress;
};
This data ensures that the provisioning request is valid and secure, and that it can be handled by Google Pay and the relevant TSP.
4. Adding the card to Google Wallet
Finally, with all the necessary data available, you can call the addCardToGoogleWallet(androidCardData)function. Here’s what it does under the hood:
- First, it checks if Google Wallet is installed and properly set up on the device. If it isn’t, the wallet is created.
- Then, it starts the native Android process to add the card by passing the
AndroidCardDataobject and handling interactions with the Google Pay service. - Finally, it shows the native interface to the user, so they can confirm and complete the card provisioning.
async function addCardToWallet(): Promise<TokenizationStatus> {
  const walletData: AndroidWalletData = await getSecureWalletInfo();
  const cardData: AndroidCardData = await callToYourCardIssuer(walletData);
  const status: TokenizationStatus = await addCardToGoogleWallet(cardData);

  return status;
}
5. Upon successful provisioning, the card is securely added to the user’s Google Wallet and becomes available for NFC payments and use in supported apps. At this point, it’s important to hide the Add to Wallet button to prevent duplicate provisioning attempts. You can do this using the functions provided by react-native-wallet, which are explained in the next section.
The react-native-wallet takes care of most of the push provisioning workflow needed to add a credit or payment card to Google Wallet on Android. It handles interactions with Google Play Services, checks if the device and wallet are ready, and launches the native add-to-wallet interface.
The only part not covered by the library is retrieving the AndroidCardData, which includes the required Opaque Payment Card. This data must be securely obtained from the card issuer and handled on your backend, since it involves issuer-specific APIs and secure data exchange.
Once the AndroidCardData is ready, the library can start the final provisioning step, creating a smooth and integrated experience within your app.
addCardToAppleWallet — adding a payment card to Apple Wallet
addCardToAppleWallet is a key function in the react-native-wallet library that lets users securely add payment and credit cards to Apple Wallet.
The in-app provisioning process for Apple Wallet involves multiple interactions between the issuer app, issuer host, Apple Wallet, Apple servers, and PNO (Payment Network Operators).
Below you can see a simple sequential chart that shows each step of the iOS in‑app provisioning process. It’s a great way to see how addCardToAppleWallet works with Apple’s services to securely add a payment card to your app:

Unlike on Android, the entire in-app provisioning process on Apple is managed by a single function: addCardToAppleWallet. This function requires two parameters:
cardData— this includes essential information such as the card provider network, the last four digits of the card (card suffix), cardholder’s name, and a card description.issuerEncryptPayloadCallback— key callback function that communicates with your backend and the card issuer to secure the necessary encrypted token for the wallet entry.
The function handles the entire card addition flow, managing all required interactions with Apple Wallet, Apple servers, and the PNO. It makes adding payment cards much easier by taking care of the complicated tasks, so all you need to do is connect with your card issuer. To initiate adding a card, users tap the “Add Card to Apple Wallet” button, which triggers the addCardToAppleWallet function and opens a native modal (step 1).
Next, users can select the device (like their iPhone or a paired Apple Watch) where they want to add the card, and review the card details before confirming. After users proceed, Apple Wallet requests the public certificates it needs from Apple servers to encrypt the payment data (steps 2 and 3). These certificates, along with a nonce and its signature are passed to issuerEncryptPayloadCallback. This function sends the data to your card issuer, who then generates several key pieces of information essential for the provisioning process (step 5):
ephemeralPublicKey— ephemeral private key and public key that will be used for provisioning attempts only;encryptedPassData— encrypted data with shared key from certificates and generated private key;activationData— cryptographic OTP generated according to the PNO or service provider specifications.
This data is returned to Apple Wallet, where it’s validated by Apple Servers (step 6) and PNO or service provider (step 7). After successful validation, the PNO displays the terms and conditions in the provisioning modal for the user to review and approve (step 8). When accepted (step 9), the PNO runs final validation checks and sends out the successful card activation status back to our library through Apple Servers (step 10) (you can dive into more details in the Apple in-app provisioning documentation). Then, our library captures the delegate call, and if everything is fine, it displays a confirmation screen indicating the card was added successfully (step 11).
Here’s a simple example of how you can initiate Apple Wallet in-app provisioning in your app:
addCardToAppleWallet(
  {
    network: ‘VISA’, // also supports ‘MASTERCARD’, ‘AMEX’ and ‘DISCOVER’
    lastDigits: ‘2468’,
    cardHolderName: ‘John Smith’,
    cardDescription: ‘Visa World Intensive’,
  },
  issuerEncryptPayloadCallback,
);
Your issuerEncryptPayloadCallback may look like that:
async function issuerEncryptPayloadCallback(
  nonce: string,
  nonceSignature: string,
  certificates: string[],
) {
  const response = … // call to your backend / card issuer to encrypt card data
  return {
    encryptedPassData: response.encryptedPassData,
    activationData: response.activationData,
    ephemeralPublicKey: response.ephemeralPublicKey,
  } as IOSEncryptPayload;
}
As you can see, the addCardToAppleWallet function encapsulates all the previously described steps into a simple and manageable function. It automates the complex interactions needed for secure card provisioning in Apple Wallet. This not only speeds up development but also ensures your integration complies with all of Apple’s standards.
Checking the card status
Once a payment or credit card has been successfully added to Apple or Google Wallet, it’s important to update the visibility of the “Add to Wallet” button based on the card’s status. This isn’t just a UX improvement — it’s a requirement clearly outlined in the branding guidelines of both platforms.
To help developers meet platform requirements and pass app store reviews, react-native-wallet includes dedicated functions for checking a card’s status in the wallet. The library provides two methods to retrieve this status:
getCardStatusBySuffix— this function fetches the card’s status using the last four digits of the card number. It’s a straightforward approach when the full card details aren’t available to the user.getCardStatusByIdentifier— for a more precise query, this function uses a unique card identifier token when more detailed card information is available.
Both functions use a specified argument to identify the correct card among those linked to the app in the user’s digital wallet. Cards can have various statuses such as active, deactivated, suspended, pending or requiring activation. If the card isn’t found in the wallet or isn’t associated with your app, a “not found” status is returned, indicating that no further action is needed for that card.
Adding payment cards to Apple & Google Wallet with react-native-wallet
react-native-wallet makes adding payment and credit cards to digital wallets on iOS and Android much easier. It simplifies complex processes by wrapping native SDKs into straightforward React Native functions, saving you development costs and time. The package is available via npm — give it a try and feel free to report any issues through our GitHub repository!
npm install @expensify/react-native-wallet Disclaimer: Please keep in mind that while the library handles all the technical aspects of in-app provisioning, you’ll still need the proper permissions from Google and Apple to use it fully. Additionally, you need to set up your payment cards to link with your app and manage communication with your card issuer. Without these steps, digital wallets won’t be accessible, and the card addition process could encounter many errors. All the necessary details are clearly outlined in the repo’s README.
We hope you find this guide to the react-native-wallet library helpful. It was a team effort, with special thanks to Zuzanna Furtak for her valuable contributions. Our goal is to share accurate and practical information to support your work.
This project is developed and maintained by Software Mansion, in collaboration with Expensify. We’re a software agency specializing in web and mobile app development. As React Native core contributors and creators of the Membrane multimedia framework, we’re experts in tackling all kinds of React Native and WebRTC challenges. Ready to build your next dream product or need help integrating react-native-wallet into your project? Let’s work together — hire us.