Integrating Deferred Deep Linking in React Native Apps
 Bartłomiej Krasoń•Apr 24, 2026•9 min read
Deferred deep linking allows mobile apps to route users to specific in-app content even if the app wasn't installed when the link was clicked – closing the attribution gap. Instead of landing on a generic home screen after install, the user is taken exactly where they were headed.
This tutorial focuses on the technical implementation using Detour – a deferred deep linking tool build with developers in mind. We will focus on the technical implementation: getting the SDK running, handling the install ‘snapshot’, and passing custom data through app installation into your navigation.
Configuring deferred deep links: Detour dashboard setup
As I’ve mentioned, for deferred deep linking to work, we need a middleman to persist information between the click and the app installation. This requires simple configuration in our dashboard.
First, sign up and create an organization and your application. If you have multiple environments, we suggest creating separate apps using a naming convention like <your-app>-staging and <your-app>-production.
iOS requirements
Bundle ID: found in your Xcode project settings under the General tab, or in the Apple Developer Portal under “Identifiers.”
Team ID: located in your Apple Developer Account under the “Membership” section.
App Store ID: once your app is created in App Store Connect, you can find this string under “App Information” -> “Apple ID”.
Android requirements
Package name: this is your applicationId, found in your app-level
build.gradlefile.Production certificate (SHA-256): since you’re likely using Google Play App Signing, you must grab this from the Google Play Console.
Debug certificate (SHA-256): used for testing during local development. You can find this by running
./gradlewsigningReport in your/androidfolder.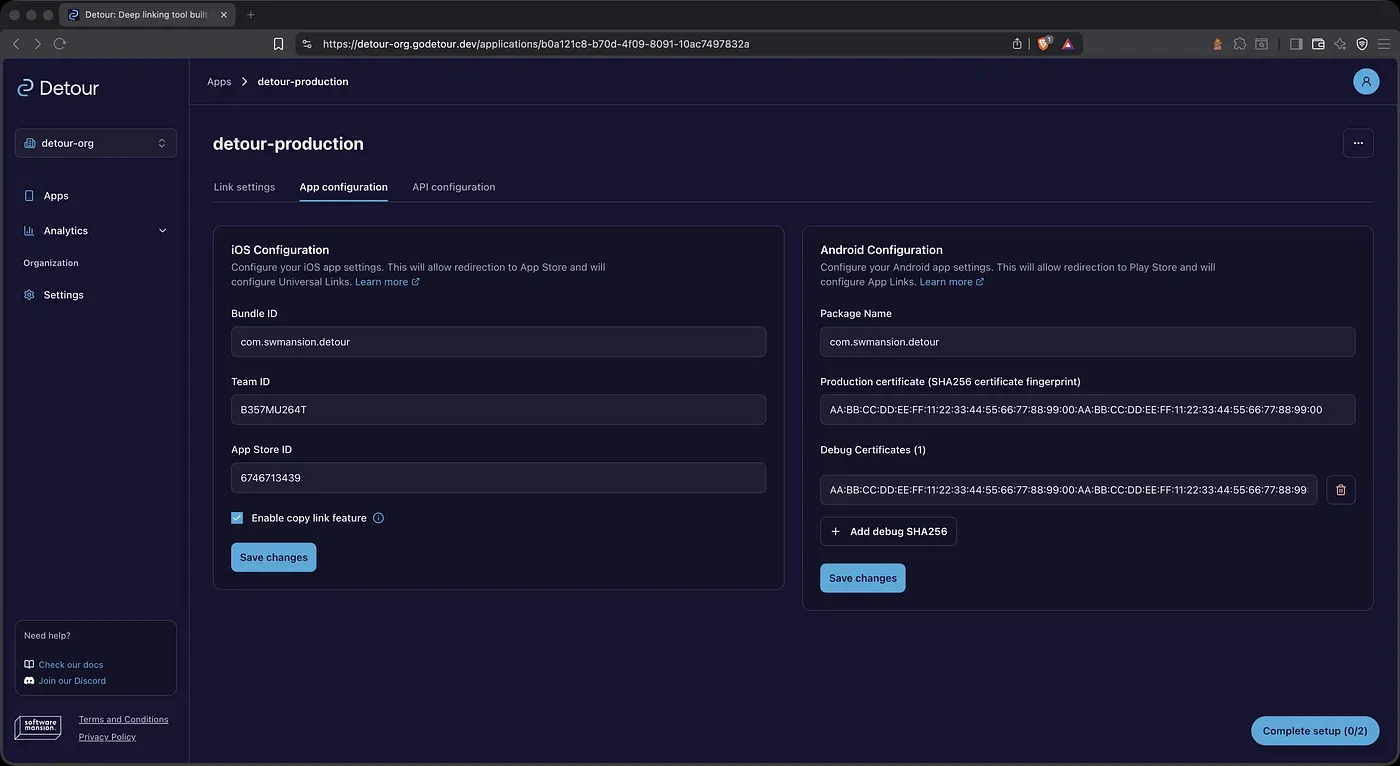
App configuration in the Detour panel
There is also an option to improve matching efficiency by using clipboard content. While not required, it serves as a common workaround for iOS privacy restrictions and helps boost accuracy in some scenarios.
Installing the deferred deep linking SDK for React Native
Note: since react-native-detour was our first SDK (and remains our most refined one) I’ll be using it as the example for this article.
First, you’ll need to install the SDK using the package manager of your choice:
bun add @swmansion/react-native-detourFor fingerprinting purposes, there are a few other required dependencies responsible for extracting device signals. We highly recommend using @swmansion/react-native-detour v2.0.0 or higher, as it allows you to skip the prebuild requirement entirely.
npx expo install expo-application expo-clipboard expo-constants expo-device expo-localization @react-native-async-storage/async-storageNote: have in mind that @react-native-async-storage/async-storage is optional. If you’re using a different storage solution in your project, you can provide a custom storage adapter in the config, as described here.
Next, for the universal links part to work, paste your associatedDomains and intentFilters to your app.json.
{
  "expo": {
    "ios": {
      "associatedDomains": ["applinks:<your-host>"]
    },
    "android": {
      "intentFilters": [
        {
          "action": "VIEW",
          "autoVerify": true,
          "data": [
            {
              "scheme": "https",
              "host": "<your-host>",
              "pathPrefix": "/<hash-included-in-link>"
            }
          ],
          "category": ["BROWSABLE", "DEFAULT"]
        }
      ]
    },
  }
}
Finally, you’ll need to pass your credentials to DetourProvider and — depending on your app's navigation structure — to createDetourNativeIntentHandler. However, because our example will be using +native-intent with the default intercept mode, providing a configuration to the intent handler is not required here.
Overall, we recommend using expo-router with a +native-intent file, as we find it the most natural way to handle deferred deep links. However, you can also use Detour with:
// src/app/_layout.tsx
const detourConfig: Config = {
 apiKey: process.env.EXPO_PUBLIC_DETOUR_API_KEY!,
 appID: process.env.EXPO_PUBLIC_DETOUR_APP_ID!,
 …
};
SplashScreen.preventAutoHideAsync();
export default function RootLayout() {
 return (
   <DetourProvider config={detourConfig}>
     <RootNavigator />
   </DetourProvider>
 );
}
After that, you should be able to extract the necessary info through useDetourContext.
Integrating deferred deep links with expo-router
The library handles the fingerprinting logic, but the biggest headache for developers has always been navigation integration. Auth gates, deep nesting, weird glitches, or the same deferred link triggering multiple times – are just a few of the common pain points that come to mind.
For the sake of this example, let’s simplify the structure: we’ll use an app with a sign-in screen, as well as a tab navigator and an onboarding screen – both of which are protected by an auth gate.
First, create a src/app/+native-intent.tsx file, define a detour native handler, and specify your root path as a fallback.
// src/app/+native-intent.tsx
import { createDetourNativeIntentHandler } from '@swmansion/react-native-detour/expo-router';
import { detourConfig } from '_layout.tsx';


const detourHandler = createDetourNativeIntentHandler({
  hosts: [/\.godetour\.link$/i],
  fallbackPath: "/",
});


export async function redirectSystemPath(args: { path: string; initial: boolean }) {
  const detourResult = await detourHandler(args);
  if (detourResult !== args.path) {
    return detourResult;
  }


  // fallbackPath only applies to Detour host matches. Any other URL-like
  // path here (custom scheme such as myapp://details) would otherwise be passed through to Expo Router,
  // which would try to route to it and paint +not-found before
  // useDetourGate can react to link/auth state. Send it to "/" instead so
  // the SDK-resolved link in useDetourContext() drives navigation.
  if (args.path.includes("://") || args.path.startsWith("//")) {
    return "/";
  }


  return args.path;
}
Now, you need to consume a link. You can achieve that using useDetourContext. In case of the app with an auth flow, it would usually be placed inside of the auth gate of some sort — for this example let’s use useDetourGate that will extract the link and based on auth status and whether the onboarding was finished, will decide what to do next.
// src/hooks/useDetourGate.ts
import { useEffect, useRef } from "react";


import { useRouter } from "expo-router";
import * as SplashScreen from "expo-splash-screen";


import { useDetourContext } from "@swmansion/react-native-detour";


import { useAuth } from "./auth";


export const useDetourGate = () => {
  const { isLinkProcessed, link, clearLink } = useDetourContext();
  const { isLoaded, isSignedIn, isOnboardingCompleted } = useAuth();
  const router = useRouter();


  // Guards the "normal startup" branch so it only fires once per sign-in
  // session. Set to true after any successful navigation; reset on sign-out.
  const initialNavigationFired = useRef(false);


  useEffect(() => {
    if (!isLinkProcessed || !isLoaded) return;


    if (!isSignedIn) {
      SplashScreen.hideAsync();
      initialNavigationFired.current = false;
      router.replace("/sign-in");
      return;
    }


    if (link) {
      initialNavigationFired.current = true;


      // Onboarding must run once before the deep link destination is shown.
      // Keep the link alive so this branch re-fires after onboarding completes.
      if (!isOnboardingCompleted) {
        SplashScreen.hideAsync();
        router.replace("/(app)/onboarding");
        return;
      }


      // Onboarding done — navigate to the link destination.
      // Mark before clearLink so the re-fire caused by link→null is skipped.
      clearLink();
      SplashScreen.hideAsync();
      router.replace({
        pathname: link.route as any,
        params: { fromDeepLink: "true", linkType: link.type, ...link.params },
      });
      return;
    }


    if (initialNavigationFired.current) return;
    initialNavigationFired.current = true;


    SplashScreen.hideAsync();
    if (!isOnboardingCompleted) {
      router.replace("/(app)/onboarding");
    } else {
      router.replace("/(app)/(tabs)");
    }
  }, [clearLink, isLoaded, isLinkProcessed, isOnboardingCompleted, isSignedIn, link, router]);
};
The only remaining thing would be to just use this hook in the root layout, somewhere below DetourProvider and everything should be set in place.
// src/app/_layout.tsx
import { Stack } from 'expo-router';
import { DetourProvider, type Config } from '@swmansion/react-native-detour';
import { useDetourGate } from '@hooks/useDetourGate';
import { AuthProvider, useAuth } from "../auth";


...
const AppStack = () => {
  const { isSignedIn } = useAuth();
  useDetourGate();


  return (
    <Stack screenOptions={rootScreenOptions}>
      <Stack.Protected guard={isSignedIn}>
        <Stack.Screen name="(app)" />
      </Stack.Protected>
      <Stack.Protected guard={!isSignedIn}>
        <Stack.Screen name="sign-in" />
      </Stack.Protected>
      <Stack.Screen name="+not-found" />
    </Stack>
  );
};


export const detourConfig: Config = {
  apiKey: process.env.EXPO_PUBLIC_DETOUR_API_KEY!,
  appID: process.env.EXPO_PUBLIC_DETOUR_APP_ID!,
  shouldUseClipboard: true,
};


export default function RootLayout() {
  return (
    <AuthProvider>
      <DetourProvider config={detourConfig}>
        <AppStack />
      </DetourProvider>
    </AuthProvider>
  );
}
Customizing React Native deep link parameters and short links
By default, every application in our dashboard has a link assigned to it, to which you can append any URL parameters you want:
https://your-org.godetour.link/<app-id>
For example, if you wanted to redirect to (app)/details, you would just append this path:
https://your-org.godetour.link/<app-id>/(app)/details
And if you wanted to let’s say track a marketing campaign, you would add the UTM properties like that:
https://your-org.godetour.link/<app-id>/(app)/details utm_source=SP&utm_origin=web&utm_screen=header
Keeping the link clean
While this manual approach is highly flexible, adding too many parameters can result in long, unwieldy URLs that aren’t ideal for public-facing content.
The solution is to create a short link within our management panel. This allows you to predefine your parameter list and condense the entire string into a clean, professional-looking hash that is much easier to share.
Testing deferred deep links in React Native
Verifying this flow is straightforward, though there are a few platform-specific nuances to keep in mind:
Store presence: your application must be available on the App Store or Google Play Store to successfully complete the required redirect chain.
Android referrer API: while simulating this API often requires specific workarounds, you can easily verify the flow using probabilistic matching as a simpler alternative.
Development builds: you must install your development build to ensure the application identifies and enforces the correct behavior after the redirect.
With all these considerations in place, you can just test your link by opening it in your browser, or by scanning the QR code from our panel.
Handling web fallback for React Native deep links
While this process is optimized for mobile apps, you may wonder what happens when a user clicks a link on a desktop browser. By default, users are redirected to the App Store or Google Play; however, if you have a relevant website, you can configure it as a fallback URL. Furthermore, if your links include specific attribution parameters – such as a chat invitation ID – you can choose to pass these through to your web platform and handle everything in there as well.
Improving deep link matching accuracy and time window
In some cases, the matching score might not be high enough for the process to succeed. While the default value is 850, you can always adjust this in our panel if there is a high probability that certain attribution parameters might not be captured properly.
The same flexibility applies to the matching time window – the duration between the initial user click and the matching process once the app download is complete. By default, this is set to 15 minutes, which is typically sufficient for a standard installation, but the setting is customizable to fit your specific case.
Have any questions? The Detour team is here to help
We’re building Detour specifically for developers, which means your feedback is our roadmap. If you have questions or feature ideas, please reach out to us:
On our Discord
Directly through our email – contact@godetour.dev
And if there are any technical details you are interested in, check out our documentation and examples