

Integrating Deferred Deep Linking in Android Apps
Deferred deep linking allows mobile apps to route users to specific in-app content even if the app wasn’t installed when the link was clicked – closing the attribution gap. Instead of landing on a generic home screen after install, the user is taken exactly where they were headed.
This tutorial focuses on the technical implementation using Detour – a deferred deep linking tool build with developers in mind. We will focus on the technical implementation: getting the SDK running, handling the install ‘snapshot’, and passing custom data through app installation into your navigation.
Deep link vs. deferred deep link: what's the difference in Android
A deep link routes a user directly to a specific screen in your app – but only if the app is already installed. A deferred deep link does the same, but also survives the app installation process: if the app isn't installed yet, the link preserves the user's intended destination and context, routing them to the right screen on the very first open.
In practice, every deferred deep link is a deep link, just with an extra fallback path: install → first launch → match → route. That's the flow this guide walks through step by step, and it's also why iOS needs probabilistic matching (covered later) – unlike Android, there's no install referrer to rely on, so the SDK has to reconstruct the original link from device signals after the fact.
Configuring deferred deep links: Detour dashboard setup
As I've mentioned, for deferred deep linking to work, we need a middleman to persist information between the click and the app installation. This requires simple configuration in our dashboard.
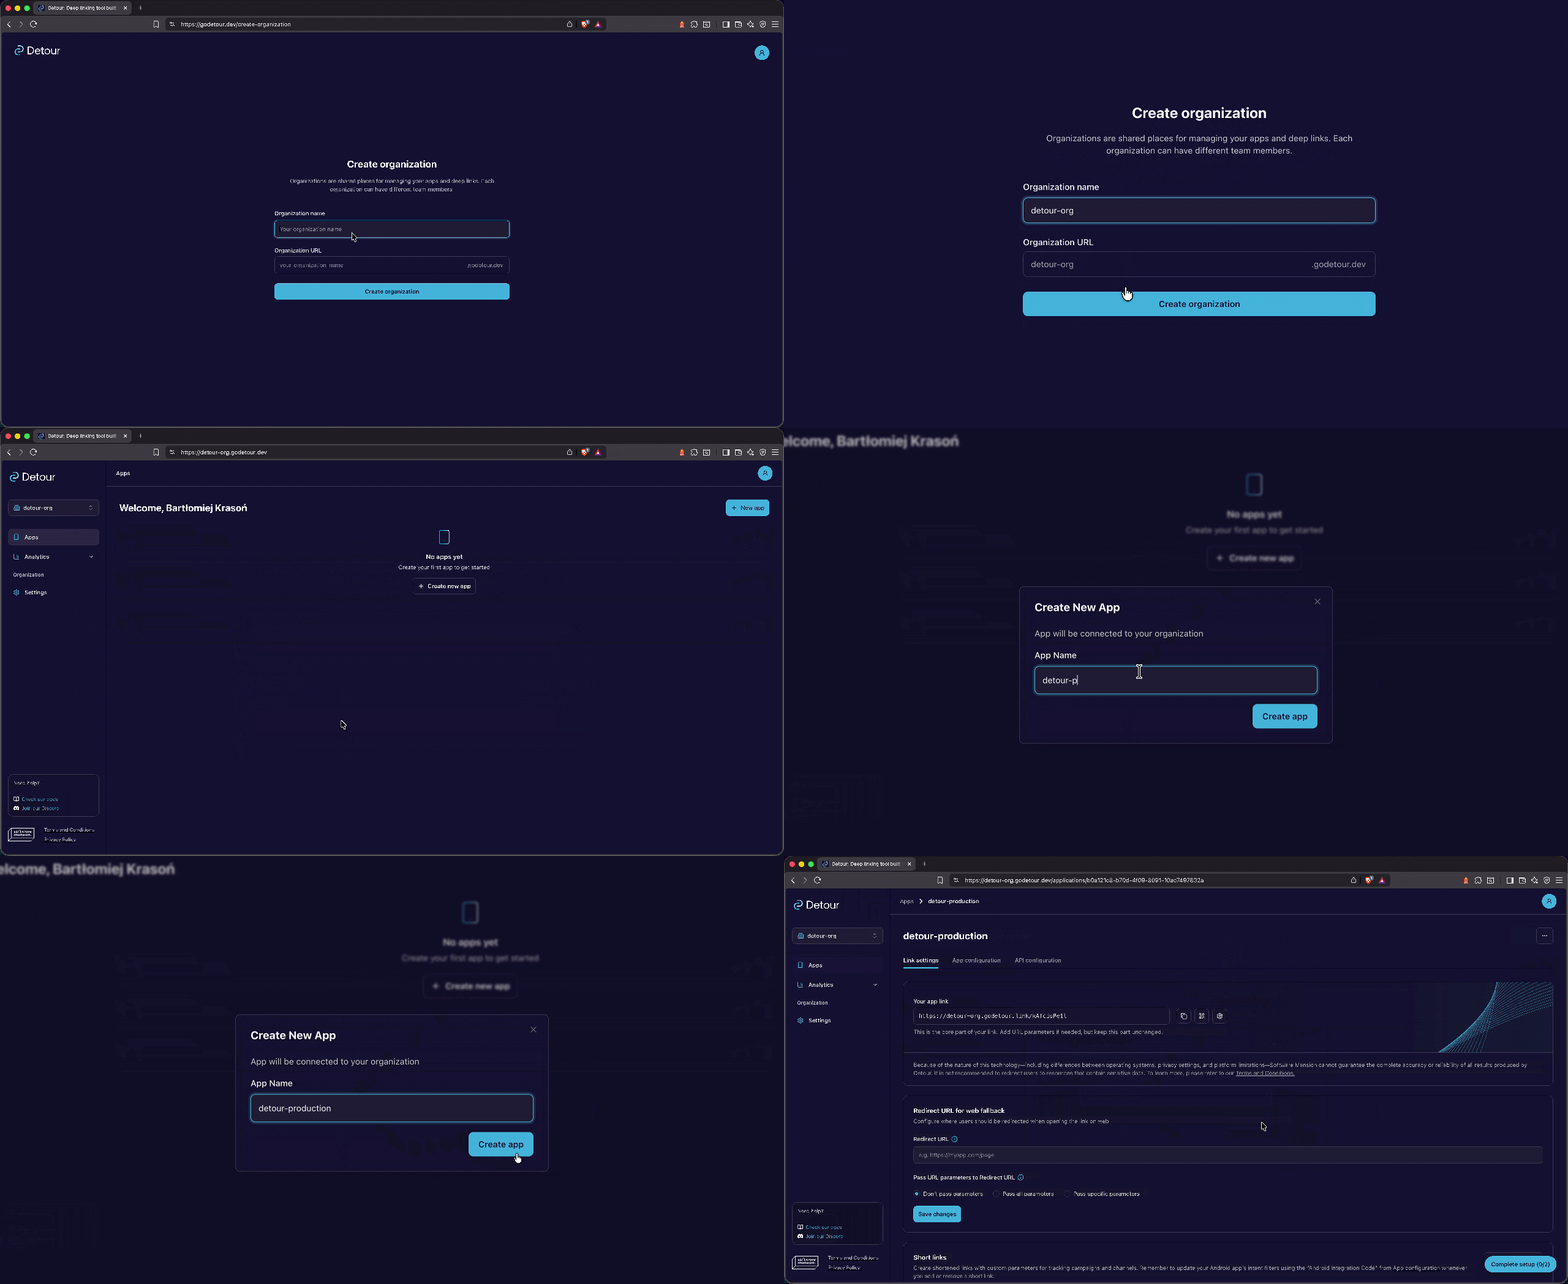
First, sign up and create an organization and your application. If you have multiple environments, we suggest creating separate apps using a naming convention like <your-app>-staging and <your-app>-production.
Android requirements
- Package name: this is your
applicationId, found in your app-levelbuild.gradlefile. - Production certificate (SHA-256): since you're likely using Google Play App Signing, you must grab this from the Google Play Console.
- Debug certificate (SHA-256): used for testing during local development. You can find this by running
./gradlew signingReport.
The fingerprint has to match the key that actually signed the build on the device – App Links only open your app when it does.
iOS requirements
If your product ships on iOS as well, fill in the iOS card too – Bundle ID, Team ID, and App Store ID.
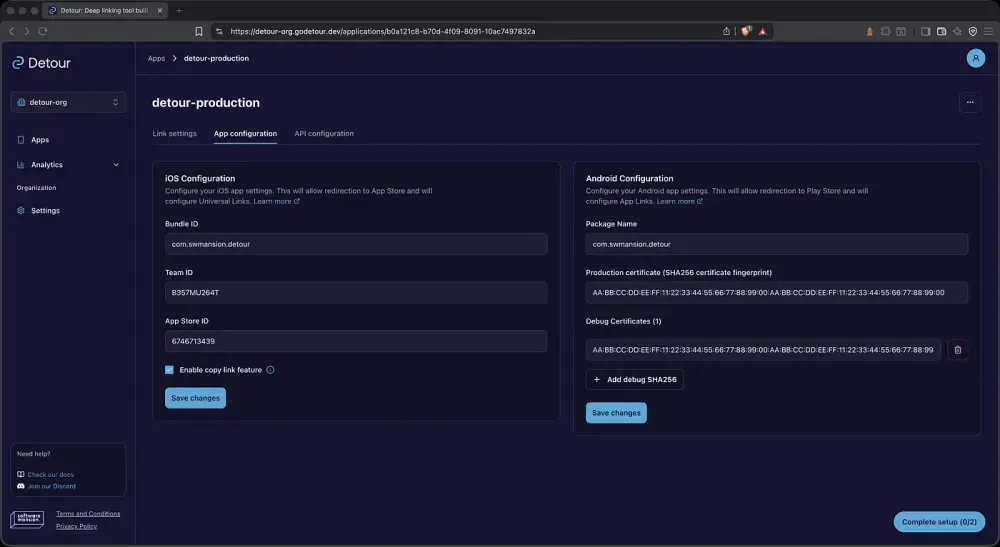
There is also an option to improve matching efficiency by using clipboard content.
Installing the deferred deep linking SDK for Android
This guide covers Android; if you're on a different stack, we have companion guides for React Native, iOS, and Flutter.
The Android SDK is a plain Gradle dependency. It requires min SDK 21, Kotlin 2.0+, and a JVM target of 11.
// app/build.gradle.kts
dependencies {
    implementation("com.swmansion.detour:detour-sdk:1.1.0")
}
Keep google() and mavenCentral() in your repositories and that's the whole installation – there are no companion packages to pull in for fingerprinting, since the SDK reads device signals from the platform directly.
Credentials shouldn't be hardcoded. The pattern used across our example apps is to route them through BuildConfig:
// app/build.gradle.kts
buildConfigField("String", "DETOUR_API_KEY", "\"${secrets["DETOUR_API_KEY"] ?: ""}\"")
buildConfigField("String", "DETOUR_APP_ID", "\"${secrets["DETOUR_APP_ID"] ?: ""}\"")
Next, for the App Links part to work, paste the integration snippet generated in the dashboard into your AndroidManifest.xml:
<activity
  android:name=".MainActivity"
  android:exported="true">
  <intent-filter android:autoVerify="true">
    <action android:name="android.intent.action.VIEW" />
    <category android:name="android.intent.category.DEFAULT" />
    <category android:name="android.intent.category.BROWSABLE" />
    <data android:scheme="https" />
    <data android:host="<your-host>" />
    <data android:pathPrefix="/<your-app-hash>" />
  </intent-filter>
</activity>
If you also want custom scheme links, add a second intent filter with <data android:scheme="myapp" />. Without these entries, Android will never dispatch the link to your app in the first place.
Finally, define your config and initialize the SDK once, before anything tries to process a link:
val config = DetourConfig(
    apiKey = BuildConfig.DETOUR_API_KEY,
    appId = BuildConfig.DETOUR_APP_ID,
    linkProcessingMode = LinkProcessingMode.ALL,
)

Detour.initialize(applicationContext, config)
linkProcessingMode decides which link sources the SDK claims. ALL is the default and handles App Links, custom schemes, and deferred links. WEB_ONLY skips custom schemes, and DEFERRED_ONLY leaves every runtime intent to your own navigation stack and resolves deferred links only – which is the mode you want if Jetpack Navigation already owns your deep links.
One more thing worth knowing: the SDK stores a first-launch flag and a device ID in SharedPreferences. If you want it kept somewhere else, pass your own storage in the config:
val config = DetourConfig(
    apiKey = BuildConfig.DETOUR_API_KEY,
    appId = BuildConfig.DETOUR_APP_ID,
    linkProcessingMode = LinkProcessingMode.ALL,
    storage = MyStorage(context),
)
The custom storage docs have a ready example.
Integrating deferred deep links with Navigation Compose
The library handles the fingerprinting logic, but the biggest headache for developers has always been navigation integration. Auth gates, deep nesting, weird glitches, or the same deferred link triggering multiple times – are just a few of the common pain points that come to mind.
For the sake of this example, let's simplify the structure: we'll use an app with a sign-in screen, as well as a home screen and an onboarding screen – both of which are protected by an auth gate.
The lifecycle side is handled by DetourDelegate. It wraps the coroutine calls to Detour.processLink(), ties them to your LifecycleOwner, and hands you a LinkResult in a callback. You wire it into two places – onCreate for the launching intent and cold-start deferred resolution, and onNewIntent for links that arrive while the app is already running:
// MainActivity.kt
class MainActivity : AppCompatActivity() {

    private val linkViewModel: DetourLinkViewModel by viewModels()

    private val detourDelegate by lazy {
        DetourDelegate(
            lifecycleOwner = this,
            config = DetourConfig(
                apiKey = BuildConfig.DETOUR_API_KEY,
                appId = BuildConfig.DETOUR_APP_ID,
                linkProcessingMode = LinkProcessingMode.ALL,
            ),
            onLinkResult = { result -> linkViewModel.onLinkResult(result) },
        )
    }

    override fun onCreate(savedInstanceState: Bundle?) {
        val splashScreen = installSplashScreen()
        super.onCreate(savedInstanceState)

        // Hold the system splash until the SDK tells us whether there is a link.
        splashScreen.setKeepOnScreenCondition { !linkViewModel.state.value.isLinkProcessed }

        Detour.initialize(this, detourDelegate.config)
        detourDelegate.onCreate(intent)

        setContent { AppRoot(linkViewModel = linkViewModel) }
    }

    override fun onNewIntent(intent: Intent) {
        super.onNewIntent(intent)
        setIntent(intent)
        detourDelegate.onNewIntent(intent)
    }
}
The callback gives you a sealed LinkResult, and collapsing it into a single piece of UI state is what makes the gate readable later. Note that only Success carries a link – the other three branches all mean "carry on with a normal launch", and the important thing is that every one of them still flips isLinkProcessed, otherwise your splash never goes away:
// DetourLinkViewModel.kt
data class DetourLinkState(
    val isLinkProcessed: Boolean = false,
    val link: LinkResult.Success? = null,
)

class DetourLinkViewModel : ViewModel() {
    private val _state = MutableStateFlow(DetourLinkState())
    val state: StateFlow<DetourLinkState> = _state.asStateFlow()

    fun onLinkResult(result: LinkResult) {
        _state.update { current ->
            when (result) {
                is LinkResult.Success -> current.copy(isLinkProcessed = true, link = result)
                // Deferred flow already consumed for this install.
                is LinkResult.NotFirstLaunch -> current.copy(isLinkProcessed = true)
                is LinkResult.NoLink -> current.copy(isLinkProcessed = true)
                is LinkResult.Error -> {
                    Log.e(TAG, "Link processing failed", result.exception)
                    current.copy(isLinkProcessed = true)
                }
            }
        }
    }

    fun clearLink() = _state.update { it.copy(link = null) }

    private companion object {
        const val TAG = "DetourLinkViewModel"
    }
}
Now the gate itself. It has to wait for both the SDK and your auth layer, survive an onboarding detour without dropping the link, and not re-navigate on every recomposition:
// AppRoot.kt
@Composable
fun AppRoot(
    linkViewModel: DetourLinkViewModel,
    authViewModel: AuthViewModel = viewModel(),
) {
    val navController = rememberNavController()
    val linkState by linkViewModel.state.collectAsStateWithLifecycle()
    val auth by authViewModel.state.collectAsStateWithLifecycle()

    // Guards the "normal startup" branch so it only fires once per sign-in
    // session. Set to true after any successful navigation; reset on sign-out.
    var initialNavigationFired by rememberSaveable { mutableStateOf(false) }

    LaunchedEffect(linkState, auth) {
        if (!linkState.isLinkProcessed || !auth.isLoaded) return@LaunchedEffect

        if (!auth.isSignedIn) {
            initialNavigationFired = false
            navController.navigateAsRoot(Route.SignIn)
            return@LaunchedEffect
        }

        val link = linkState.link
        if (link != null) {
            initialNavigationFired = true

            // Onboarding must run once before the deep link destination is shown.
            // Keep the link alive so this branch re-fires after onboarding completes.
            if (!auth.isOnboardingCompleted) {
                navController.navigateAsRoot(Route.Onboarding)
                return@LaunchedEffect
            }

            // Onboarding done — navigate to the link destination.
            // Clear before navigating so the re-fire caused by link→null is skipped.
            val destination = link.toRoute()
            linkViewModel.clearLink()
            navController.navigateAsRoot(destination)
            return@LaunchedEffect
        }

        if (initialNavigationFired) return@LaunchedEffect
        initialNavigationFired = true

        navController.navigateAsRoot(
            if (auth.isOnboardingCompleted) Route.Home else Route.Onboarding
        )
    }

    NavHost(navController = navController, startDestination = Route.Splash) {
        composable<Route.Splash> { SplashScreen() }
        composable<Route.SignIn> { SignInScreen() }
        composable<Route.Onboarding> { OnboardingScreen() }
        composable<Route.Home> { HomeScreen() }
        composable<Route.Product> { entry -> ProductScreen(entry.toRoute<Route.Product>()) }
    }
}

private fun NavController.navigateAsRoot(route: Route) = navigate(route) {
    popUpTo(graph.id) { inclusive = true }
    launchSingleTop = true
}
The only piece left is turning the link into one of your typed routes. LinkResult.Success gives you url, route (path plus query), pathname (path only), params (the query parsed into a map), and type, which tells you whether the link arrived as DEFERRED, VERIFIED, or SCHEME:
private fun LinkResult.Success.toRoute(): Route = when {
    pathname.startsWith("/products/") ->
        Route.Product(
            id = pathname.removePrefix("/products/").trim('/'),
            campaign = params["utm_source"],
        )

    pathname.startsWith("/promo") -> Route.Promo

    else -> Route.Home
}
Because type is on the same object, one branch of your routing code covers deferred installs, App Links, and scheme links alike – which is the main practical difference from wiring each of them up separately.
Customizing Android deep link parameters and short links
By default, every application in our dashboard has a link assigned to it, to which you can append any URL parameters you want:
https://your-org.godetour.link/<app-id>
For example, if you wanted to redirect to a product screen, you would just append this path:
https://your-org.godetour.link/<app-id>/products/42
And if you wanted to let's say track a marketing campaign, you would add the UTM properties like that:
https://your-org.godetour.link/<app-id>/products/42?utm_source=SP&utm_origin=web&utm_screen=header
Everything after the app hash lands in result.route, and the query string is parsed into result.params for you.
Keeping the link clean
While this manual approach is highly flexible, adding too many parameters can result in long, unwieldy URLs that aren't ideal for public-facing content.
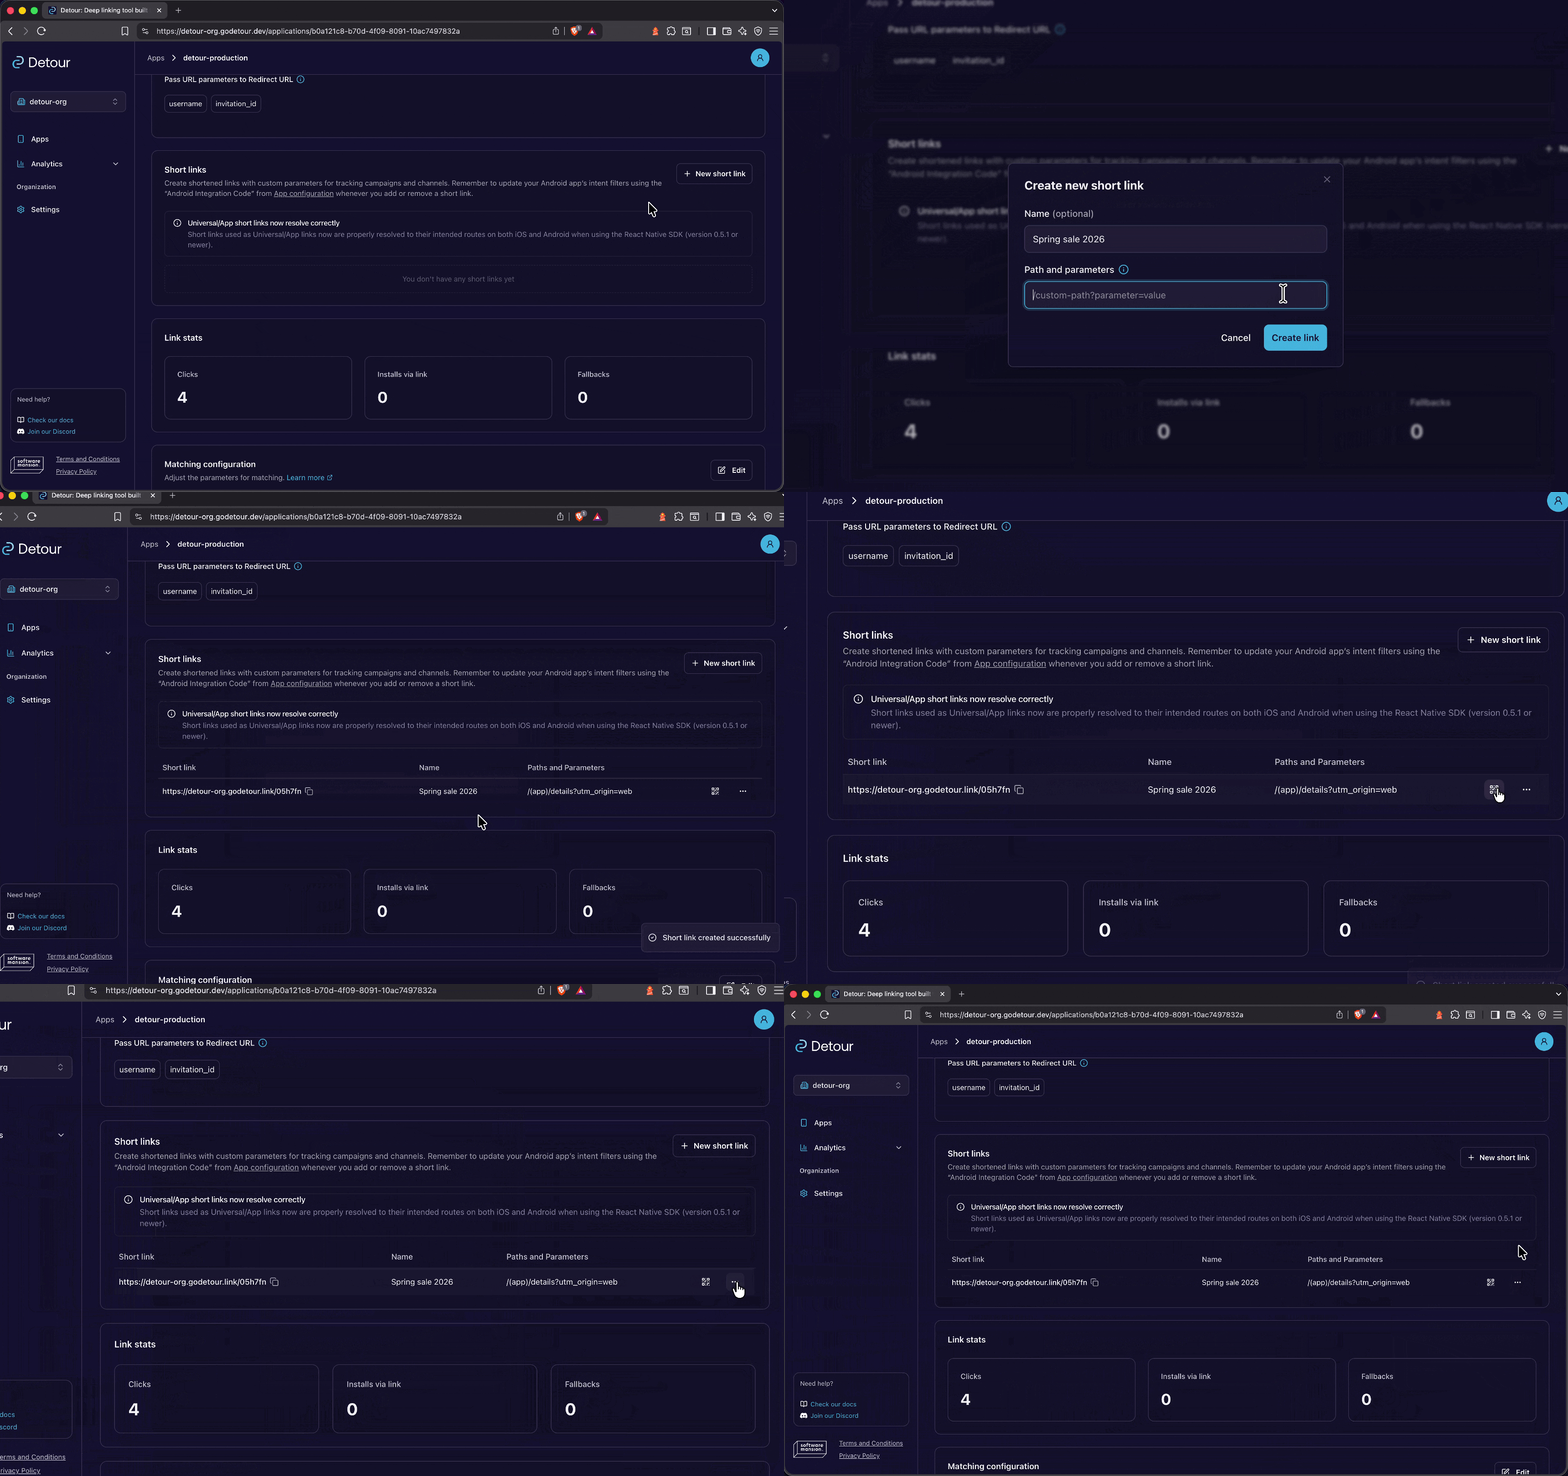
The solution is to create a short link within our management panel. This allows you to predefine your parameter list and condense the entire string into a clean, professional-looking hash that is much easier to share.
Testing deferred deep links in Android
Verifying this flow is straightforward, though there are a few platform-specific nuances to keep in mind:
- Store presence: your application must be available on the Google Play Store to successfully complete the required redirect chain.
- Android referrer API: while simulating this API often requires specific workarounds, you can easily verify the flow using probabilistic matching as a simpler alternative.
- First launch only: deferred matching runs on the first launch after install, so reinstall the app between test runs.
With all these considerations in place, you can just test your link by opening it in your browser, or by scanning the QR code from our panel.
For ADB commands plus a troubleshooting checklist, see the testing docs.
Handling web fallback for Android deep links
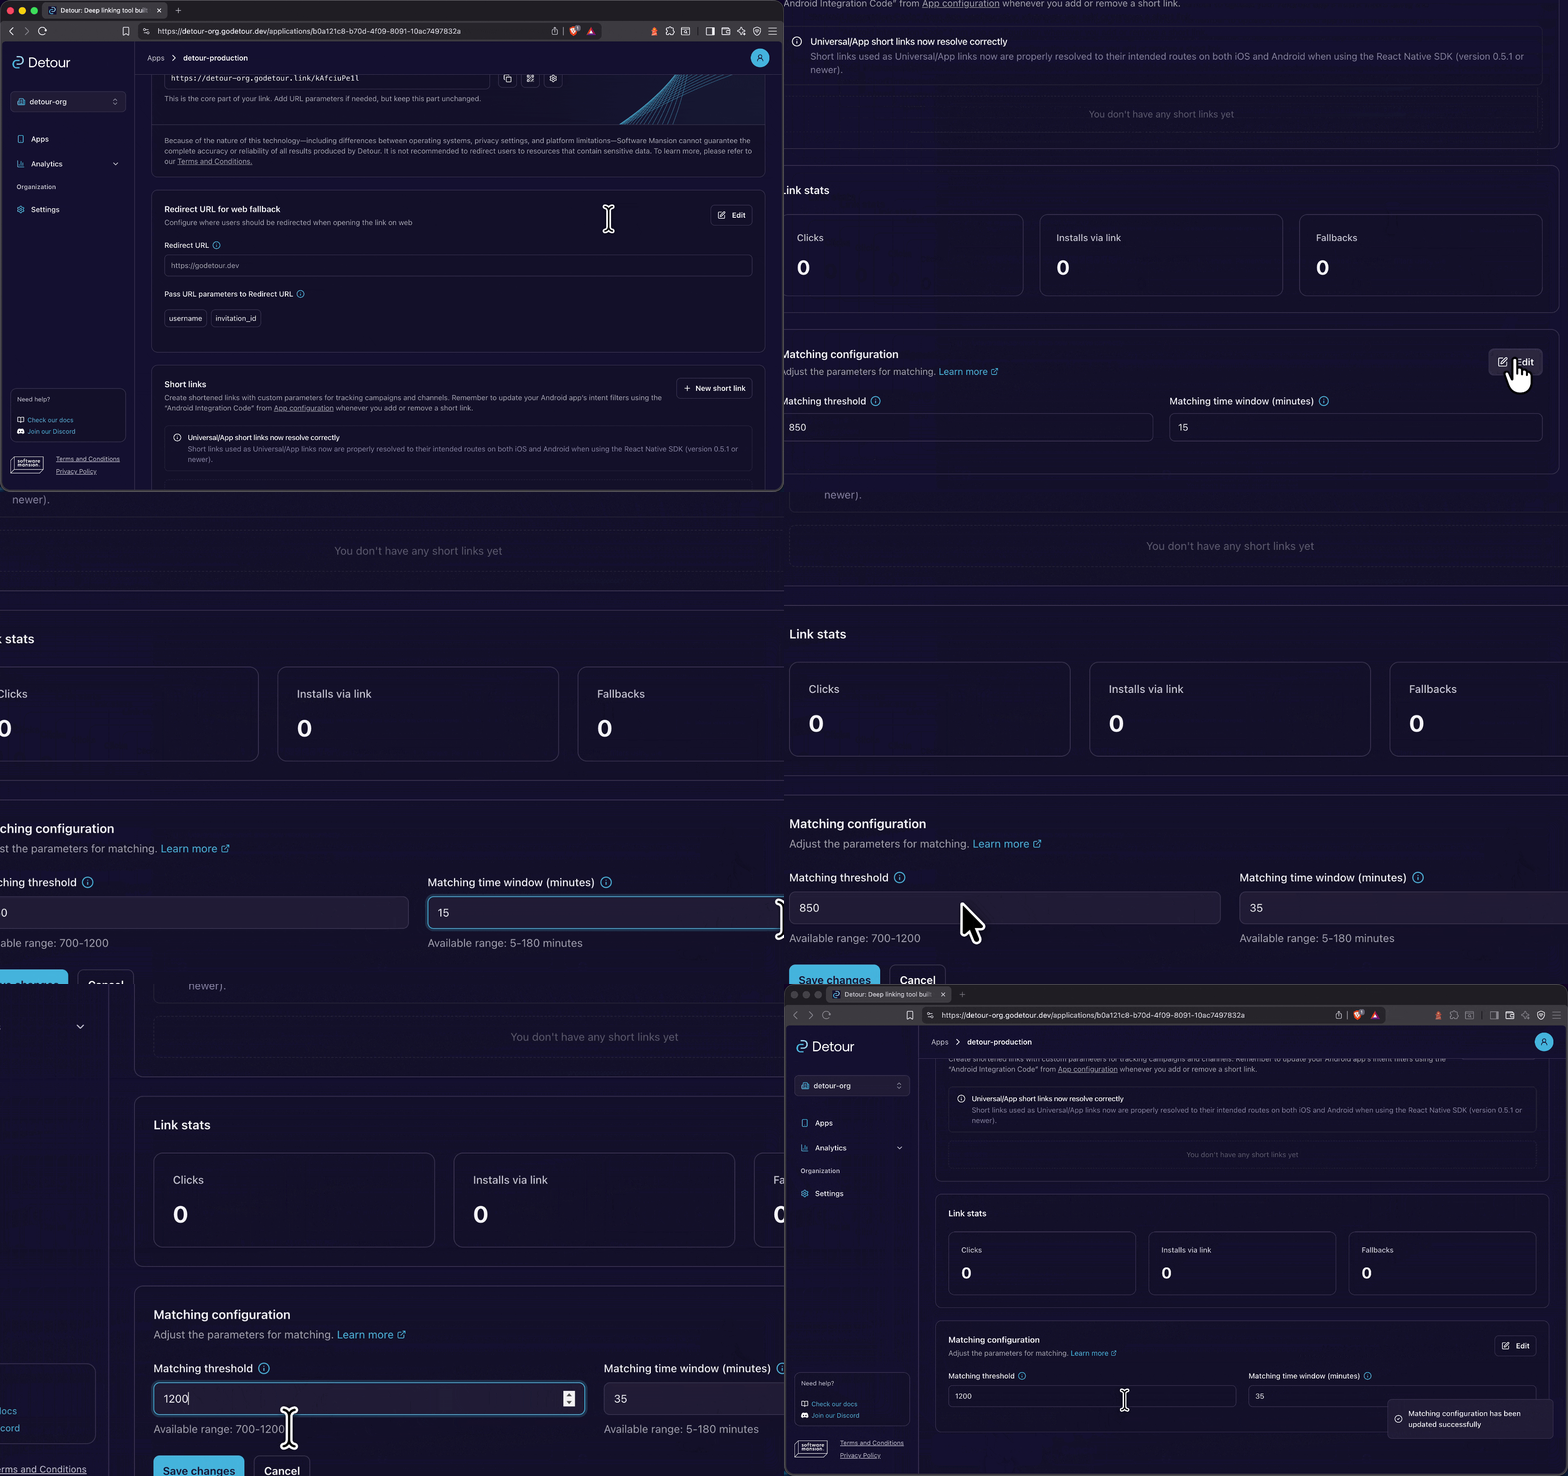
While this process is optimized for mobile apps, you may wonder what happens when a user clicks a link on a desktop browser. By default, users are redirected to the Google Play Store; however, if you have a relevant website, you can configure it as a fallback URL. Furthermore, if your links include specific attribution parameters – such as a chat invitation ID – you can choose to pass these through to your web platform and handle everything in there as well.
Improving deep link matching accuracy and time window
In some cases, the matching score might not be high enough for the process to succeed. While the default value is 850, you can always adjust this in our panel if there is a high probability that certain attribution parameters might not be captured properly.
The same flexibility applies to the matching time window – the duration between the initial user click and the matching process once the app download is complete. By default, this is set to 15 minutes, which is typically sufficient for a standard installation, but the setting is customizable to fit your specific case.
Have any questions? The Detour team is here to help
We're building Detour specifically for developers, which means your feedback is our roadmap. If you have questions or feature ideas, please reach out to us:
- On our Discord
- Directly through our email – contact@godetour.dev
And if there are any technical details you are interested in, check out our documentation and examples.