
How to Add Vega OS Support to Your React Native App
 Patryk Mleczek•Nov 12, 2025•19 min read
How to Add Vega Support to Your React Native App?
Vega OS is huge news in the React Native world. It’s not just a platform supporting React Native: it’s a full operating system where React Native is a first-class citizen. It’s also one of the officially supported ways to develop Vega apps. This is reflected throughout the system, for example by including the native parts of React Native and many libraries in the system image, which allows developers to create smaller apps.
The React Native ecosystem wouldn’t be what it is today without core React Native libraries and Expo packages — the building blocks of high-quality, engaging apps. Thanks to the collaboration between Software Mansion and Amazon, all major libraries known from iOS, Android, or web are available on Vega OS. This includes our Reanimated, Gesture Handler, Screens, SVG, along with many Expo packages, React Navigation, Sentry, and Shopify’s FlashList.
With such a rich set of tools and first-class React Native support, we should be able to avoid the most boilerplate tasks and fully concentrate on the integration with the new platform, when adding Vega compatibility to an existing app. In this article, we’ll explore how to extend a React Native project to Vega OS and ensure it runs smoothly on this new platform.
Adding Vega support to app — LLM Chat
We’ll analyze how to add Vega OS support using LLM Chat — a simple React Native app which allows users to chat with a locally hosted LLM from Ollama. Whenever the user submits a prompt, the app sends a request to the locally hosted LLM endpoint and then streams the response back on the screen, formatting it using the markdown provided by the model. On the technical side, it’s built with the latest stack — React Native 0.81, Expo SDK 54, and Expo Router — using Yarn as the package manager. Besides those core packages, it also depends on some other libraries, like e.g. Legend List for implementing the chat list, which we’ll analyze closer in the next section.
What to consider when adding support for Vega
In this section, we’ll look at different aspects you should consider when adding Vega OS support to your React Native project. Treat these points as a checklist (it might be incomplete though), helping you select the approach that best fits your project’s specifics and requirements.
Your React Native version
Let’s start with one of the basics — your React Native version. The latest version supported by Vega OS is React Native 0.72. If your project uses a different version, you’ll need to decide whether upgrading or downgrading makes sense for you.
Our app is built with React Native 0.81, and we don’t plan to revert to 0.72, since newer releases bring significant performance improvements and new features. Downgrading would also mean adjusting the Expo SDK and libraries, as the versions we use may not be fully compatible with 0.72.
Expo
We used Expo to initialize and manage the project, taking advantage of features like Continuous Native Generation and automatic autolinking. However, the Expo SDK doesn’t support Vega as a target platform yet, and Expo Router — which our app relies on — isn’t compatible with Vega OS.
In our case, the navigation is a single screen, so the migration to React Navigation would be very simple. However, for projects with more complex navigation, you’d need to rewrite it entirely and reconfigure the project to remove Expo Router. Since navigation patterns differ on TV platforms, such a refactor could easily double the amount of work.
Note: In theory, an Expo project (without Expo Router and possibly after downgrading the Expo SDK to a version compatible with 0.72) could be extended with the configurations and files required by Vega. However, this approach isn’t officially supported by either the Vega SDK or Expo and could lead to configuration conflicts. Based on my tests, this experimental setup does work — both apps build and launch (at least the simple template app). However, it may cause dependency issues, especially when adding packages from the
@amazon-devicesscope, and if something breaks, there are no official resources available for debugging.
Libraries
Like we’ve already seen, Vega OS supports the most important libraries like Reanimated, Gesture Handler, Screens or Navigation (available under the @amazon-devices scope on npm). This means the core parts of our app should transfer to Vega fairly easily. However, there are two important considerations regarding Vega dependencies.
First, Vega libraries are based on specific (often older) versions of the original packages — for example Reanimated 3.5.4, while version 4.1.3 is already available for the standard package. Not all features available on iOS, Android, or web are supported on Vega either.
Like with Expo, we could downgrade and use Vega’s versions of the libraries, but some features from our RN 0.81 app might be missing, and others may not be available on Vega at all.
Let’s quickly analyze our app dependencies and try estimating whether they should work on Vega. We can use the official docs to see the versions, what’s supported and what’s not: https://developer.amazon.com/docs/vega-api/0.21/supported-libraries.html.
Officially supported libraries
- React Native Masked View is supported on Vega and the API shouldn’t differ much between versions, so you should be okay using either version.
- Expo Crypto for Vega supports the
randomUUID()method we’re using and Expo Linear Gradient is also supported. But those versions are intended for Expo SDK 49 and we’ve decided to stick with 54. - React Native Reanimated is based on version 3.5.4, which should be sufficient, because we’re using APIs available in this release. What might be problematic is the lack of support for Layout Animations on Vega. Additionally we might want to stick with Reanimated 4 in our Expo app for performance purposes.
- React Native SVG should work fine using either version, as the APIs should be very similar (if not identical) and we’re using it to render simple icons. But as we’re sticking with Expo SDK 54 and React Native 0.81, we would have to use at least release 15.13.0.
Libraries that aren’t officially supported
- Legend List promises to support the TV platforms and additionally states that: “Any React Native platform should work since there’s no native code.”, so we should be able to use it.
- React Native Markdown Display used for markdown formatting doesn’t seem to contain any native code. So unless any of its dependencies have some native implementations, we should be fine.
- Jotai is a simple state management library which works well in web React apps and iOS/Android React Native apps and doesn’t seem to contain any native dependencies, so it should be fine too.
- Expo Fetch used to polyfill the response streaming might be the most problematic library since it depends on a native module (
ExpoFetchModule) which isn’t implemented for Vega. For this dependency, we’ll need to either find an alternative solution or fall back to simple responses on Vega OS.
Platform-specific features
Both Android and iOS have their own slightly different feature sets: the supported APIs, components and props or parameters they accept. As Vega OS is a separate implementation of React Native, independent of those two platforms, the same applies here.
While the majority of features our app uses should be available, some e.g. the response streaming in Fetch API we’ve mentioned before, might not be implemented or might be implemented differently. In cases like this, we’ll need to find workarounds or implement certain parts differently. Thankfully, Vega SDK comes with built-in resolution and prioritization of .kepler.ts and .kepler.tsx files and adds “kepler” as the Platform.OS, so we should be able to easily compose in any platform-specific solutions, while still sharing the majority of the codebase between all platforms.
Platform-specific behavior
Besides the platform-specific features, there’s also platform-specific behavior which consists of guidelines and patterns for how certain things should be implemented to fit the platform specifics. Vega OS is a TV platform, so we need to ensure that our app supports navigating with the TV remote and uses the screen space reasonably (using full height and width like we do on smaller phones might not be ideal from a UI/UX perspective).
What’s next?
As we don’t want to introduce any trade-offs to our original React Native app, we’ll continue using React Native 0.81, Expo SDK 54, and Expo Router. Since Vega SDK supports React Native 0.72, it‘ll make most sense to add a separate entrypoint for Vega OS and try to share as much code between the apps as possible.
We also want to keep using the latest dependency versions, so the easiest approach is likely a monorepo with three packages: app (Expo app), chat (shared components and logic), and vega (Vega OS app). This solution allows us to resolve the dependencies of the chat package in the app consuming it (either with the original or Vega versions) and keep everything contained and modular.
Extending project with Vega OS support
Step 1: Setting up monorepo
Let’s start with setting up the monorepo, as it’ll make most sense to divide everything into three packages. We can start with moving the Expo app from the root of the project to the packages/app directory:
# vega-support-example
mkdir -p packages/app
rm -rf yarn.lock node_modules
find . -maxdepth 1 -mindepth 1 ! -name 'packages' ! -name '.git' ! -name '.vscode' ! -name '.yarn' ! -name '.yarnrc.yml' -exec mv {} packages/app/ \;
Then, we can set up the monorepo root by creating a package.json file with the following contents at the root of our project:
{
  "name": "@llm-chat/monorepo",
  "version": "0.0.0",
  "private": true,
  "workspaces": [
    "packages/*"
  ],
  "packageManager": "[email protected]",
  "installConfig": {
    "hoistingLimits": "dependencies"
  }
}
The hoisting setting will be useful a bit later once we have multiple versions of the same packages in our project (e.g. two versions of React Native: 0.72 and 0.81).
If you’re using Git, you can also ensure that the root of the project contains a .gitignore file:
# Dependencies
node_modules/
# Yarn
.yarn/*
!.yarn/patches
!.yarn/plugins
!.yarn/releases
!.yarn/sdks
!.yarn/versions
.pnp.*
.yarn/cache
.yarn/install-state.gz
Step 2: Moving common components and logic to a separate package
Extracting common components and logic will allow us to easily and modularly share the codebase between Expo and Vega app and resolve the dependencies in the specific entrypoints. To begin, let’s create a new directory chat (packages/chat) and a package.json with the following contents in it:
{
  "name": "@llm-chat/common",
  "version": "1.0.0",
  "private": true,
  "type": "module",
  "module": "./index.ts",
  "dependencies": {
    "@legendapp/list": "^2.0.14",
    "jotai": "^2.15.0",
    "react-native-markdown-display": "^7.0.2"
  },
  "devDependencies": {
    "@types/react": "~19.1.0",
    "typescript": "^5.9.3"
  },
  "peerDependencies": {
    "expo": "*",
    "expo-crypto": "*",
    "expo-linear-gradient": "*",
    "react": "*",
    "react-native": "*",
    "react-native-reanimated": "*",
    "react-native-safe-area-context": "*",
    "react-native-svg": "*"
  },
  "packageManager": "[email protected]"
}
As the same versions of the three packages: Legend List, Jotai and React Native Markdown Display can be used both on Vega and in the Expo app, we can define them as dependencies and have them resolved in the chat package. The rest of the packages can be defined as peer dependencies and get resolved in the specific apps. We can also remove the dependencies on @legendapp/list, jotai and react-native-markdown-display from packages/app/package.json and add dependency on them in our chat package:
"dependencies": {
  "@expo/vector-icons": "^15.0.2",
  "@llm-chat/common": "workspace:*",
  "@react-native-masked-view/masked-view": "0.3.2",
  …
We should also ensure that the chat package exports components needed by the Expo app and that all imports and exports within it are properly updated (if necessary) after the move.
We can now run yarn install to sync the workspace and install all dependencies, then try running the app to make sure everything works correctly. If you run into any issues with the app, try starting it with the --clear flag (e.g. yarn ios --clear) to clear the bundler cache.
Step 3: Setting up Vega SDK project
Vega OS comes with a CLI tool — kepler project generate, that can be used for initializing projects based on predefined templates. However, it seems that it has some problems with initializing the projects inside a monorepo:
2025–10–28 13:42:01 error [ProjectInit]: failed to load template from /Users/patrykmleczek/Desktop/vega-support-example/packages/kepler-templateVr9fYx
2025–10–28 13:42:01 error [ProjectInit]: Project creation failed: Cant find template metadata file. path: /Users/patrykmleczek/Desktop/vega-support-example/packages/kepler-templateVr9fYx/node_modules/@amazon-devices/ks-app/templateMetadata.json
Kepler operation FAILED due to an irrecoverable error: Cant find template metadata file. path:
…
(It may also fail on unrecognized workspace:* references if you’re using them)
Luckily, we can simply work it around by creating the project in some temporary directory and manually moving it to our project:
cd /tmp
kepler project generate - template hello-world - name llmchatvega - packageId com.swmansion.llmchatvega - outputDir vega
mv vega/ ~/Desktop/vega-support-example/packages/
Let’s update the package.json file of the generated project to include @llm-chat/common and the dependencies needed by it:
"name": "@llm-chat/vega", // To match the monorepo naming convention
…
"dependencies": {
  "@amazon-devices/keplerscript-turbomodule-api": "^1.0.0",
  "@amazon-devices/react-native-kepler": "^2.0.0",
  "@llm-chat/common": "workspace:*",
  "@react-native-masked-view/masked-view": "npm:@amazon-devices/react-native-masked-view__masked-view@².0.0",
  "expo": "^54.0.0",
  "expo-crypto": "npm:@amazon-devices/expo-crypto@^2.0.0",
  "expo-linear-gradient": "npm:@amazon-devices/expo-linear-gradient@^2.0.0",
  "react": "18.2.0",
  "react-native": "0.72.0",
  "react-native-reanimated": "npm:@amazon-devices/react-native-reanimated@^2.0.0",
  "react-native-safe-area-context": "npm:@amazon-devices/react-native-safe-area-context@^2.0.0",
  "react-native-svg": "npm:@amazon-devices/react-native-svg@^2.0.0"
},
"overrides": {
  "@react-native-masked-view/masked-view": "npm:@amazon-devices/react-native-masked-view__masked-view@^2.0.0",
  "expo-crypto": "npm:@amazon-devices/expo-crypto@^2.0.0",
  "expo-linear-gradient": "npm:@amazon-devices/expo-linear-gradient@^2.0.0",
  "react-native-reanimated": "npm:@amazon-devices/react-native-reanimated@^2.0.0",
  "react-native-safe-area-context": "npm:@amazon-devices/react-native-safe-area-context@^2.0.0",
  "react-native-svg": "npm:@amazon-devices/react-native-svg@^2.0.0"
},
…
"packageManager": "[email protected]"
Then, we can update the metro.config.js as suggested here: https://developer.amazon.com/docs/vega/0.21/monorepo-issues.html
const {getDefaultConfig, mergeConfig} = require('@react-native/metro-config');
const path = require('path');

/**
+ * Metro configuration
+ * https://facebook.github.io/metro/docs/configuration
*
+ * @type {import('metro-config').MetroConfig}
*/
const config = {
  projectRoot: __dirname,
  watchFolders: [
    path.resolve(__dirname, '../../packages'),
    path.resolve(__dirname, '../../node_modules'),
  ],
  resolver: {
    // With this option enabled markdown display
    // Fails to resolve its dependency on 'entities'
    // disableHierarchicalLookup: true,
    nodeModulesPaths: [
      path.resolve(__dirname, 'node_modules'),
      path.resolve(__dirname, '../../node_modules'),
    ],
  },
};

module.exports = mergeConfig(getDefaultConfig(__dirname), config);
We can also remove the assets/ and components/ directories added by the Vega CLI and replace the contents of the App.tsx file with the entrypoint of our LLM chat app:
import {BottomBar, ChatList, Color} from '@llm-chat/common';
import React from 'react';
import {StyleSheet, View} from 'react-native';
import {SafeAreaProvider} from 'react-native-safe-area-context';

export const App = () => {
  return (
    <SafeAreaProvider>
      <View style={styles.container}>
        <ChatList />
        <BottomBar />
      </View>
    </SafeAreaProvider>
  );
};

const styles = StyleSheet.create({
  container: {
    backgroundColor: Color.backgroundPrimary,
    flex: 1,
    justifyContent: 'center',
    alignItems: 'center',
    gap: 16,
  },
});
Let’s not forget to include the Reanimated plugin in the babel config (babel.config.js):
module.exports = {
  presets: ['module:metro-react-native-babel-preset'],
  plugins: ['react-native-reanimated/plugin'],
};
Then, let’s sync the workspace by running yarn install and start the Vega OS simulator:
kepler virtual-device startWe can build and run the app using the following commands:
# packages/vega
yarn build:debug
kepler run-kepler <path-to-vpkg> com.swmansion.llmchatvega.main -d VirtualDevice
The app launches, but as soon as we send a prompt to LLM it crashes:
Which suggests that, as we suspected, expo/fetch isn’t supported on Vega. We’ll look into that and other potential platform-specific adjustments in the next step.
Step 4: Adding Vega-specific changes
Before we start looking into the Expo Fetch issue, there was an even bigger problem: the keyboard didn’t appear when the text input was focused, and typing inserted the word “Space” instead of spaces while ignoring letter casing. That was because using the keyboard on Vega requires the app to have additional entries in manifest.toml file. Let’s add the following lines at the end of it:
[wants]
[[wants.service]]
id = "com.amazon.inputmethod.service"
[[wants.service]]
id = "com.amazon.inputd.service"
Now, after rebuilding and restarting the app, we should be able to use the fullscreen keyboard:
As the keyboard works, we can move on to fix the issue with expo/fetch. We’re using it instead of the default fetch function because React Native doesn’t support streaming responses by default. You can find more details about this problem in a very interesting talk by Delphine Bugner at the 2025 App.js Conference.
As expo/fetch is out of play, we can consider other solutions as cross-fetch or the polyfills. I have tried using three solutions:
cross-fetch- polyfill using
react-native-polyfill-globalsandreact-native-fetch-api - polyfill based on
react-native-url-polyfillandweb-streams-polyfill
But unfortunately none of them worked with the configurations suggested in various issues. So it seems that this feature is either not available on Vega or requires more investigation and non-standard setup.
To proceed, for now, we can replace the streaming with a single HTTP response for Vega and continue using streaming on Android and iOS. Since our response-streaming hook is fairly complex — handling throttling, decoding, and appending chunks — we can add a Vega-specific version in a separate file to keep the implementations cleanly separated. Let’s create a new hook with the same name, but with the .kepler.ts (e.g. useStreamLLMResponse.kepler.ts) extension so we can utilize the Vega-specific file resolution. Let’s simply call the fetch API and display a new message once we have the response:
# chat/hooks/useStreamLLMResponse.kepler.ts

const useStreamLLMResponse = () => {
  const { setLoading, setStreaming } = useAppState();
  const getLLMResponse = useLLM();
  const { pushMessage } = useChat();
  const streamLLMResponse = useCallback(
    async (prompt: string) => {
      setLoading(true);
      setStreaming(true);

      pushMessage({
        id: randomUUID(),
        role: "user",
        content: prompt,
      });

      const response = (await getLLMResponse(prompt, false))
        as string;

      setLoading(false);
      setStreaming(false);
      pushMessage({
        id: randomUUID(),
        role: "assistant",
        content: response,
      });
…
Before we test it out we also have to make sure that we use the standard fetch function instead of the one from expo/fetch on Vega:
# chat/hooks/useLLM.ts

type ReturnType =
  | ReadableStreamReader<Uint8Array<ArrayBufferLike>>
  | string // on Vega OS
  | undefined;

let fetchFn = global.fetch;
// @ts-expect-error - 'kepler' has no overlap with the default platforms
if (Platform.OS !== "kepler") {
  fetchFn = require("expo/fetch").fetch;
}

const useLLM = () => {
  const getLLMResponse = useCallback(
    async (
      message: string,
      streamResponse: boolean = true
    ): Promise<ReturnType> => {
      const input: MessageInput = {
        role: "user",
        content: message,
      };

      const body: LLMRequest = {
        model: "qwen3:4b",
        messages: [input],
        stream: streamResponse,
      };

      const response = await fetchFn("http://localhost:11434/api/chat", {
        method: "POST",
        body: JSON.stringify(body),
      });

      if (!streamResponse) {
        const jsonResponse = await response.json();
        return jsonResponse.message.content;
      }

      return response.body?.getReader();
    },
    [],
  );
…
We can rebuild and launch the application to see if the responses are displayed correctly:
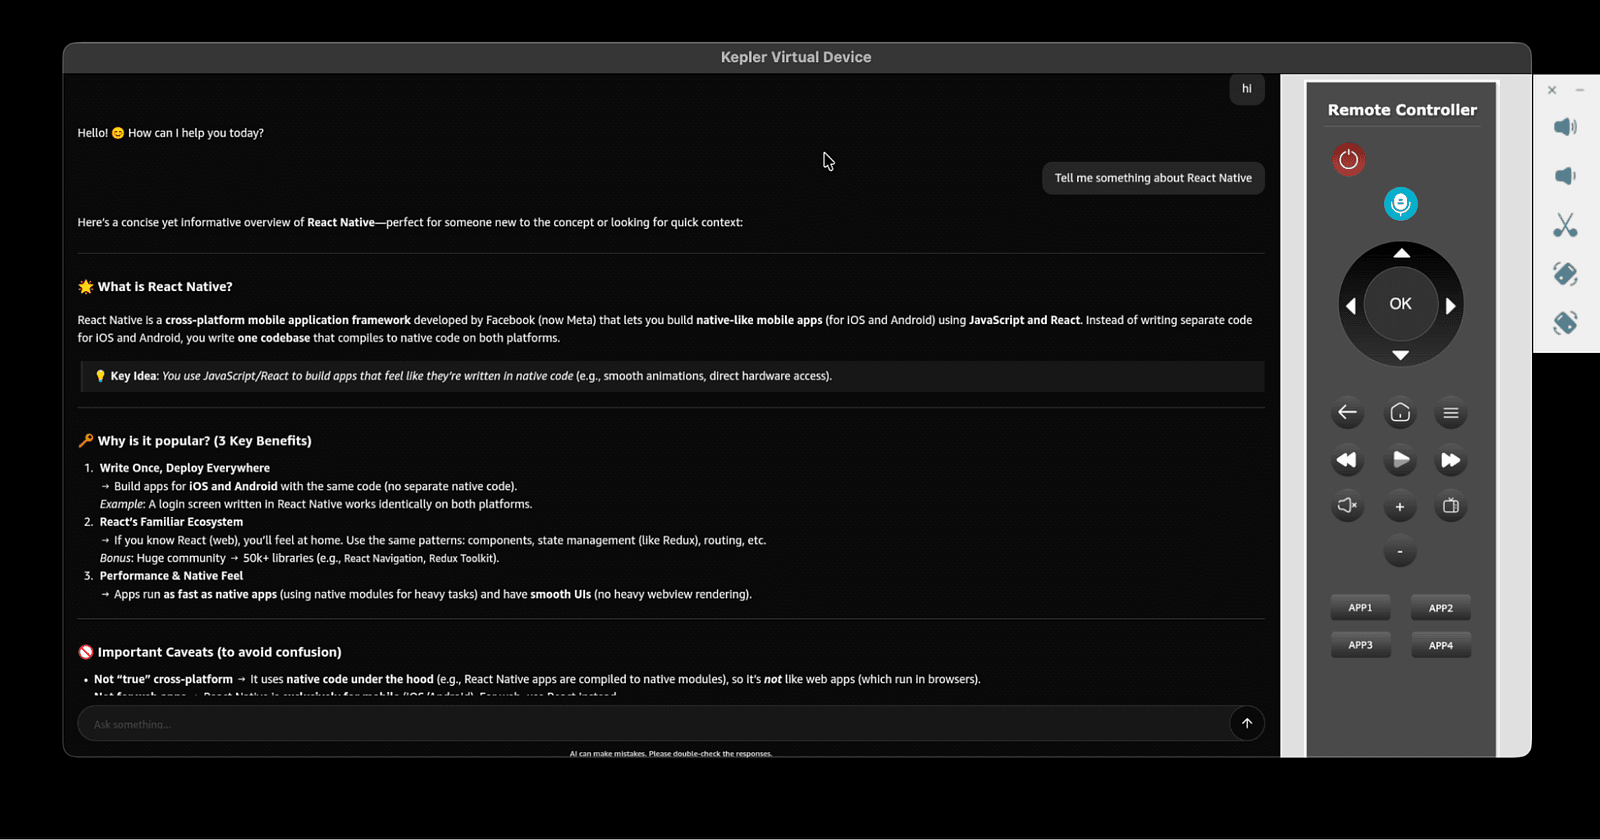
The next area that needs adjustment is the app’s UI. While using the full screen width works well on small phones, it can be uncomfortable on wider devices like the Virtual Device or TVs. Let’s conditionally limit the width of the bottom bar:
inputRow: {
  flexDirection: "row",
  alignItems: "center",
  justifyContent: "space-between",
  gap: 12,
  // @ts-expect-error - 'kepler' doesn't have overlap with the default platforms
  maxWidth: Platform.OS === "kepler" ? 1000 : undefined,
},
Now, let’s do the same for the chat list:
list: {
  flex: 1,
  // @ts-expect-error - 'kepler' doesn't have overlap with the default platforms
  width: Platform.OS === "kepler" ? 1000 : "100%",
},
We can also notice that the app is missing padding at the top and bottom, because both safe area insets are 0 on Vega. Let’s fix this by adding margins to the list and bottom bar:
container: {
  paddingHorizontal: 24,
  width: "100%",
  alignItems: "center",
  // @ts-expect-error - 'kepler' doesn't have overlap with the default platforms
  marginBottom: Platform.OS === "kepler" ? 24 : 0,
},
list: {
  flex: 1,
  // @ts-expect-error - 'kepler' doesn't have overlap with the default platforms
  marginTop: Platform.OS === 'kepler' ? 24 : 0,
  // @ts-expect-error - 'kepler' doesn't have overlap with the default platforms
  width: Platform.OS === "kepler" ? 1000 : "100%",
},
Let’s rebuild the app and test our UI improvements:
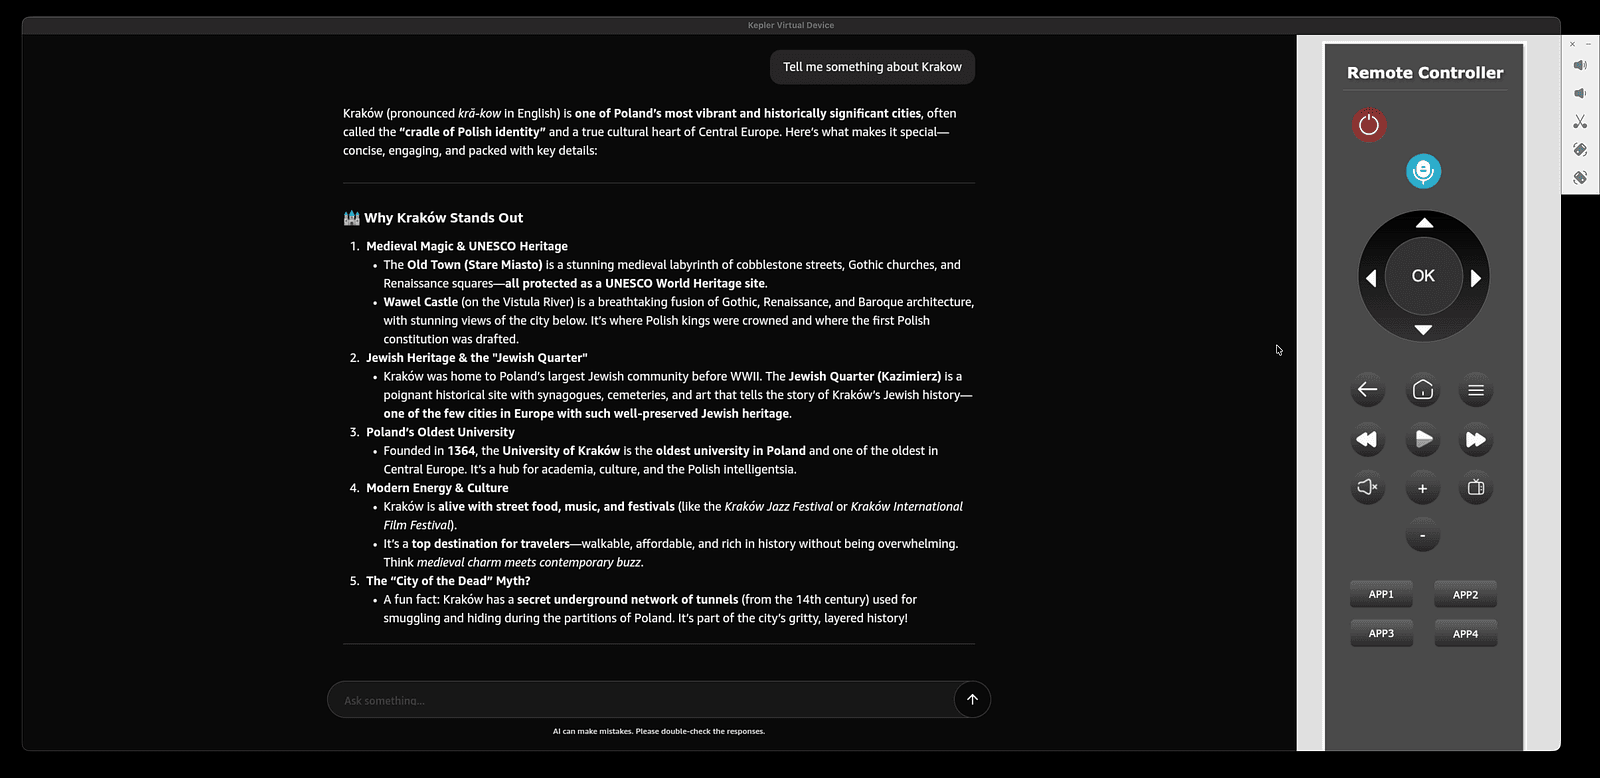
The app looks way better and is more readable now. We can also see that scrolling in Legend List works fine and the app can be easily navigated using the TV remote. The Markdown Display renders correctly without the need for any adjustments and Jotai seems to handle our state correctly. However, there’s still room for some improvements which we’ll look into in the next section.
Step 5: Improvements (optional)
The project builds and runs successfully, allowing users to chat with the LLM on Android, iOS, and Vega OS; meaning we’ve successfully added Vega support. That said, there’s still room to improve both the app and the developer experience.
Starting with the developer experience, the chat package currently has libraries like react-native or react-native-reanimated only as peer dependencies, which is fine from the entrypoints perspective as they resolve them anyway. However, not including them as dev dependencies (which could break either the Vega or Expo app depending on the versions used) also impacts the developer experience within the package. IntelliSense doesn’t always provide the expected suggestions and TypeScript problems aren’t always highlighted. To fix that, we could bundle it with tools like esbuild and have the apps use built files. This approach would let us exclude development dependencies from the bundle, but it would require frequent builds or running a dev server with hot reload.
For readability, we could ensure all packages follow the @llm-chat/package-name naming convention, e.g. @llm-chat/app or @llm-chat/vega.
We could also specify some scripts in the root package of our monorepo to simplify running both Expo and Vega apps. For Expo, it would be as simple as forwarding the scripts to the package — and for Vega, we could define a script setting up the fast refresh as described here: https://developer.amazon.com/docs/vega/0.21/fast-refresh.html.
As for the app, main improvements would be related to the UI. First, we can see that Layout Animations aren’t supported on Vega, whereas on iOS and Android they give our app a polished, high-quality feel.
So we could potentially replace them with some other explicitly defined animations. We could think about changing the text and icon sizes to better fit the bigger screens of Vega.
There’s also one tiny nit related to Legend List — while automatic scrolling to the bottom works well with streaming on iOS and Android, it doesn’t scroll the list to the bottom when a new message is sent on Vega. So we could use a workaround, either by leveraging other Legend List props or by scrolling via a ref, to replicate the Expo app’s behavior.
The takeaway
Adding Vega support to an existing iOS/Android app isn’t a one-size-fits-all process; it needs to be tailored to the specifics and requirements of each project. The complexity and the steps involved depend on your app and on whether making certain trade-offs would be acceptable.
Thanks to the portability of React Native and JavaScript, the majority of the components and the logic can be reused between iOS/Android and Vega OS apps (though they might require some adjustments). The availability of key libraries like Reanimated, Gesture Handler, and SVG makes it easy to transfer your codebase, though it’s still important to watch out for version differences and feature gaps.
Be sure to check out our GitHub and try adding Vega support to your React Native app. And if you need any help along the way, you can always reach out to us at [email protected]. As the official Vega-supported agency and a long-time Amazon partner who helped deliver React Native to Vega OS, we’ll be happy to use our first-hand experience to help you!
We’re Software Mansion: multimedia experts, AI explorers, React Native core contributors, community builders, and software development consultants.