Building Reigns: How to reign over mobile game development using Reanimated 2. Pa
 Wojciech Stanisz•Jun 21, 2021•7 min read
Building Reigns: How to reign over mobile game development using Reanimated 2. Part 3
This is the last post in a series dedicated to building a clone of Reigns game in React Native using Reanimated 2 and Gesture Handler. If you haven’t seen the first two parts you can find part one where we implemented the gesture handler here and the second part where we focus mostly on the animations here. Our last meeting will finalize our project by adding game logic, show questions, and making the initial animation.
Like in the previous articles, you can find the code in the Github repository that you can visit by clicking the iteration link next to the title of each chapter.
Add basic logic — iteration-6
The time has come. Our creation will be alive! (At least a little bit).
In order to make the game playable, we need to determine when the player makes a decision by swinging the card to the side of the screen. To do so, we will use two metrics: velocity and position.
By combining the current position and multiplying velocity by a given time (in this example it will be 0.2 sec) we can simulate toss and see where the released element is going to land. Based on this information we can decide if the player made a decision by moving the card to any side of the screen or should it return to the deck on the center of the screen.
To make such recognition possible we have to modify the gestureHandler (created in iteration-1).
Conditional statements are pretty simple here. The one thing you should know about them is that there are different useful pieces of information inside the event object, for example: velocity. What’s more interesting is the runOnJS function with quite a distinct syntax. This strange line of code lets us call JS functions inside Reanimated’s code block. In this case, we don’t pass any prop to our function but instead, this syntax allows us to pass props to the function using second brackets like:
runOnJS(func)(prop1, prop2);
An important note here: You shouldn’t try to run JS functions declared outside reanimated code blocks inside it without runOnJS.
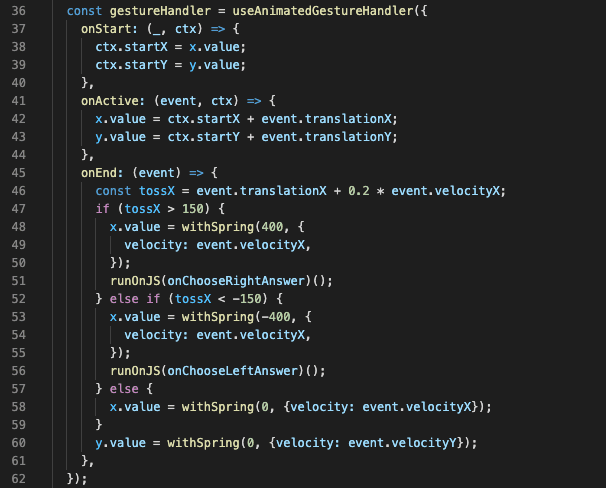
Worth noting here is that you should always pass velocity to the withSpring hook to keep smooth and persistent animation.
The actual handler lives in the Screen.js file and is passed to the Card via prop.
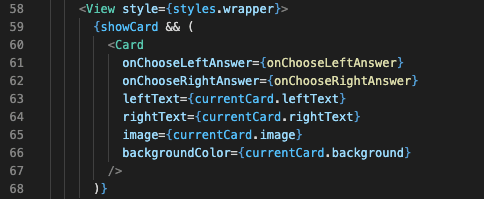
Handler sets the showCard flag to false to remove the old card loads the next card data and switches the flag to show it again. Each time Card gets a new date, it fires flip animation. This way, every new card is shown in a smooth, animated manner.
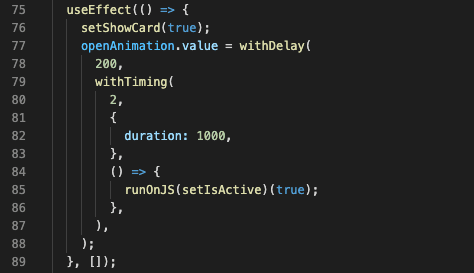
As you can see there is also a small trick here. The card is rendered and then flipped, but only after 200 milliseconds await.
What’s worth noting here is using the new withDelay hook. This is a simple hook that will delay the start of an animation by a given time. This is a really simple way to make sure all data in the front of the card (like avatar picture) actually managed to load and show up, without any visual glitches. There should be some more advanced logic but I didn’t want to add unnecessary complexity to an already big example.
To make the card active after the end of animation I used the animation callback of withTiming function. You can read more about it here.
Start game animation — iteration-7
At this stage, we should make a couple of animated cards slide into the welcome screen of the game. To do so, we need to import them in the Screen.js file like this:

As you can see, I created separate Static and Animated reverse cards. That’s because we need one reversed card always on the bottom to simulate the deck. But since we animate 5 different cards into the screen, it would be a waste to keep all 5 of them on the screen for the rest of the game, if we are not going to use them anymore. Following that logic, we have separate components for animated cards, and one separate for the static card that will stay on the screen for the rest of the game.
Let’s take a closer look at the animated card, shall we?
Previously, using Animated.View we created a separate animatedStyle for each card. It worked because each style was unique. But now, since we need to create a couple of components with the exact same styles and the only difference will be timing it will be better to automatize it somehow. How?
The answer is: ‘worklet’.
Let’s take a look at Card in PlaceholderBackCards.js. As you can see, I used useAnimatedStyle in a little different manner here. Instead of passing an object that contains static useAnimatedStyle inside, I used the useAnimatedStyle hook to wrap the function that will get the index.
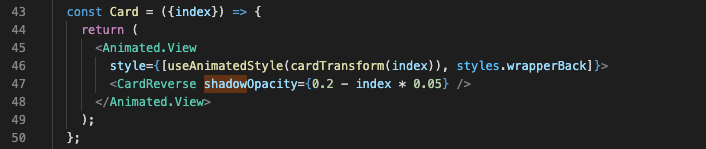
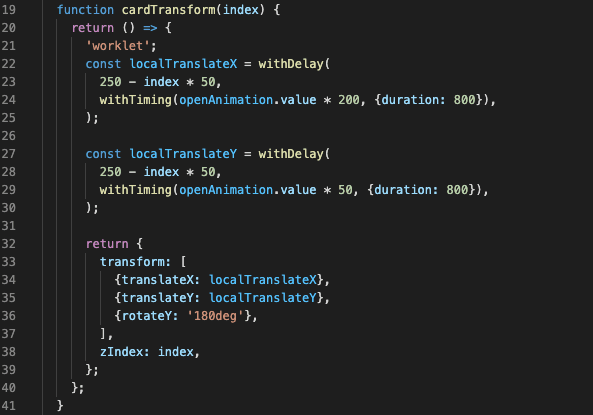
cardTransform function is a ‘worklet’. That means we can use it in Reanimated 2 code. This way I can pass an index and make a small adjustment in style based on a given variable.
What’s worth noting here is using the withDelay hook. In my case, the delay itself is calculated based on the passed index.
Animated questions — iteration-8

Question time!
First things first, let’s add the question component to the main render. As you can see the component is not shown conditionally this time. The visibility of the component will be controlled by showQuestion flag passed as a prop to the component.

This time we don’t need to create any shared values or create any useEffect to handle our animation. If your animations are really simple and need to be performed once the props change you can simply put them straight into the useAnimatedStyle and calculate them directly inside the returned style object.

Lastly, we have to use our new animatedWrapper, as a style for Animated.View and we are done!
Viola! That was fast!

Animated elements: final touch — iteration-9
Final iteration!
Time for an ultimate trial!
This time it’s gonna be different. I won’t describe each step. This time YOU will do it yourself. If you followed all the previous steps I’m pretty sure you can do it. I haven’t used any new technique or API so figuring out what happened in the last iteration will be a pretty good exercise. Good luck!
I strongly recommend looking for new things in Screen.js and finding new components there.
But if you don’t feel like trying today and just wanna see how the last iteration looks like, and how it works, here’s part for you:

In Screen.js you can find a new PowerIndicators component with currentMood prop. currentMood is an object containing two arrays: happy and sad containing info on who should be amazed by the player’s answer and who should be enraged. Those arrays are set in the handlers of left and right answers.

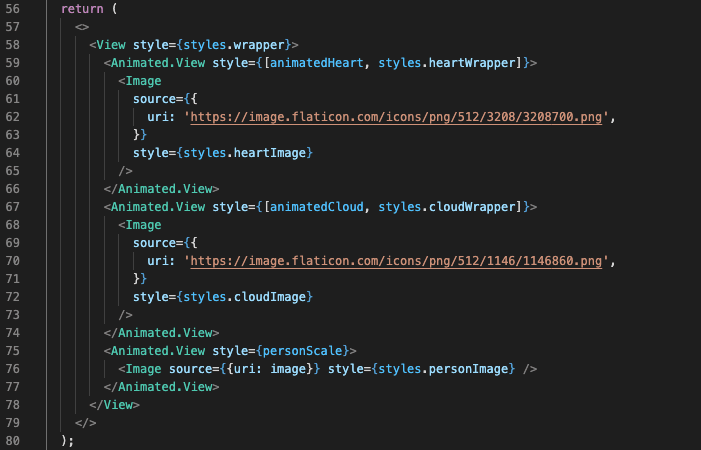
currentMood property is processed in the PowerIndicators.js to get info about each person and push it as a prop to the next components in which we are checking if the selected person should react to the current action and handle this information in PowerPerson.js file by firing suitable animation. In case somebody is happy with the player’s answer it’s gonna be a heart, and in case somebody is not in fond of the action it’s a rainy cloud.
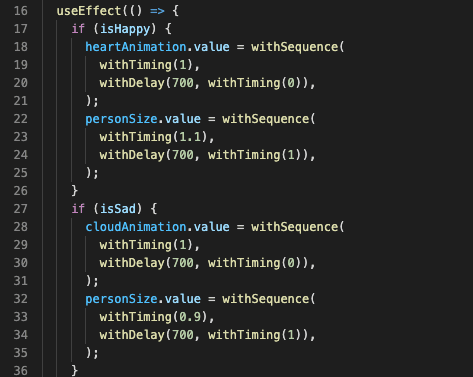
In the return statement, we can see that the heart and cloud images are hardcoded and the only thing that is changing are the styles of the animated wrapper.
That’s it. Whole application. What a journey!
Time to steal some hearts!
Now you know it all. You are ready to make the best animations out there with brand new, cutting-edge technology! If you want to learn more you can always read the official documentation or read about the library itself here.
The possibilities are endless! You can create games, apps, try to recreate your old project, or enhance existing react-native ones! Time to steal the hearts of your users!