Building a Spotify Clone in React Native
 Apkotarski•Oct 15, 2025•12 min read
In this article, we’re going to build a simple Spotify-style music player in React Native using react-native-audio-api.
React Native Audio API is a library we developed at Software Mansion to help you create powerful audio features in your app — from real-time effects and visualization to multi-track playback Let’s get started.
What will you learn?
We’ll go step-by-step through:
- creating a new project and setting up React Native Audio API
- designing a basic app interface
- building a music player for audio playback
- running the app in background mode
- adjusting playback speed of songs
- handling music controls on the lock screen
- extra: visualizing audio frequencies
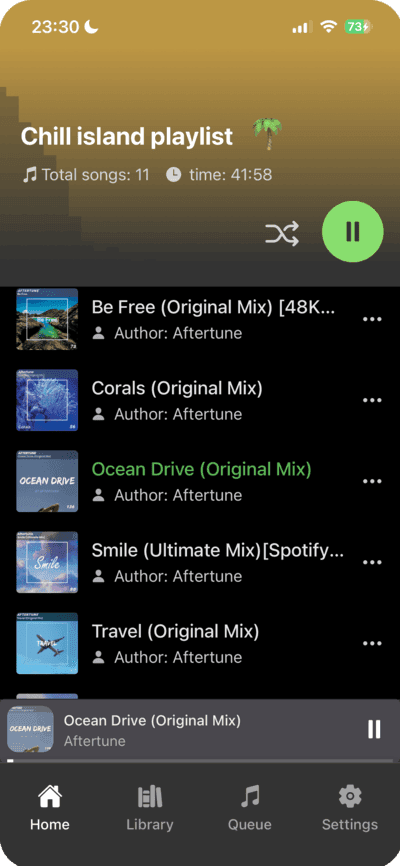
Here’s what the ready app is going to look like:

Technologies used
For the mobile application, we’re going to use React Native, which is perfectly suited for building cross platform solutions. When creating a cross platform app, we also need to ensure that audio playback works seamlessly on every platform. React Native Audio API is the most suitable library for our case. For now, it’s the only library that supports background mode on Android, which is especially important for a music player app, since these applications are most often used in the background.
On top of that, the library is fully compatible with Web Audio API, which guarantees true cross-platform support.
What about alternatives? For a typical music player we could also use expo-audio or react-native-track-player — both are simpler to wire up (background mode on Android aside). For this demo, however, we’ll build it with React Native Audio API (RNAA) to keep a single, Web-Audio-compatible programming model across web and mobile, and to showcase lower-level control that we’ll reuse elsewhere in the app.
For backend, we’re going to use a simple Node.js (Express.js) server, which will serve songs along with their cover art.
You can find the full application code in our GitHub repository: https://github.com/homosum1/AudioPlayer.
Creating the project and setting up React Native Audio API
Let’s start by creating a base React Native app template using Expo. We’ll be writing the whole project in TypeScript. To do that, we use the template flag and select the blank (TypeScript) option, which will generate a basic project with all the necessary configuration included:
npx create-expo-app spotify-clone -templateNext, let’s install the react-native-audio-api library:
npm install react-native-audio-apiIn order for the audio library to work properly in the background mode and have the required permissions, we need to add the following snippet to the app.json file:
  "plugins": [
    [
      "react-native-audio-api",
      {
        "iosBackgroundMode": true,
        "androidPermissions" : [
          "android.permission.MODIFY_AUDIO_SETTINGS",
          "android.permission.FOREGROUND_SERVICE",
          "android.permission.FOREGROUND_SERVICE_MEDIA_PLAYBACK"
        ],
        "androidForegroundService": true,
        "androidFSTypes": [
          "mediaPlayback"
        ]
      }
    ]
  ]
And that’s it, the configuration is ready! We can now move on to writing the actual code.
Building a basic app interface
Before moving on to the core part of the app (handling audio playback), let’s start with a simple application template to let us display songs and navigate between them.
(If you’re only interested in the audio implementation, feel free to skip this section!)
First, let’s create a basic app template. Inside the app folder, create a (tabs) directory, which will contain the tabs for our application:
app
└── (tabs)
    ├── _layout.tsx
    ├── index.tsx
    ├── library.tsx
    ├── queue.tsx
    ├── settings.tsx
└── _layout.tsx
We’re going to focus on the index.tsx tab, which contains the main screen of the app with the list of songs. All songs are displayed as FlatList items that the user can interact with.
...
   <FlatList
       data={musicInfo}
       keyExtractor={(index) => index.toString()}
       renderItem={({ item }) => (
         <SongElement
           singleMusicInfo={item}
           active={item.id === playedSong?.id}
           toggleSelectedProperties={toggleSelectedProperties}
         />
       )}
       contentContainerStyle={{
         paddingBottom: 140,
         paddingTop: 15,
       }}
   />
...
The information about songs in the playlist is fetched from the backend, which we’ll cover later in the article. This includes basic details such as each track’s id, title, and author.
The SongElement components are styled views that display the cover art, basic song information, and whether the track is currently playing. We also want tapping on a tile to allow switching the currently playing song.
Since we now have information about multiple songs, we’re keeping track of the currently playing track, its playback state (playing or paused), and the current playback position, we need a place to store all this data.
In our application, this place will be a context. This is where we’ll define all the logic responsible for audio playback and manage the app state. This will allow us to access it from anywhere in the app and use it to change, pause, or resume the currently playing track.
The AppContextProvider we’re using has the basic template shown below. In the next step, we’ll extend it with all the methods and variables needed for proper music management. For now, this simple template is enough:
const AppProvider = ({ children }: AppProviderProps) => {
   const [playedSong, setPlayedSong] = useState<PlayedMusicInfo | null>(null);
   const [musicInfo, setMusicInfo] = useState<MusicInfo[]>([]);
   ...

   return (
       <AppContext.Provider value={{
           playedSong,
           setPlayedSong,
           musicInfo,
           setMusicInfo,
           ...
      }}>
           {children}
       </AppContext.Provider>
   );
};

export default AppProvider;
Now, using this context, we can easily access it inside the SongElement component:
const {
   playedSong,
   setPlayedSong
} = useContext(AppContext);
Clicking allows us to change the currently playing song:
onPress={() => {
   if(playedSong?.id === singleMusicInfo.id) return;

   setPlayedSong({
       ...singleMusicInfo,
   });
}}
We can also use it to highlight the currently playing song in a Spotify like style.
The last piece we need on the main interface is the most iconic element of any Spotify-style app: the bottom playback bar. Tapping it opens a bottom sheet, where we can scroll through songs and control playback.
You can find the complete code and panel styles on GitHub. From a UI perspective, there’s nothing particularly unique here. What matters most is that this is where methods like handleNextSongClick and handlePlayButtonClick are used, as they’re responsible for managing the audio state.
Audio logic implementation
Now let’s move on to the actual audio implementation.
Everything starts with the AudioContext object. This object is responsible for controlling and processing audio. I’ll show you how to use it in a moment, but first let’s create the object and store a reference to it:
if (!audioContextRef.current) {
  audioContextRef.current = new AudioContext({ initSuspended: true });
}
The entire audio system is managed through a single AudioContext. That’s why, using an if statement, we make sure that this context is created only once. With the audioContext ready, we can finally use it to play sounds.
In our app, two main methods will handle audio playback: handlePlaySound() and handleStopSound(). These will be directly connected to the buttons in our interface, but first, let’s implement them.
Let’s start with the handlePlaySound() method. It first checks whether the AudioContext object already exists — without it, we wouldn’t be able to interact with the audio system. If it does exist, we can proceed.
Next, we select the song to play (I’ll show you shortly how we fetch it) and assign it to the audioBufferRef reference. The prepared sound needs to be passed to a new audio source. In react-native-audio-api, this audio source is called AudioBufferSourceNode. We create it from the AudioContext object using the createBufferSource() method.
At this point, we also pass the pitchCorrection parameter to the method, which ensures that pitch correction remains enabled when changing the playback speed. With the AudioBufferSourceNode ready, the final step is to assign it the processed audio from the buffer:
async function handlePlaySound() {

  if (!audioContextRef.current) {
    return;
  }

  const playedSong = playedSongRef.current

  bufferSourceRef.current = audioContextRef.current.createBufferSource({
    pitchCorrection: true,
  });

  bufferSourceRef.current.buffer = audioBufferRef.current;
  bufferSourceRef.current.connect(audioContextRef.current.destination);

  ...
}
Finally, we need to connect the AudioBufferSourceNode directly to the output, meaning audioContextRef.current.destination.
async function handlePlaySound() {
  …
  bufferSourceRef.current.start(
    audioContextRef.current.currentTime,
    offsetRef.current
  );
}
This starts audio playback using the start() method. We pass two parameters to it:
currentTime— determines when to start playback (in this case: immediately).offsetRef.current— specifies the point in the track to begin playback (e.g: 30 seconds from the start).
Thanks to these parameters, we can pause and resume playback from a given point instead of always starting from the beginning. This is especially useful in any music player style app, which should allow seeking, pausing, resuming, and so on.
Stopping playback is much simpler. We start the same way: by checking if the AudioContext and BufferSourceNode exist. If they do, we just need to call the stop() method on the BufferSourceNode, and that’s it. The method takes one parameter: the exact time at which the audio should stop. Since we want this to happen the moment handleStopSound() is called, we pass in audioContextRef.current.currentTime.
async function handleStopSound() {
  if (!audioContextRef.current) {
    return;
  }

  bufferSourceRef.current?.stop(audioContextRef.current.currentTime);
}
Among the basic audio player features, we still need to cover fetching a song and storing it properly in the AudioBuffer, which we keep as a reference. In this example, the song is retrieved from the server using a simple fetch. A raw .mp3 or .wav file is treated as a byte stream, and we use the arrayBuffer() method to convert it into theArrayBuffer — a binary byte array suitable for further processing.
To actually use the raw bytes for playback, we need to convert them into an AudioBuffer, which is the data structure understood by React Native Audio API:
const buffer = await fetch(playedSong?.musicUrl)
  .then((response) => response.arrayBuffer())
  .then((arrayBuffer) =>
    audioContextRef.current!.decodeAudioData(arrayBuffer)
   )
   .catch((error) => {
     console.error('Error decoding audio data source:', error);
     return null;
   });
Apart from the raw data itself, the AudioBuffer can also provide useful information — for example, the total duration of a song, stored for later use. We also need to assign the AudioBuffer to a reference so that it’s accessible when the song is played:
setSongDurationFromTheBuffer(buffer?.duration || 0);
audioBufferRef.current = buffer;
We’ve covered the core functionality of the player. However, it’s still missing a few important features such as: adjusting playback speed, adding gain (volume) control, and visualizing the song in the form of a frequency spectrum graph (a feature many audio players include).
On top of that, there’s one more essential feature that every audio-based app should have: the ability to control playback from the lock screen and display the song’s cover art.
Changing playback speed
Let’s start with the simplest of the improvements mentioned earlier — adding the ability to control playback speed. The playback speed of the application can be controlled by modifying the playbackRate parameter of bufferSourceNode. In our example app, we do it like this:
bufferSourceRef.current.playbackRate.value = playbackSpeedRef.current;Chaining multiple nodes
Now we move on to my favorite part of React Native Audio API — the node system. So far, we’ve only created a single node, bufferSourceNode, which we connected directly to AudioContext.destination. However, between these two we can plug in many more nodes that are capable of processing audio.
As mentioned earlier, we want to add two things: the ability to control gain and visualization of songs in the form of a frequency spectrum graph. To handle gain, we’re going to create a GainNode, which is fairly intuitive. To gather the data needed for the frequency spectrum visualization, we’re going to need AnalyserNode.
If we want the gain level we set to affect the height of the bars in AnalyserNode, it’s important that the analyzer receives audio data that has already been processed by the gain node. The analyzer should therefore sit between the gain node and the destination, as you can see in the diagram below.

Alright, let’s write some code. This setup is also done only once, right after creating the main AudioContext. Like all nodes, AnalyserNode is created using the createAnalyser method.
The first parameter we configure for AnalyserNode is the FFT size (Fast Fourier Transform), which determines the resolution of the frequency analysis. As a rule of thumb, the higher the FFT size, the more accurate the frequency analysis. However, this costs performance. For our case, a value of 256 should be more than enough.
The next parameter is smoothingTimeConstant, which is a smoothing factor ranging from zero (no smoothing) to one (full smoothing).
Once these parameters are set, we can connect the output of AnalyserNode to AudioContext.destination:
if (!analyserRef.current) {
  analyserRef.current = audioContextRef.current.createAnalyser();
  analyserRef.current.fftSize = FFT_SIZE;
  analyserRef.current.smoothingTimeConstant = 0.8;
  analyserRef.current.connect(audioContextRef.current.destination);
}
Attaching GainNode looks very similar. The way it works is essentially the same, the only difference is in how the node itself is used. In our application, we don’t need more than one GainNode or AnalyserNode. It’s worth noting, however, that you can chain multiple gain nodes together in that case, and their effects will stack.
Like all nodes, GainNode is created using the createGain() method of AudioContext. We then set its gain.value to audioGain, which can either be controlled somewhere in the app’s settings or set to a fixed value. As shown in the diagram, the output of GainNode is connected to AnalyserNode.
if (!gainNodeRef.current) {
  gainNodeRef.current = audioContextRef.current.createGain();
  gainNodeRef.current.gain.value = audioGain;

  gainNodeRef.current.connect(analyserRef.current);
}
Then we can enable the most important remote commands:
AudioManager.enableRemoteCommand('remotePlay', true);
AudioManager.enableRemoteCommand('remotePause', true);
AudioManager.enableRemoteCommand('remoteNextTrack', true);
AudioManager.enableRemoteCommand('remoteChangePlaybackPosition', true);
This allows us to specify which functions should be executed in response to events such as pausing/resuming playback from the lock screen, skipping to the next track, or seeking through the song using the playback progress bar.
Next, we need to explicitly define which functions are tied to remote commands:
const remotePlaySubscription = AudioManager.addSystemEventListener(
  'remotePlay',
  (event) => handlePlayButtonClick()
);

const remotePauseSubscription = AudioManager.addSystemEventListener(
  'remotePause',
  (event) => handlePlayButtonClick()
);

const remoteNextTrack = AudioManager.addSystemEventListener(
  'remoteNextTrack',
  (event) => handleNextSongClick()
);

const interruptionSubscription = AudioManager.addSystemEventListener(
  'interruption',
  (event) => handleStopSound()
);
One very important thing to remember: when registering system events like these, we’re creating subscriptions that listen for global events sent by the operating system. If we don’t remove these subscriptions when the component unmounts or the effect re-runs, new listeners will be added each time we navigate to the player screen.
As a result, the same event could be handled multiple times (for example, a single press of the play button might trigger handlePlayButtonClick several times). This behavior could lead to both application logic errors and memory leaks.
That’s why, inside the return () => { … } cleanup block, we remove all previously registered subscriptions. Additionally, calling AudioManager.resetLockScreenInfo() clears the information displayed on the lock screen, ensuring that outdated metadata isn’t shown after leaving the player:
return () => {
   remotePlaySubscription?.remove();
   remotePauseSubscription?.remove();
   remoteChangePlaybackPositionSubscription?.remove();
   interruptionSubscription?.remove();

   AudioManager.resetLockScreenInfo();
};
We’ve set up event handling, so the only thing left is to properly configure the cover art and other metadata about the currently playing track (such as trackName, authorName, coverUrl, duration, or playbackSpeed. This is done using the setLockScreenInfo method of AudioManager, and it looks like this:
AudioManager.setLockScreenInfo({
   title: playedSong.trackName,
   artist: playedSong.authorName,
   artwork: playedSong.coverUrl,
   duration: playedSong.duration,
   speed: playbackSpeedRef.current,
   elapsedTime: offsetRef.current,
   state: 'state_playing'
});
Using AnalyserNode data to display a visualization
Displaying data from AnalyserNode is somewhat separate from the main player logic. However, if you’d like to add it to your app, the React Native Audio API documentation provides an excellent guide explaining how to do it: https://docs.swmansion.com/react-native-audio-api/docs/guides/see-your-sound. And if you need help along the way, don’t hesitate to contact us at: [email protected]!
We’re Software Mansion: multimedia experts, AI explorers, React Native core contributors, community builders, and software development consultants.